
Royal Icing Recipe
'Royal icing is my most favorite icing to work with. Its really fun to use to decorate. Here in New Zealand however, we don't get to have the luxury of purchasing a lot of things that are readily available in the US market. So when we started decorating i read a lot of cookie blogs online and almost all of them uses the royal icing recipe with meringue powder.
Its really hard to get meringue powder here in NZ, only specialized shops sells them and they are quite expensive, so i keep reading and searching for alternatives....that's when i found out that we can also make royal icing with egg whites! Yay, that is the perfect solution for us, we always have eggs in our house and it doesn't use a lot so we thought we would share our recipe here for those of you down under who wants to make royal icing but don't want to spend a lot of money to buy meringue powder :)
Its really hard to get meringue powder here in NZ, only specialized shops sells them and they are quite expensive, so i keep reading and searching for alternatives....that's when i found out that we can also make royal icing with egg whites! Yay, that is the perfect solution for us, we always have eggs in our house and it doesn't use a lot so we thought we would share our recipe here for those of you down under who wants to make royal icing but don't want to spend a lot of money to buy meringue powder :)
Royal icing with egg whites
This recipe will make enough icing to iced approx 2-2 1/2 dozen cookies (depending on the cookie size)
This recipe will make enough icing to iced approx 2-2 1/2 dozen cookies (depending on the cookie size)
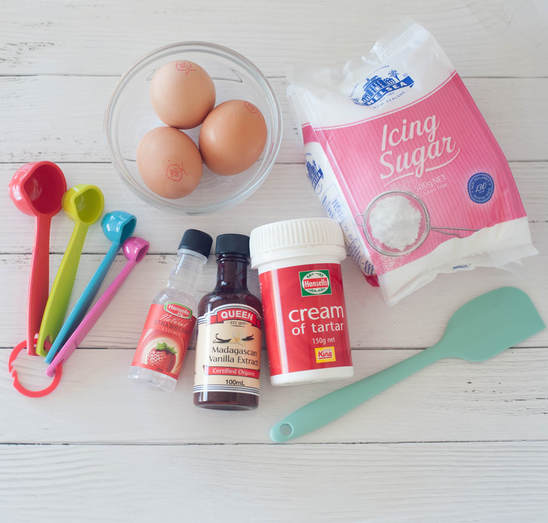
Ingredients:
Instructions:
It is very important to take care not to overbeat your icing. Extended beating, especially of looser icing, can pump a lot of air into it, creating air bubbles that can be a pain to eradicate once incorporated.
If you prefer to watch a video on how to make this royal icing, please check out our video tutorial below:
- 500 grams icing sugar {sifted}
- ¼ tsp cream of tartar
- 3 large egg whites
- 5ml vanilla extract (or any flavour you prefer)
- Gel or liquid food colouring of your choice
Instructions:
- Sift and mix the icing sugar and cream of tartar together in a bowl of an electric mixer.
- Stir in the egg whites to moisten the sugar and beat the mixture on low speed to evenly distribute the egg whites.
- Turn the mixer to medium speed and continue to beat about 1 to 2 minutes, just until the icing is silky and very white (Note: the icing will lighten and thicken as you beat it. Take care to not overbeat the icing, carefully watch the mixture until it turns to crisp white, and to only beat it at high speed at this very thick consistency).
- Lastly, add in the flavouring extract of your choice (note: again, please take care not to overbeat the icing).
It is very important to take care not to overbeat your icing. Extended beating, especially of looser icing, can pump a lot of air into it, creating air bubbles that can be a pain to eradicate once incorporated.
If you prefer to watch a video on how to make this royal icing, please check out our video tutorial below:
Consistency Adjustments of royal icing
Every cookie decorator have their own way of getting the icing consistency that works for them. However one thing remains the same, getting the right consistency that works for you is one of the most crucial factor in cookie decorating. So we would suggest that you play around with the consistencies and find what works for you. What works for us, may not work as well for you.
For us, we usually prepared two different icing consistency: outlining consistency & flooding consistency icing.
Outlining consistency
We would describe the consistency of outlining icing (some people also call it piping icing) like a toothpaste consistency. Most of the time we begin our cookie decorating process by using this outlining or piping icing to outline the cookie. This creates a border or a “dam” to make sure the icing does not flow over the edges.
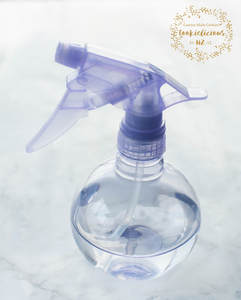
For crisp, well-defined outlines, start adding the a little bit of water, what we usually do is to use a little spray bottle to add the water into the icing. We found that we get more control of how much water that goes into the icing this way. This little spray bottle has become one of my vital tool to get the right icing consistency.
If the icing is too thick gradually spray some water into the icing a little bit at a time. When piped, the icing should hold a thin line with no - or minimal spreading.
Flooding icing
Flood icing is a thinner version of the same icing is used to fill the outlined area. It will usually flow until it fills the entire cookie. Begin by thinning your royal icing down to liquid form, you can gradually spray more water into your icing until the consistency resembles a consistency of honey, be very careful not to make it TOO thin.
Remember, at this stage, it is important to gently stir in the water into the icing. As the icing loosens, you’re much more likely to get air bubbles into it, we found that its even worse with aggressive stirring (Note: Just a little tip from us, you might want to keep a toothpick, a scribe tool, or even just a clean needle handy to pop those pesky air bubbles as they pop-up or appear on your icing).
Once those icing are ready, you can then start to venture out into the fun world of cookie decorating :)
Just do whatever works for you, and always remember that cookie decorating is like creating pieces of edible art, and like any artist, each cookie decorator has their own style...so find yours and have fun with it ;-)
If you want to see a detailed video on how to nailed difference icing consistency please check out our video tutorial below:
- The addition of food colouring or flavouring, beating time, and normal variations in egg size can all affect the consistency of your icing.
- If your icing is too thin or too thick, you can adjust the icing consistency at any stage of the decorating process simply by stirring in sifted powdered sugar to thicken, or water to thin.
Every cookie decorator have their own way of getting the icing consistency that works for them. However one thing remains the same, getting the right consistency that works for you is one of the most crucial factor in cookie decorating. So we would suggest that you play around with the consistencies and find what works for you. What works for us, may not work as well for you.
For us, we usually prepared two different icing consistency: outlining consistency & flooding consistency icing.
Outlining consistency
We would describe the consistency of outlining icing (some people also call it piping icing) like a toothpaste consistency. Most of the time we begin our cookie decorating process by using this outlining or piping icing to outline the cookie. This creates a border or a “dam” to make sure the icing does not flow over the edges.
For crisp, well-defined outlines, start adding the a little bit of water, what we usually do is to use a little spray bottle to add the water into the icing. We found that we get more control of how much water that goes into the icing this way. This little spray bottle has become one of my vital tool to get the right icing consistency.
If the icing is too thick gradually spray some water into the icing a little bit at a time. When piped, the icing should hold a thin line with no - or minimal spreading.
Flooding icing
Flood icing is a thinner version of the same icing is used to fill the outlined area. It will usually flow until it fills the entire cookie. Begin by thinning your royal icing down to liquid form, you can gradually spray more water into your icing until the consistency resembles a consistency of honey, be very careful not to make it TOO thin.
Remember, at this stage, it is important to gently stir in the water into the icing. As the icing loosens, you’re much more likely to get air bubbles into it, we found that its even worse with aggressive stirring (Note: Just a little tip from us, you might want to keep a toothpick, a scribe tool, or even just a clean needle handy to pop those pesky air bubbles as they pop-up or appear on your icing).
Once those icing are ready, you can then start to venture out into the fun world of cookie decorating :)
Just do whatever works for you, and always remember that cookie decorating is like creating pieces of edible art, and like any artist, each cookie decorator has their own style...so find yours and have fun with it ;-)
If you want to see a detailed video on how to nailed difference icing consistency please check out our video tutorial below:
