|
A workmate of mine mentioned that her nephew really love sharks. He is really into it and she mentioned one day that if i ever want to make a shark cookie to remember him :) Well we had some left over cookie dough after making our last batch of cookies, so we decided to make some shark cookies. Its pretty simple as we only need one base colour and a little bit of red, black & white icing. Here are the sharks ready to attack :P 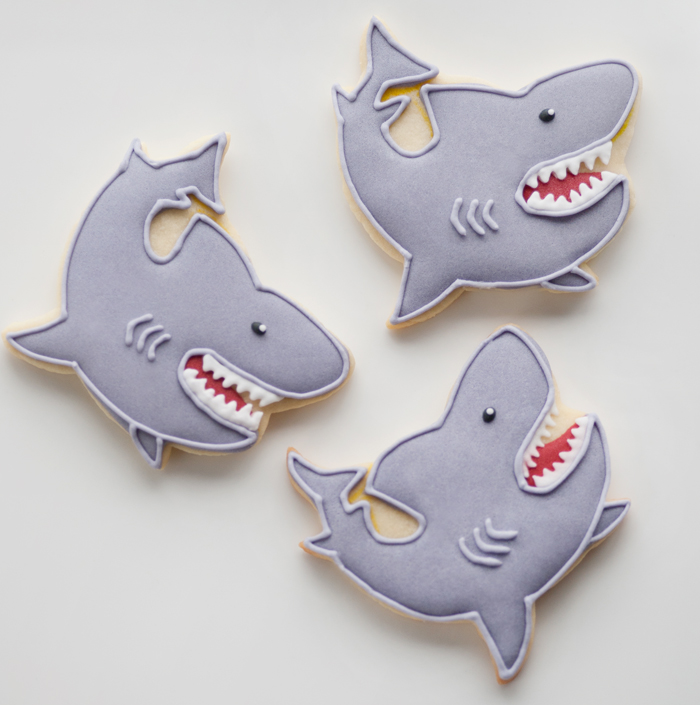 Okay so to make these sharks we had to make a paper template as unfortunately we don't have a shark cookie cutter. We cut out the shape of the shark in paper and we cut the dough with a sharp knife. I think i have put a link to Haniela's tutorial on how to make a paper template in my lil red riding hood post. If you missed it, here is the link again. So after you have cut and baked the cookie dough the next step is to mark the area that you want to fill with icing with an edible food marker. After the next steps are quite simple - see the photos below for a step by step visual Step 1: Outline and fill the area with a purplish grey icing and let it dry for a few hours. Step 2: Fill in the mouth area with a red flood icing to make a shape of the shark's tongue & let it dry. Step 3: With a white piping icing piped the shark's sharp teeth on the mouth area & let it dry. 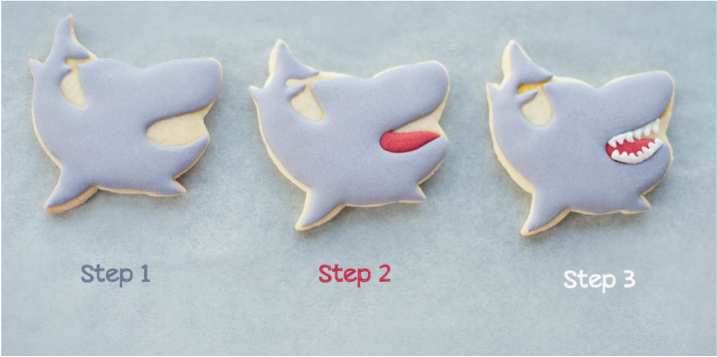 The next step is to put the details. With a tip#2 piped a small black icing for the eye, once it dries pipe a small white dot on top of the black with a tip#1. When that's done the next thing to do is to pipe the outline of the shark with a piping consistency icing, then pipe the same icing to make 3 gills on the body of the shark. That's it, all done :) 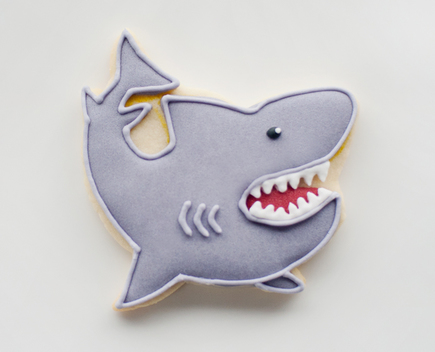 Hope the boys who had these shark cookies loves their shark attack treats ;-) 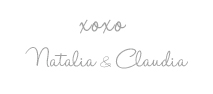
2 Comments
We are attempting to bring some fairy tales into our home this time. I have seen so many awesome versions of lil red riding hood cookies out there. One in particular really inspired me was created by a very talented cookie decorator in Instagram, unfortunately i can't put a link here to an Instagram stream but just trust me when I say she is very talented and there were many character cookies that she made which were just amazing! So this version of lil red ridinghood was totally inspired by her creations :) It was really fun making this fairy tale set, my fave part is actually decorating the mushrooms! I just love LOVE love mushrooms, i would put it in everything i eat if i can, my hubby will tell you this is real life fact....and no doubt he will also scrunch his nose and tell you that he is not a big fan of 'fungus' (that's what he called them lol). Well regardless what he thinks, personally I love them & I think they are so cute! So here is our very first fairy tale set - Lil red riding hood :) 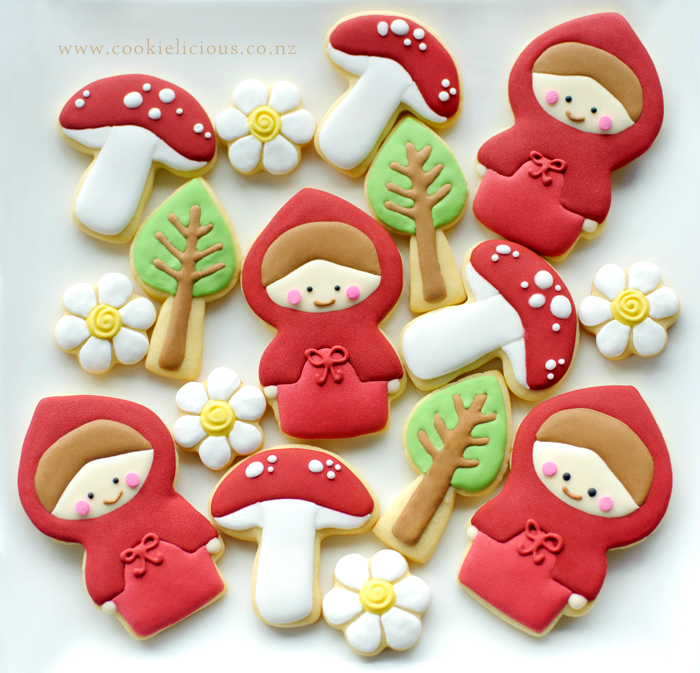 This set is pretty simple to make, but because we don't have a cookie cutter to make Red Ridinghood we had to manually cut the cookie dough with a knife with a simple paper template. I didnt get a chance to take a photo of how to do this but Haniela has posted instructions in her blog on how to do this, if you want to check it out, click HERE. So after we cut out the dough with a paper template the firtst thing we do is mark out the area to decorate with an edible marker. 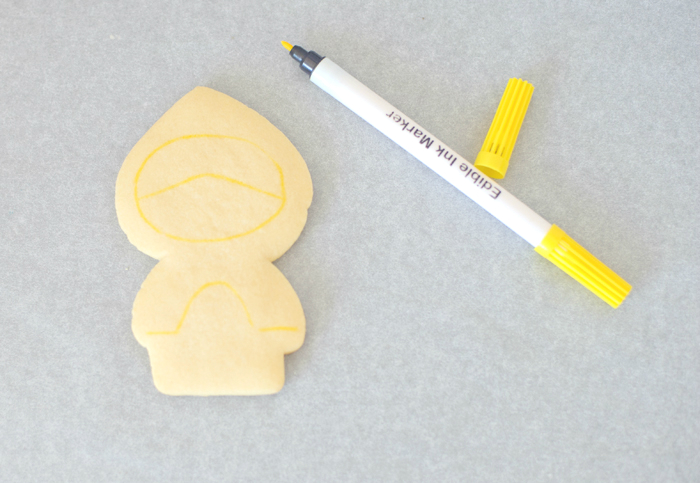 We start with the hair area, fill the area we have marked with a brown icing. We used tip #2 and 20 second icing to do this, mainly because we couldnt be bothered making 2 different consistency icing so 20 second icing works well for things like this. Then we fill the face area also with a 20 seconds cream colour icing. Let it dry for a few hours. We let it dry overnight to avoid bleeding issues.  Next step is the hood, outline the area that we are going to fill with red piping consistency icing then fill it with red flood icing. This time we made 2 different consistencies as we want to make sure the outline will act like a dam to hold the flood icing without overflowing. Let it dry for a few hours. we prefer to let it dry overnight specially as red colouring have a tendency to cause bleeding issues. 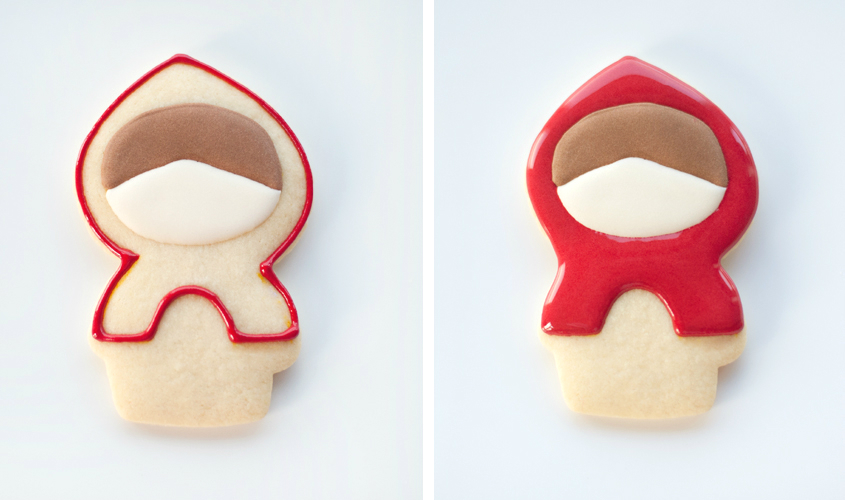 While we are waiting for her red hood to dry we decided its a good time to put her face details. Using Tip #1 we put 2 black dots for her eyes and also with tip #1 we piped a brown icing for her mouth. Then we put a couple of pink round sprinkles in her cheeks. Next step is her dress, we wanted a complimenting red colour with the hood so we made a slightly lighter red colour for her dress. Then we fill it with 20 second icing, then let it dry for a few hours. Then all we need to do is put the bow in the middle of her dress and lastly add her hands on both side of her dress using the same cream colour icing that we use for her face. 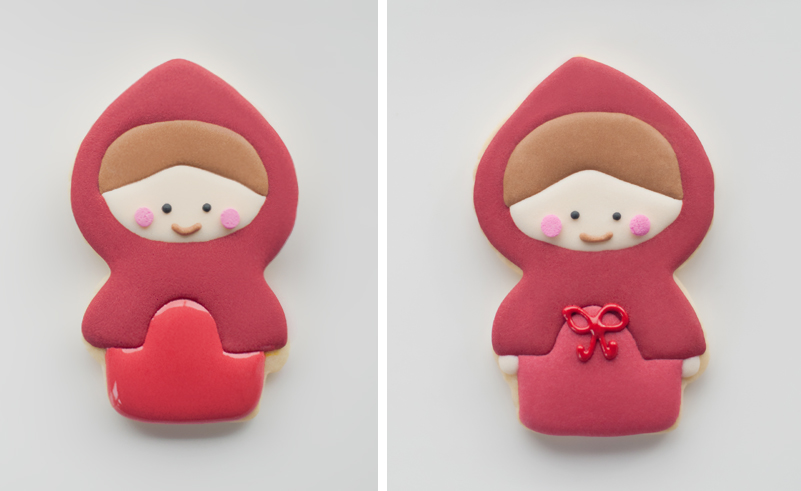 That leaves us with the other pieces for red ridinghood cookie set. Lets start with the mushrooms, just because its my favorite :P They are very simple to decorate, fill the top area of the mushroom with red icing and let it dry overnight. After the red icing dries add random white dots on top of the mushroom, then let it dry. 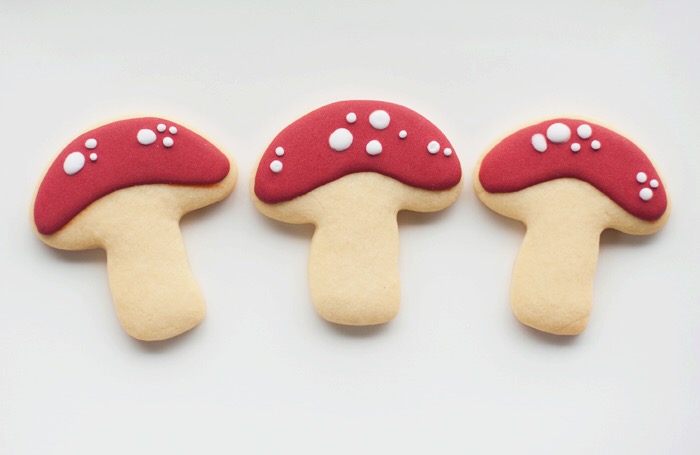 Then add the middle white stem first with 20 second icing and let it dry for a couple hours before adding the side white bits ( i really don't know what we call them). 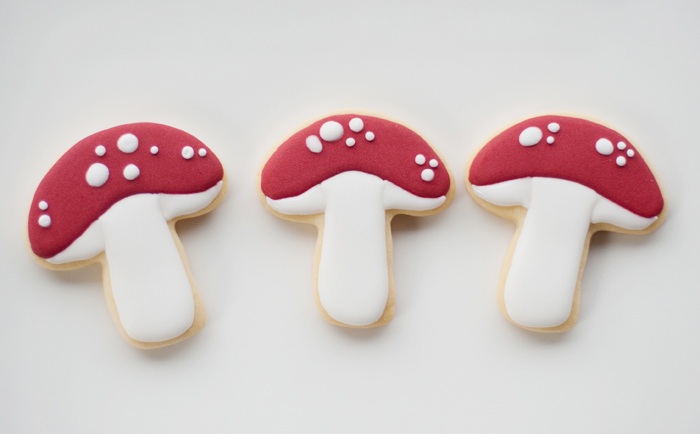 Next we do the trees. We do the branches first using a brown 20 second icing. Let it dry. 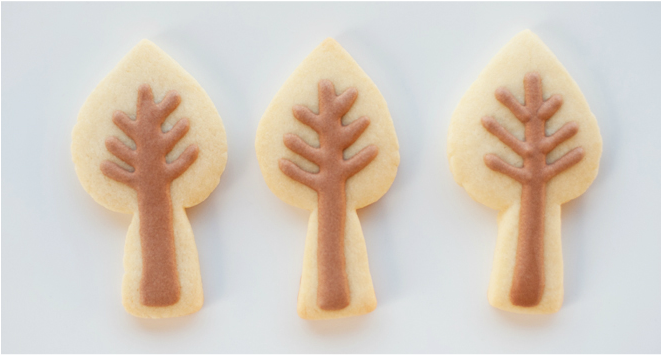 Then we fill the trees with green 20 second icing and let it dry for a few hours. 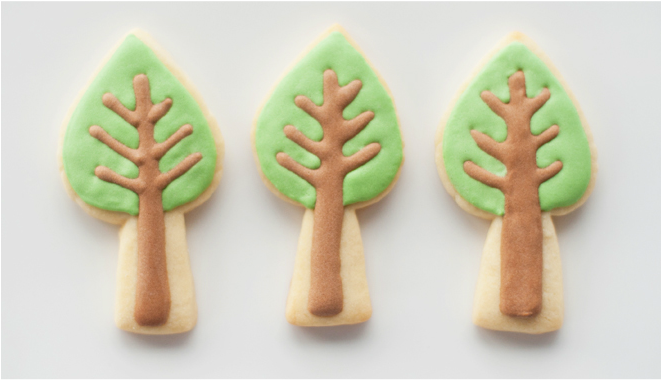 The flowers are very simple, fill the middle of the flower with yellow 20 second icing, let it dry for about an hour or so and then pipe the swirls on top of the yellow icing. Let it dry. 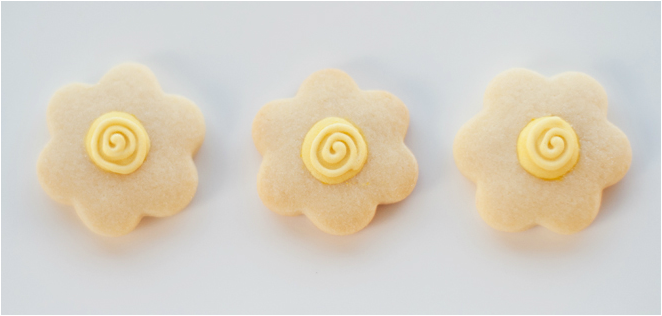 Then fill the petals with white 20 second icing, and let it dry. 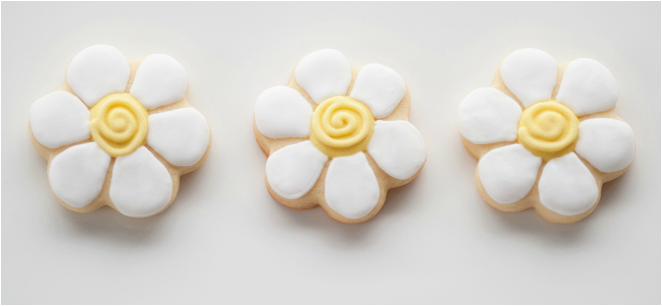 That was all, we had the cookies all ready to go :) 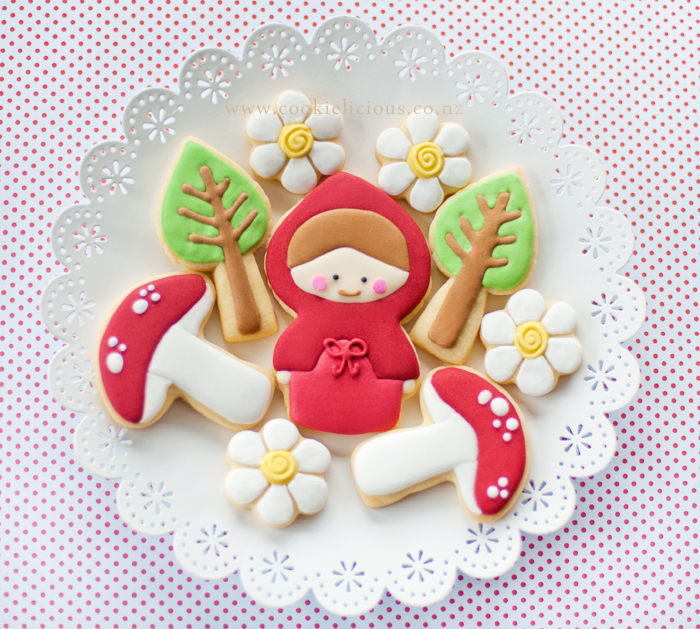 Well I hope you are having a great day, its Friday and the sun is shining...its gonna be a glorious day. Til next time, happy baking! ;-)  These cookies were specially made for my lovely cousin in Australia. She asked for a simple cookie, in fact she asked to send the cookies un-decorated. But where is the fun in that? The fun part is the decorating part so i choose a simple remake of the green owls that we made earlier this year. Its pretty simple to make and this time we are making it the proper owl colours, not a green owl with left over icing LOL :P Oh and we made them with a couple of different body shapes, they were inspired by Sweetopia's owl cookies but she made them in 2 different size - a big mama owl & a small baby owl. We decided we just want to make 1 size with two different body shape. Here they are ready to be shipped to the land of OZ :) 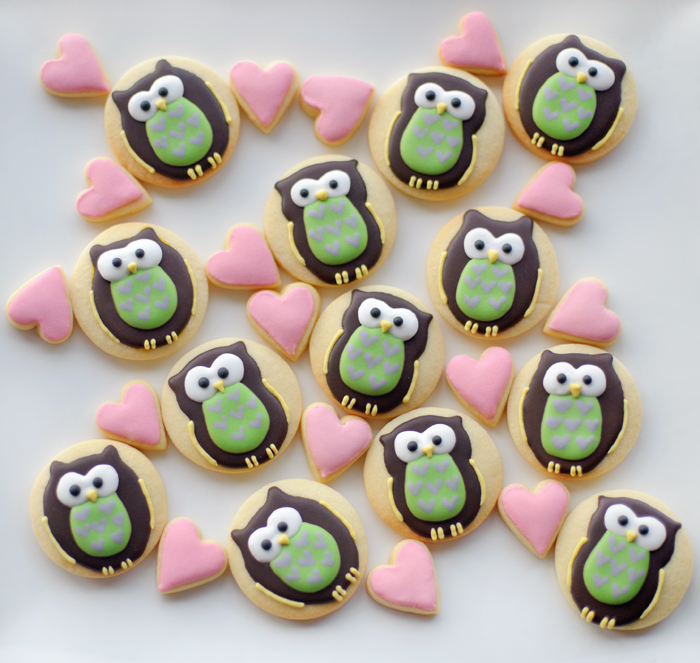 These are really simple to make because we dont have to use a special cookie cutter, just any round cookie cutters will do. First step is to pipe and fill the body of the owl, some in just a rounded body shape and some in a kind of letter 8 shape body with pointy ears. Personally I prefer the letter 8 shape body, coz i think they look cuter but thats just me....my daughter doesn't mind either way :) 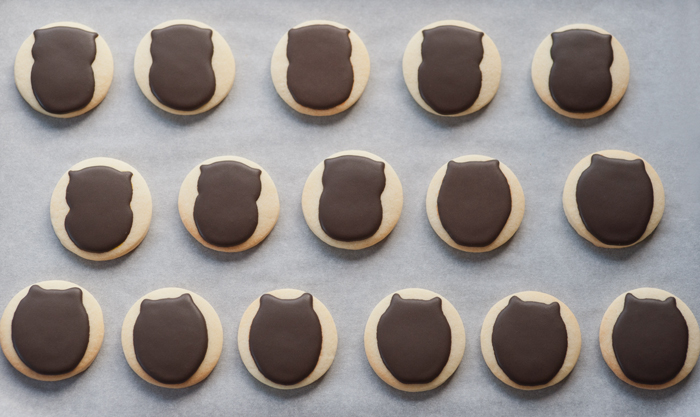 Once the body is dry, the next step is to pipe the white eye outline. It was supposed to be the easy part, just pipe 2 big round shapes on the face, but for some reason im having all sort of issues piping them. I ended up with wonky eyes, either one was bigger than the other side or it was mishapen no matter how much i tried to fix it! So i just let it be and figured that the different sizes will give them individual personality LOL .... that was just my way of making myself feel better :P You can see them here... 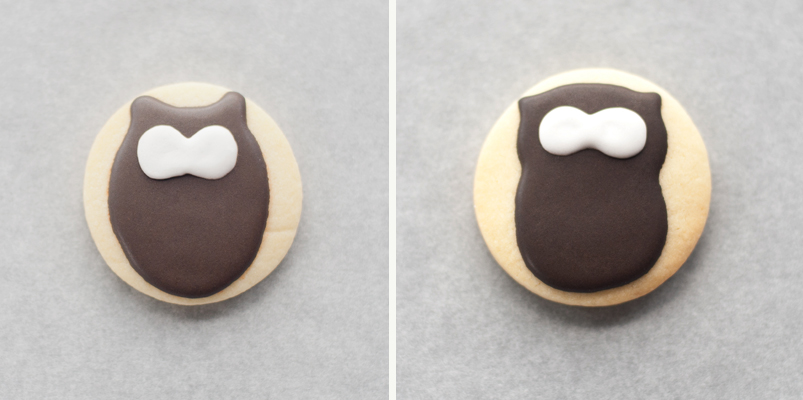 We let the white eye outline dries for a few hours, just to avoid bleeding issues. Then the next step is to pipe the body with a green flooding icing. And while the icing is still wet, pipe the little V shape inside the body to give an impression of little cute furs. Leave to dry for a few hours. 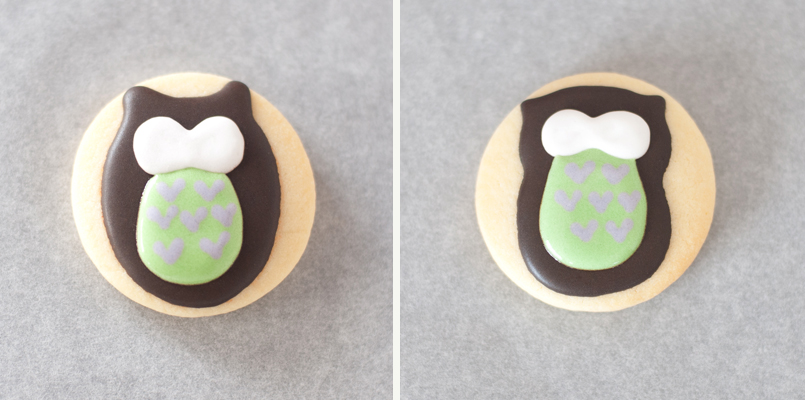 The last step is to pipe the little details like black eyes, the beak, wings and feet. We use an outline consistency icing to do the little details.  And that's it, all done. You can pipe some leaves on the bottom of their feet if you want to, but we dont have anymore left over green icing so we decided to just leave it as it is. Im sure my cousin wont mind seeing that she wasn't bothered on what decorations we put on the cookies LOL. 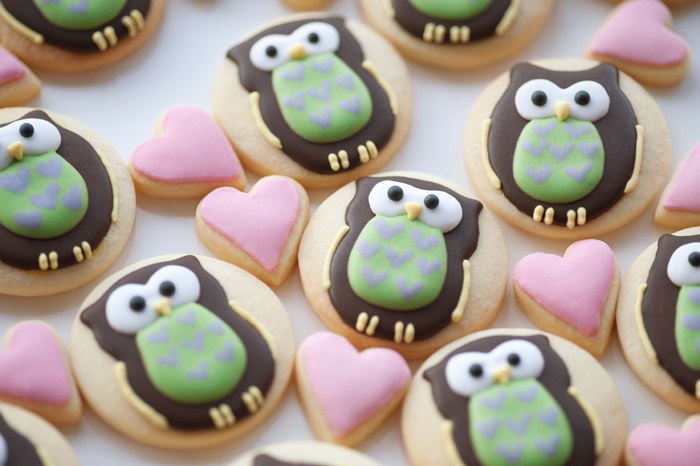  Ps: my cousin just told me that she is enjoying the cookies and refused to share them with anyone else :P  Claudia's school has requested volunteers to bake for the Kapa Haka festival this weekend. So we decided to help out and told them we will be baking some cookies for the event. We wanted to do something simple and decided that polkadot kitty and some love hearts cookies are the way to go this time. The original idea for this was from Bridget, an amazing cookie decorator, check out her blog - Bake at 350, she does a lot of awesome tutorials on cookie decorating, very inspiring! :) We only have one cat/kitty cookie cutter (apart from the Hello Kitty cutters but that doesn't count :P) so we just used what we already have :) 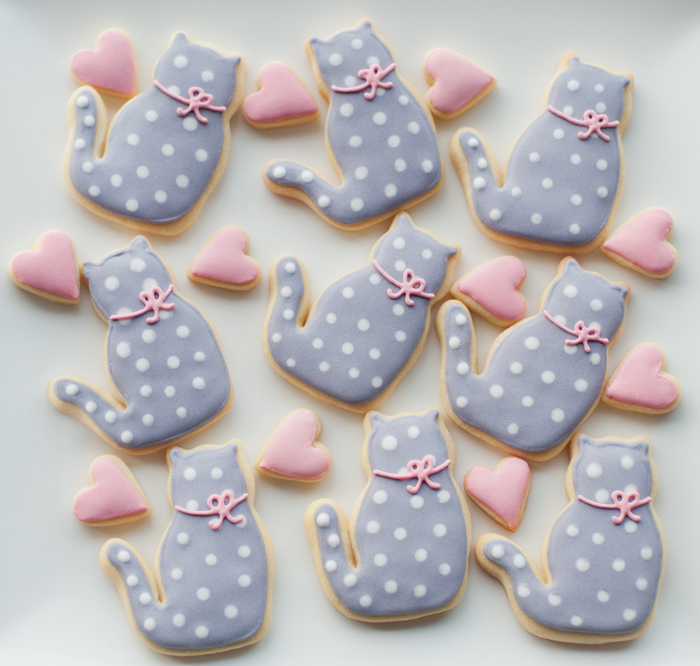 Now, on to the steps to make them....these are very easy to make in 4 easy steps: outline, flood, add dots & add bows. And what i like best of all is the fact that we only need to make 3 colours. The main body colour is purplish-grey with white polkadots and pink bows. The love heart is in a pink colour to match the bows :) Step 1: Outline the cookie with outline consistency icing, we use a tip #2. 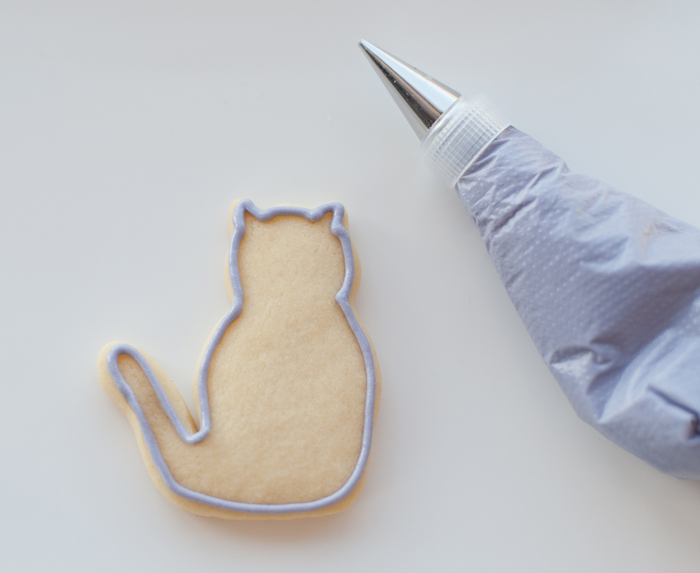 Step 2: Fill the cookie with flood icing of the same colour. 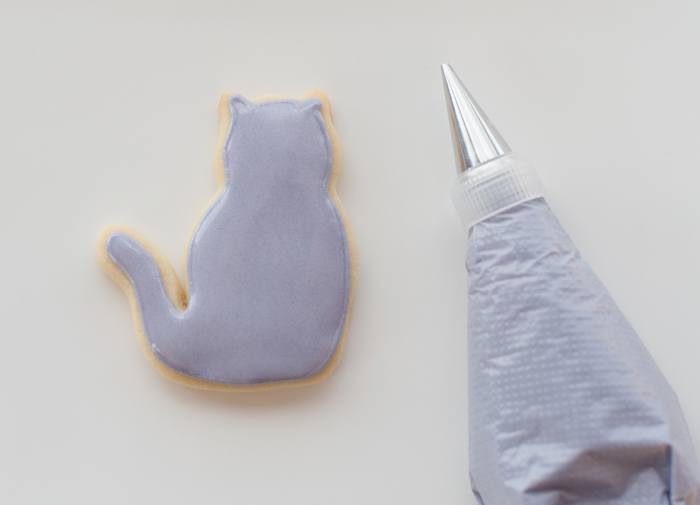 Step 3: While the icing is still wet, continue to put the polkadots with white flood icing. Then let the cookie dry for about 4-6 hours (preferably overnight). 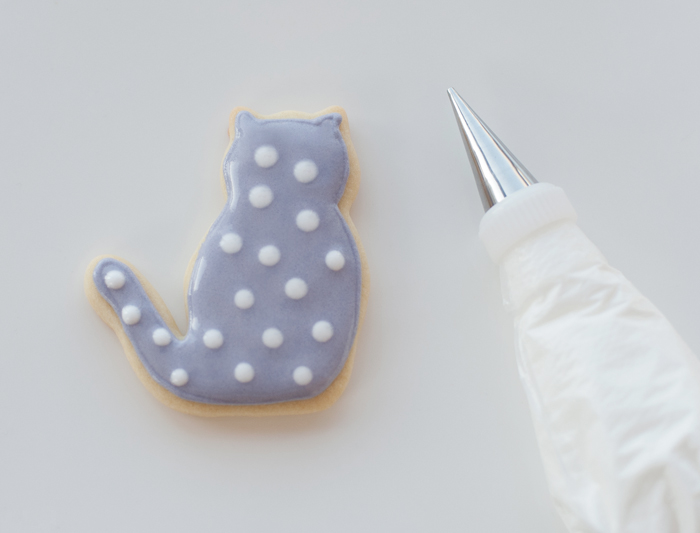 Step 4 : Pipe the bows and let it dry for a couple of hours, we use PME tip#1.5 to do this. 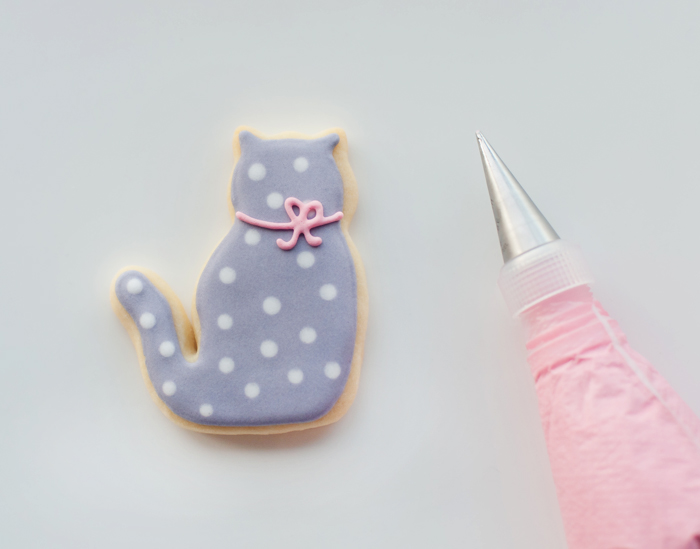 You don't have to make the little love hearts, but we like having them to compliment the main cookie designs and it works well with these kitty so we piped and fill the love hearts with pink icing. 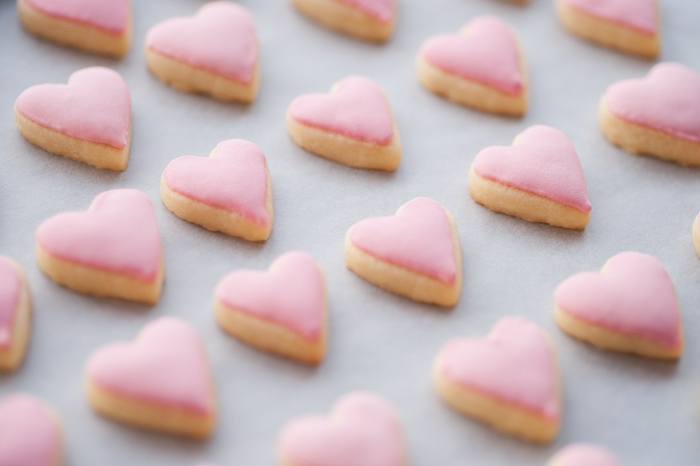 The last thing to do is packaging them for the fundraising, i made little tags with "Have a Purrfect day" written on it to match the kitty theme. We packaged them up individually so they will stay fresh longer and its easier to sell on the day. 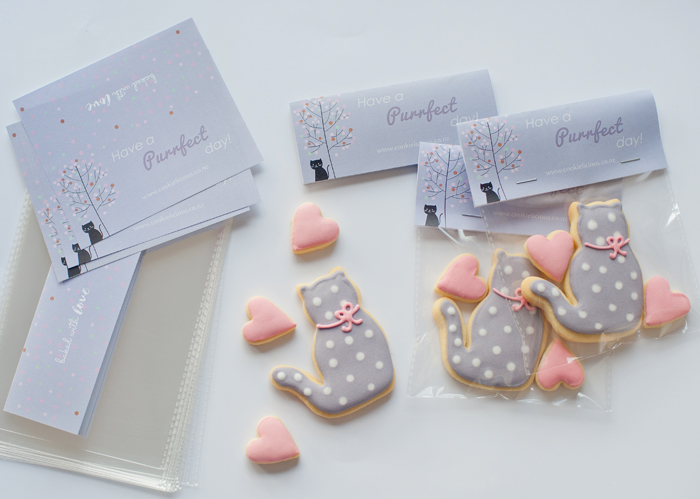 Close-up look of individual kitty with little hearts in their packaging :) 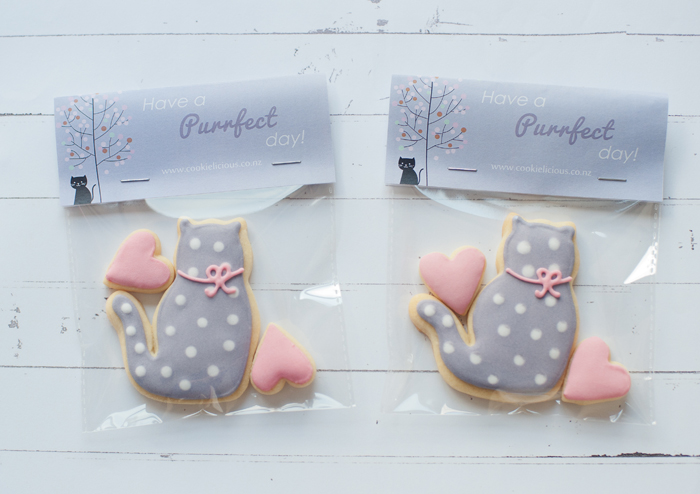 There you go, very simple and easy :) Hope these kitty will go to a good home :P  These cookies were specially made for awesome my father in law. He is the most talented artist I know. He can create really beautiful drawings and paintings of beautiful things...i really admire his work. He was an art and design teacher at one of the university here, but he just recently retired. That just gives him more time to do the things he loves, like painting :) So we thought we would make these little mini paint palette cookies. We have seen so many versions of these cookies but we like this one the best coz they are minis and colourful...so cute! :) 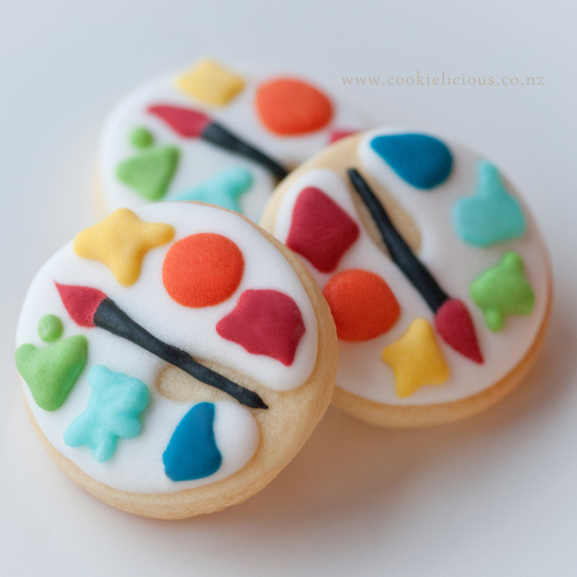 We put these mini cookies into a jar and put "The world's greatest Pop" (that's what we call him). 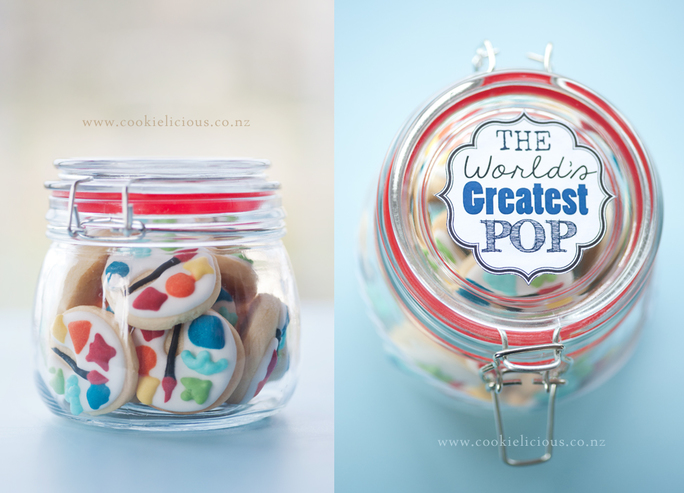 These are super easy and very fun to make. All you need is a small round cookie cutters and mainly just white icing. I love working with white icing coz that means that we don't have to put any colours straight after we made it :P So pipe an outline and fill with flooding icing in a C shape.  Do a whole bunch of them then wait to dry overnight. 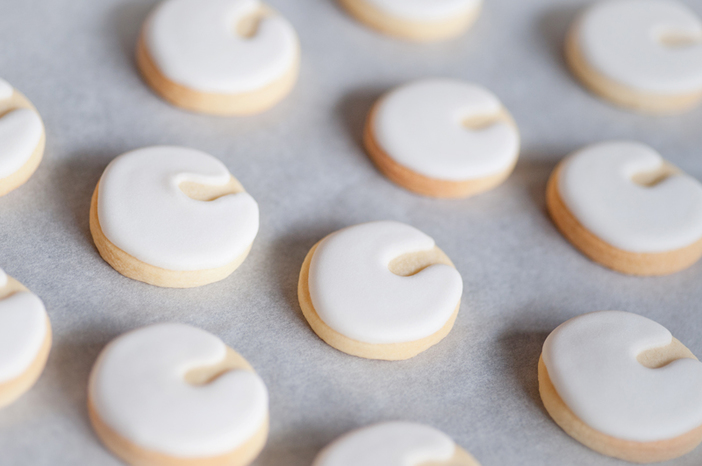 Then pipe a black line for the paint brush and then put the red tip straight away on top. You dont even have to wait until this part dries, you can continue to put blobs of different paint colours around the palette. The best thing about this is that you can choose any paint colours you like, so when you have left over colour icings that you can use its perfect for this :) Claudia had so much fun piping those colourful paint all around the palette :P 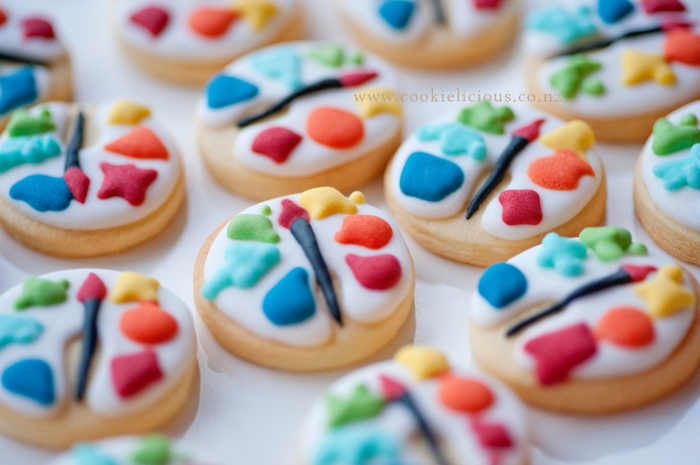 Let it dry for a few hours or overnight if you want to be extra sure, and then put them into a small jar and decorate them as you please :) 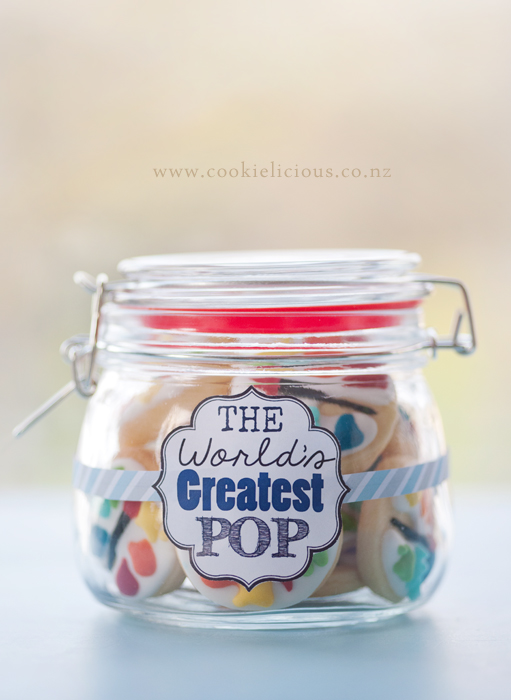 We have one very happy recipient of this mini paint palette, unfortunately I forgot to take a photo of him and the cookies after we gave him his little present. You'll just have to take my word for it that he was pleased to receive the gift :)  We didn't get a chance to post this yesterday on the actual Father's Day as we were out and about, so this post is a day late, but we still want to share anyway :) My lovely daughter and I have been very sneakily baking these cookies when my husband is not around and then decorating them when he was not looking :P Let me tell you that it is very hard to secretly bake something for someone when they are living with you and constantly rummaging the pantry for treats! LOL We had to store these cookies in a special place where he would not be looking, and we are pleased to tell you that this time around we were successful in keeping this a surprise :) 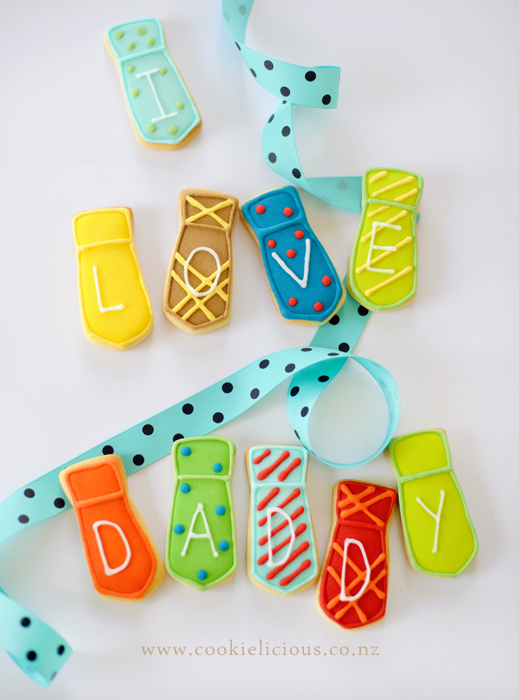 As you can see, he is very happy with his gift, yay! :) The kids gave him the present early Sunday morning, and they couldn't wait to give him the surprise gift that they didn't even bother changing out of they pyjamas! LOL 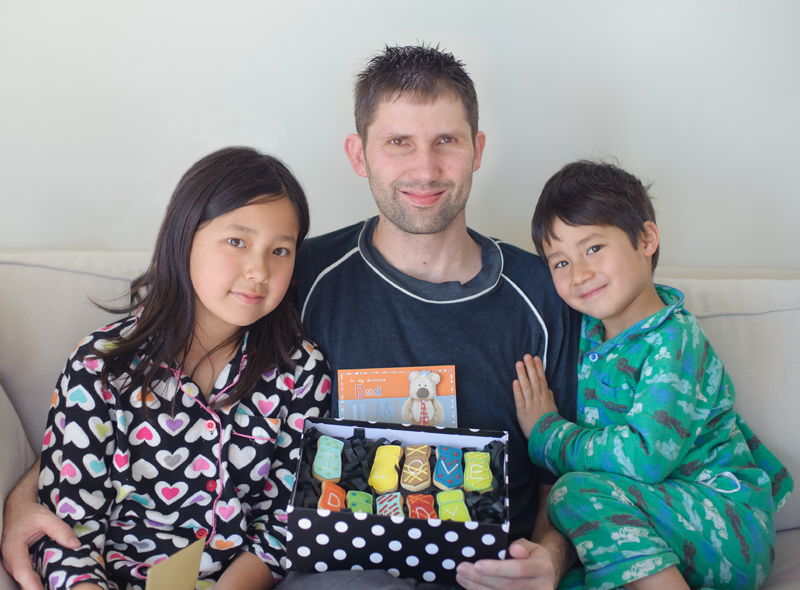 These cookies are very easy and fun to make, you can play around with all sort of colourful designs and mixed and match any combinations as you please. Once the cookies are cooled, outline and fill the cookies with any colour icing you like, the good news is that you dont need a lot of icing to iced these cookies, but it does take time to make up the colours you want to use. My daughter is really good at mixing colour, she also likes experimenting with mixing a few different colours together to get a different shade :) These are the colours she chose to make and after we piped the base colours we leave it overnight (hidden of course lol) to dry before we do the tie designs :) 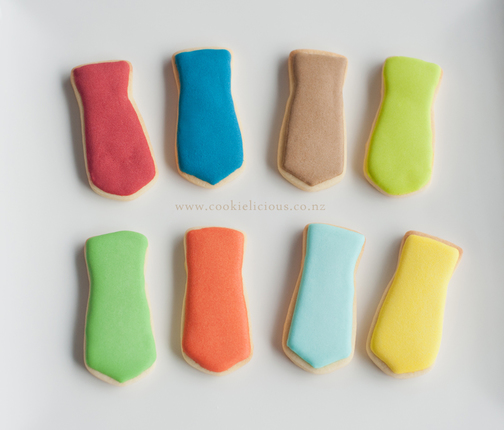 We want to do simple designs for the tie, so polkadots and stripes are the easiest and some are just plain colour ties. We leave the tie designs to dry overnight before writing any letters on top of them just to make sure there wont be any colour bleeds. The next step is to write the letters on top, we want to write "I LOVE DADDY" so this light blue polkadot tie is the first tie we decorate, isn't it cute?! :P 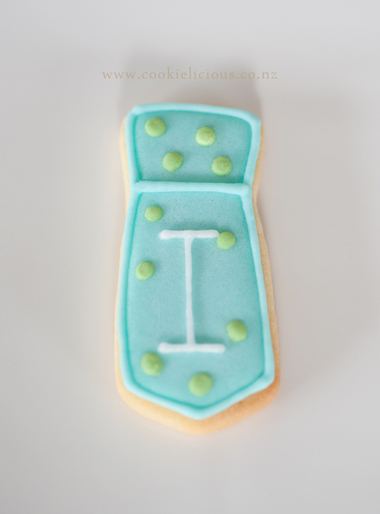 Then continue writing each letter on top of the tie. These are the second set of ties that spells 'LOVE' 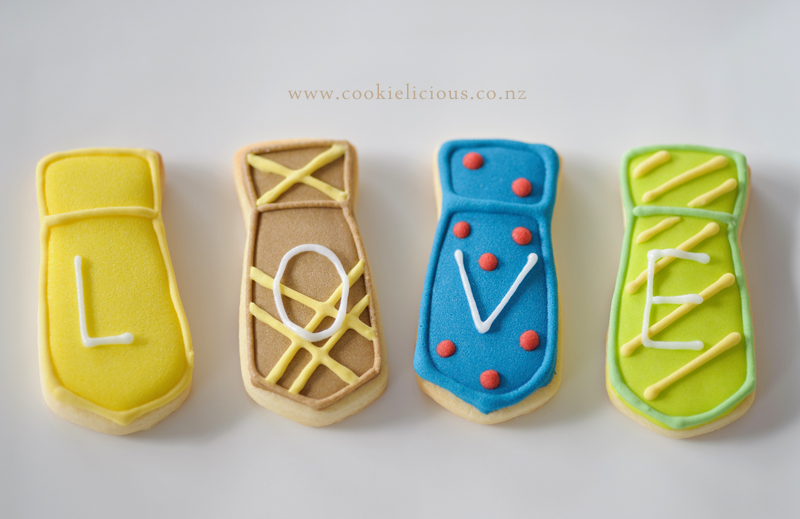 And finally the last set of ties, the most important ones that spells 'DADDY' :) 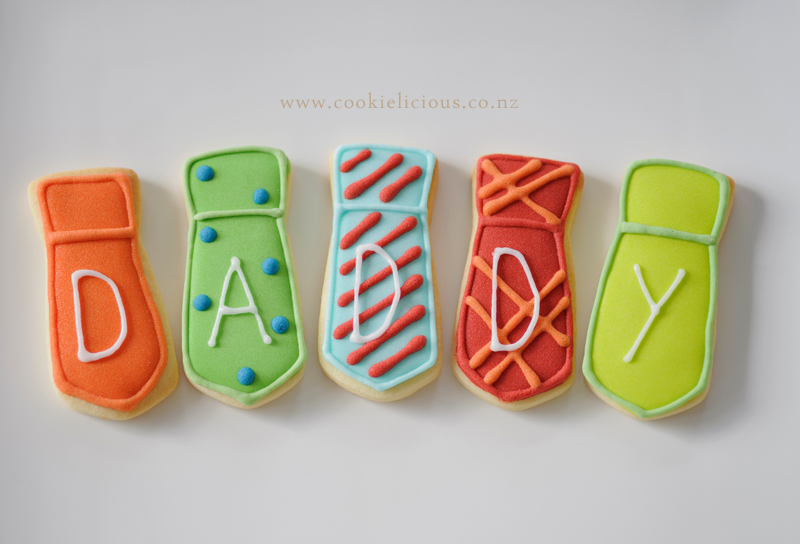 Let them dry and the next step is to box them up along with the father's day card that Claudia have prepared :) 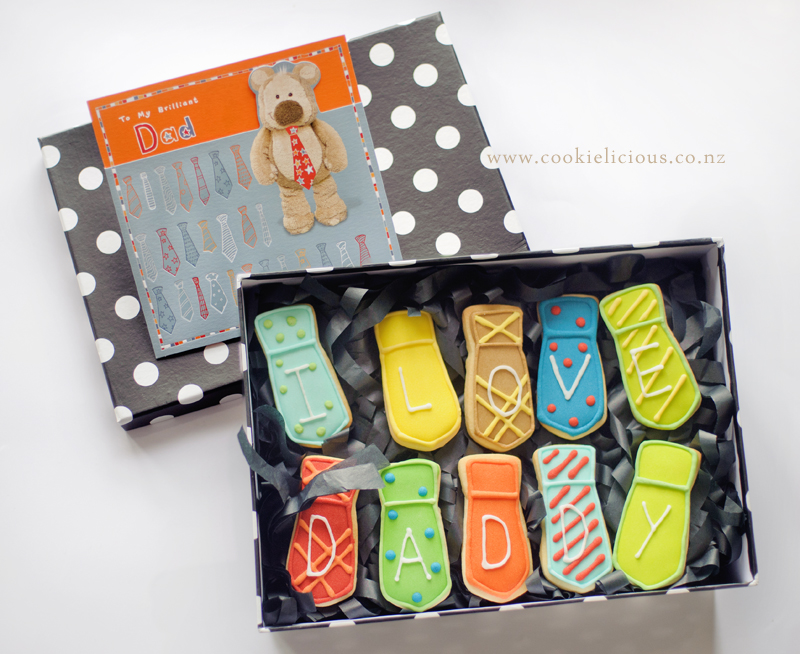 Here is my lovely creative girl with her creations, isn't she beautiful? ;-) 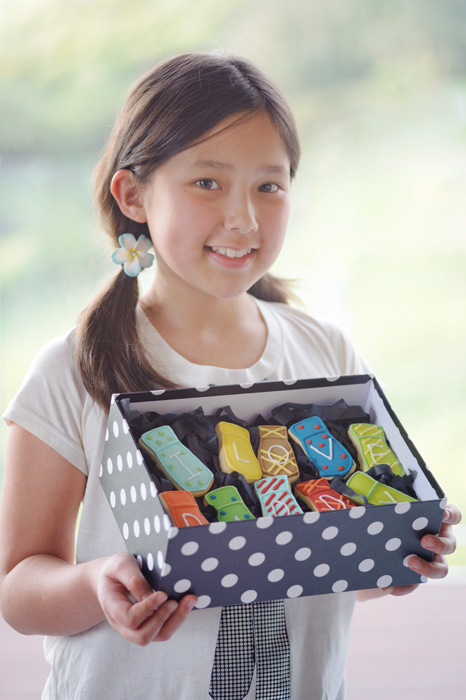 And my cheeky boy showing off his fave cute little tie :P 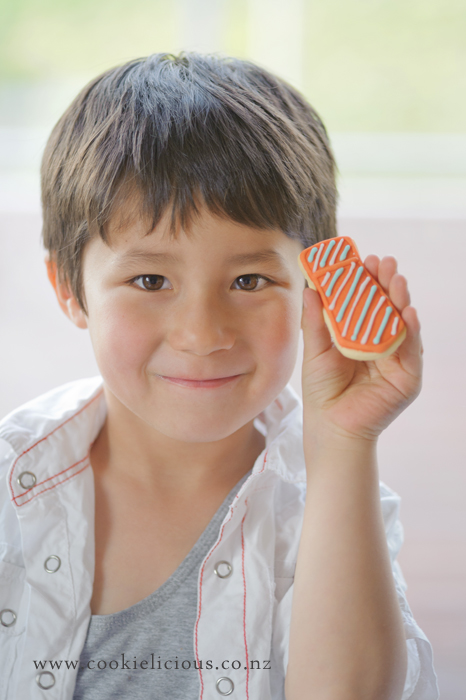 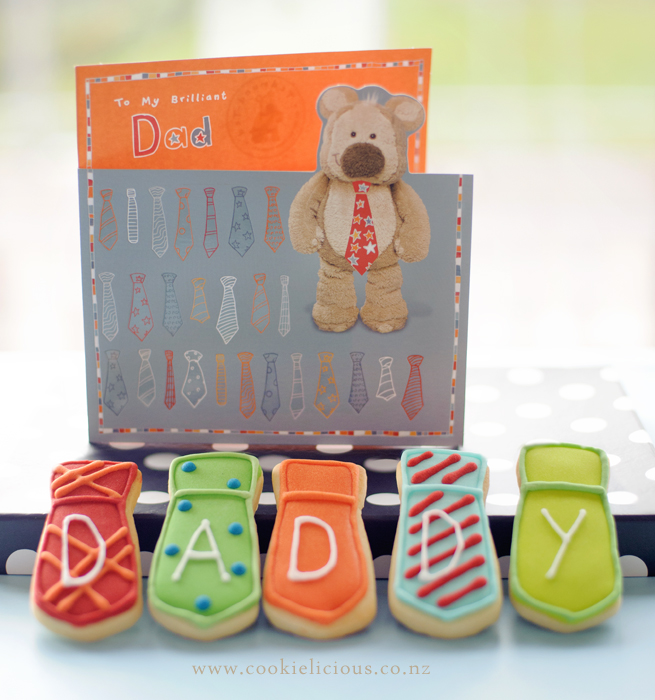 That is all...I'm sure its still father's day somewhere in the world...one day late is excusable lol ;-) Hope all the dads out there are had a wonderful day spoilt with hugs & kisses from his family :)  |
About MeCookie Artist & Content Creator, who loves spreading the cookie love. 

Archives
February 2020
Categories
All
|
 RSS Feed