|
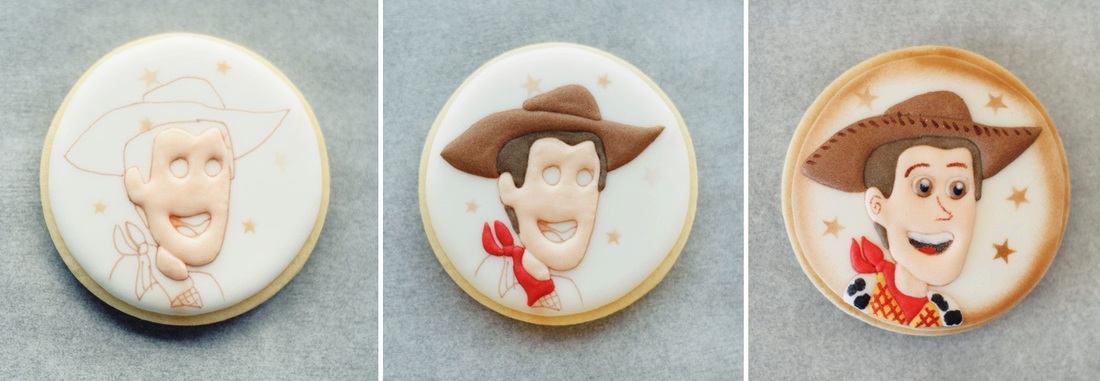
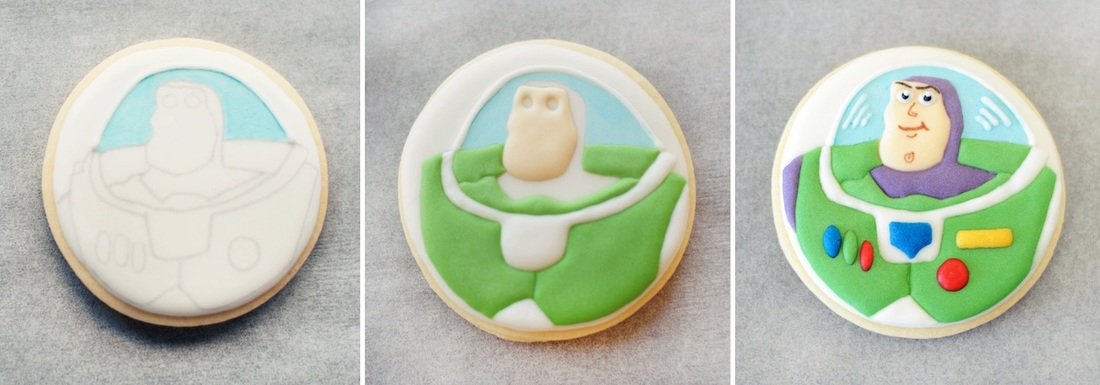
I have to say that these character cookies were the hardest thing i have come accross since i started cookie decorating. Not only they were quite detailed, creating their faces from icing were the most challenging thing of all. This is the first set of cookies that i found myself cursing and even vowing that i will never make them again! LOL So I was asked to make Toy Story cookies for a 1st Birthday party. I didn't think it was gonna be a problem until i started decorating them and wow...i really struggled with Woody's cookies. I think i finally found my arch enemies...character cookies with detailed faces! I dont mind making the cute character with simple faces, but these guysadont think i'll ever want to make these again. :P 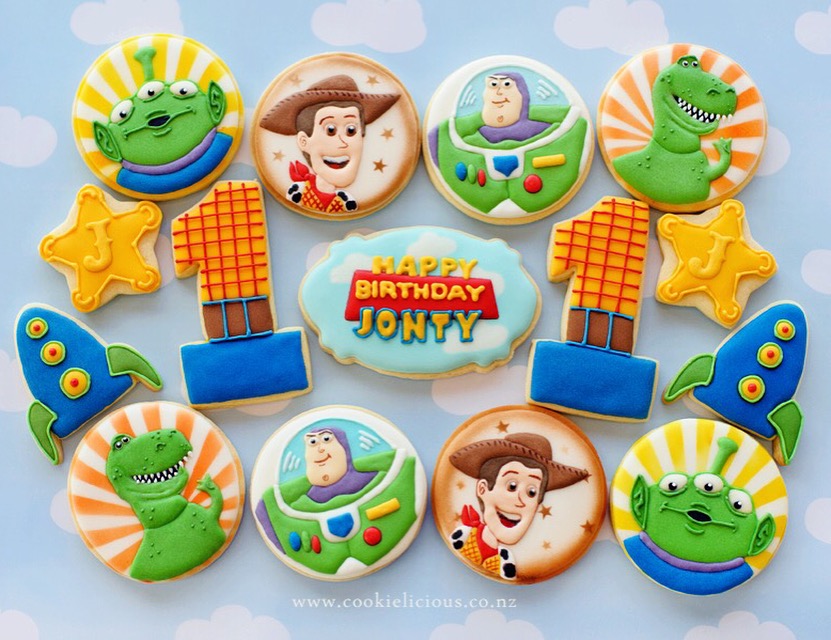 So creating Woody was a slow process, I added bit by bit and i didn't get a chance to take all the step by step process as I was cursing along the way lol but i did take the start, middle & finished photo just to show you a brief process :) All of these characters were created in a very similar process:
 Here are the Woody cookies and a few sherrif badge with the birthday boy's initial :) 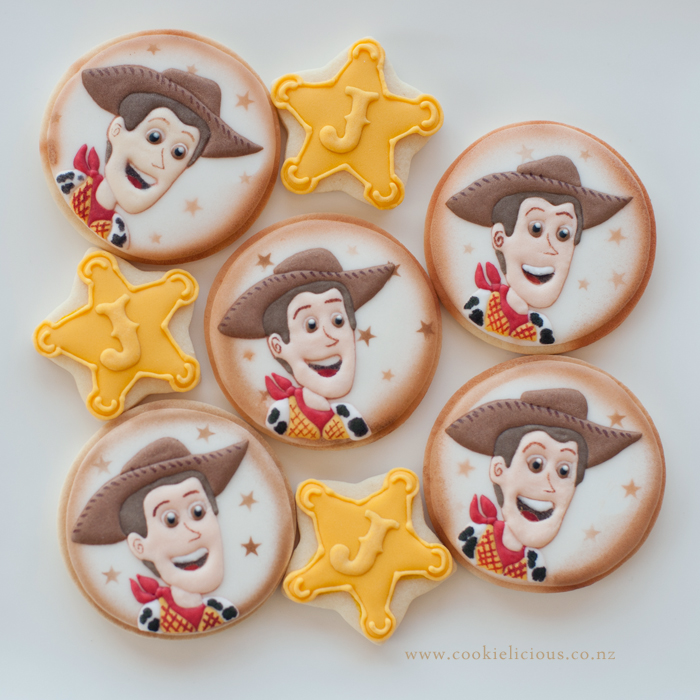 So now onto Buzz's creations. Its a similar process:
 Here are the Buzz cookies and a couple of his rockets :) 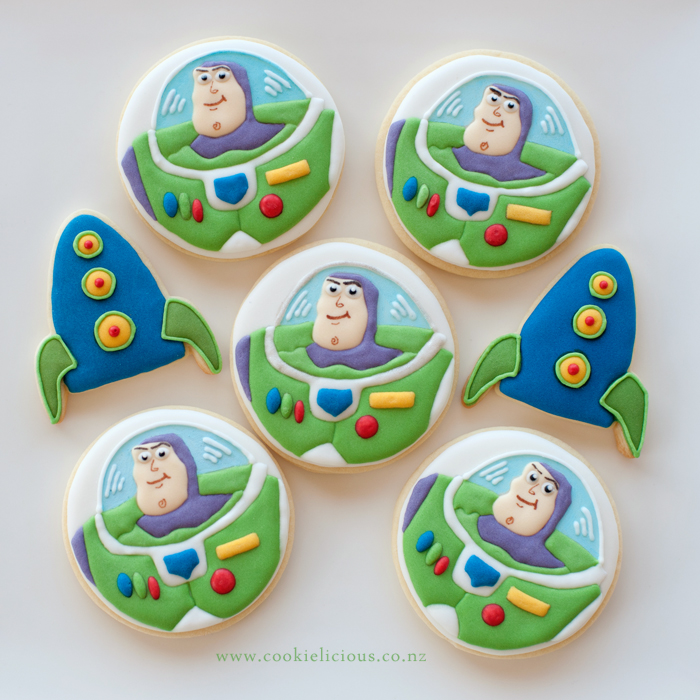 And finally, the 4 characters together for your viewing pleasure :) 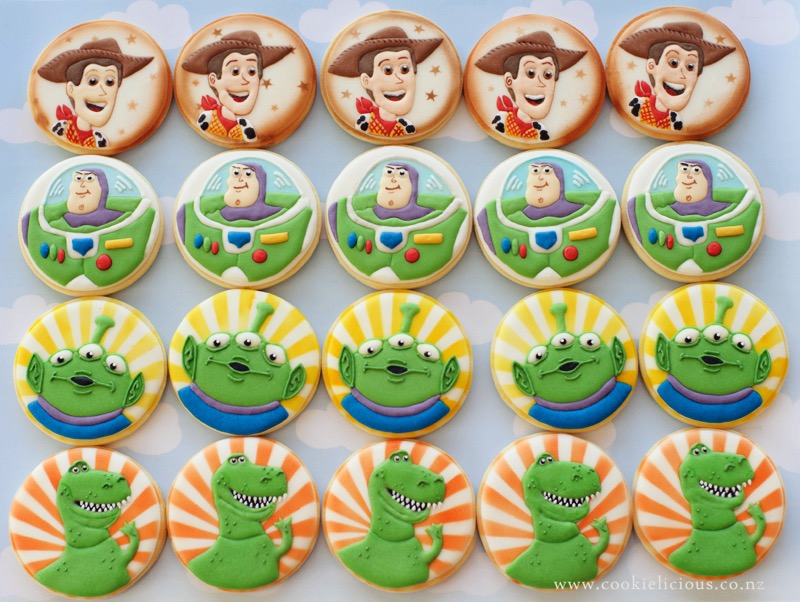 Hopefully these cookies will go down a treat for the birthday party this weekend ;-) 
5 Comments
There are so many inspiration out there and I can spend hours looking at Pinterest for beautiful illustrations from the many very talented artist that i found there. One particular illustrator that really admire because of all her beautiful work is Marina Fedotova. She is amazingly talented and when i saw one of her beautiful work I wonder how it would look as a cookie, so i set out to try and create a cookie based on her work. This is also partly an excuse so that i can practise painting on cookies some more lol :P This is a sweet little girl with her beautiful pink dress and her watering can. 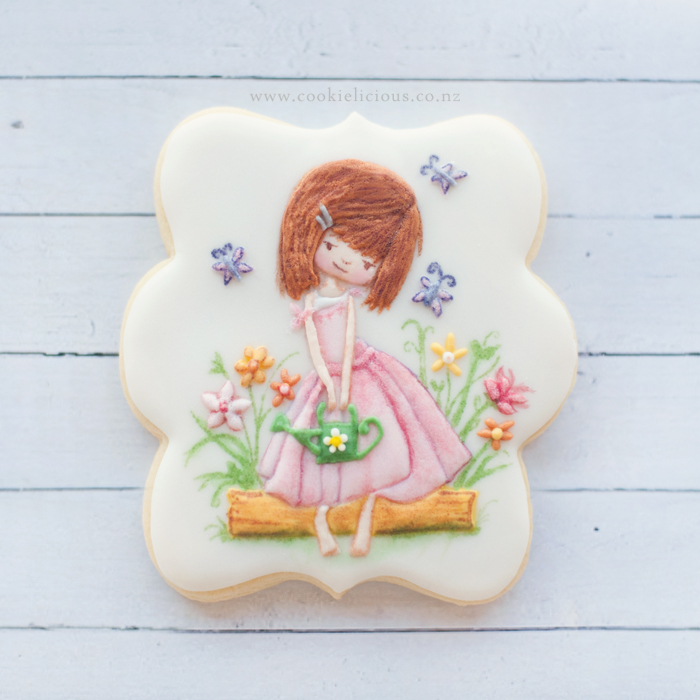 Im intrigued as to explore more about painting on cookie because i really do love the result that i get after each experiment. Its in no way perfect but each time i learn something new and i get to how I prefer to do certain things with the food gel colouring and the different brushes. Its really hard to explain how to create this, but i have taken progress photos so that you can see the stages and progression on how these were created. As always i started off with tracing the outline of the image that i want to create. I projected the image with my PICO projector, it would have been a lot harder to do without a projector. Then i started with the yellow flower planter behind her and then her pink dress. The i waited until the dress dries and add her skin and add a green watering can. Then with an edible marker draw the flower stems on the side of her dress as well as some butterflies. 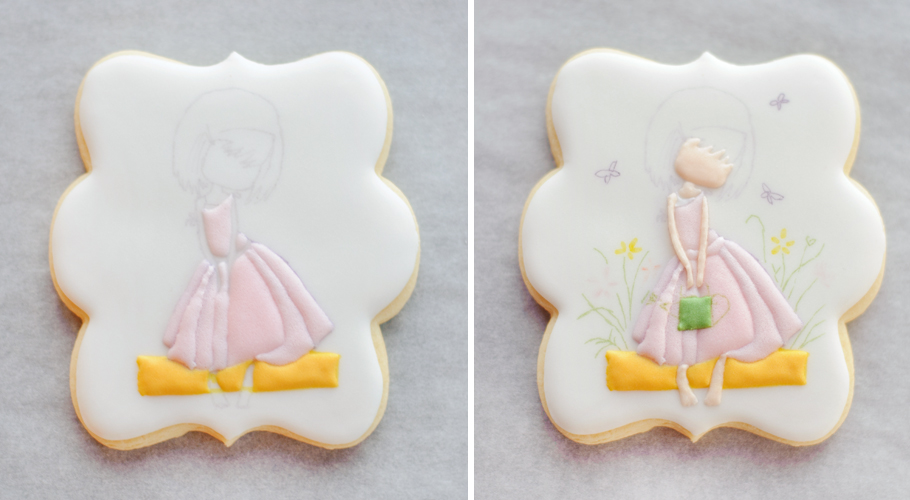 Start adding more details little by little, orange hair, butterflies, flowers, and defining the flower stems a bit more. Paint some details on the planter box with some warm brown gel food colouring to make it look more like a planter box. Add the other parts of the watering can, the spout, the handle and carry on part on the top where the girl is holding on to. Then add a little daisy in front of the watering can. Then for the most difficult part is her face, this gives her character and its tricky because the features of her face is so dainty. Using a fine tip edible marker in chocolate brown colour draw her eyes, little nose and mouth, and then brush a small pink edible luster dust to her cheeks to give her a healthy blush. 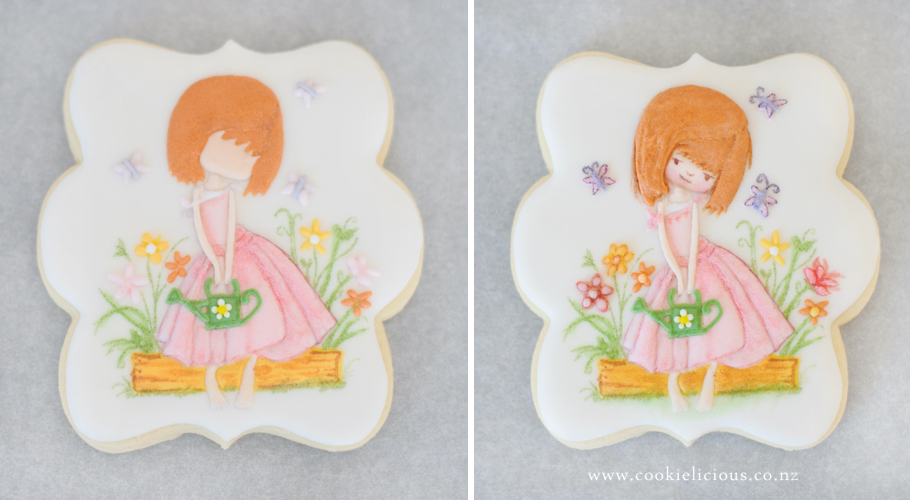 Lastly the hair....its the hardest part, it took ages to get them looking right. I use a combination of painted gel colouring and edible marker on the hair. I was kinda 'winging it' as i don't do these very often. This is probably my 3rd trial run panting cookies so learning A LOT as I'm practicing these :) Anyway, as i said earlier....its really hard to describe step by step progress of the creation for this kind of cookie, so i think the best way to have a look at the progress photos and as you can see i added the details little by little. All i can say is keep practicing as practice makes perfect right? ;-) 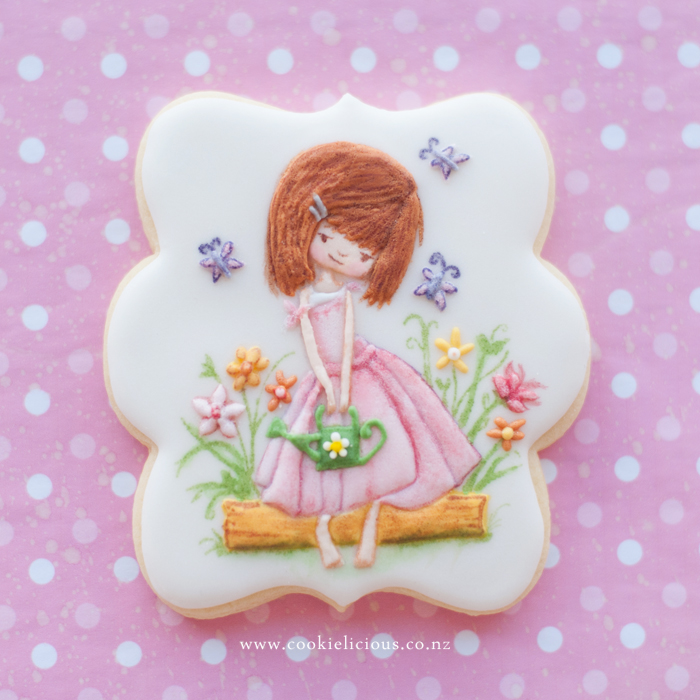 I hope you are enjoying looking at the progression of this sweet girl cookie :) There will be more to come as we are really enjoying creating these painted cookies....so until next time! ;-)  Its Valentine's Day so time to celebrate with a special gift for your love ones :) I made these bookmark valentine cookies for my dear hubby because he loves reading and i thought it they would be a perfect gift for him :) These bookmark valentine cookies were inspired by Kari from Yankee Girl Yummies, she is a very talented cookie artist that have inspired many people in the cookie decorating world :) 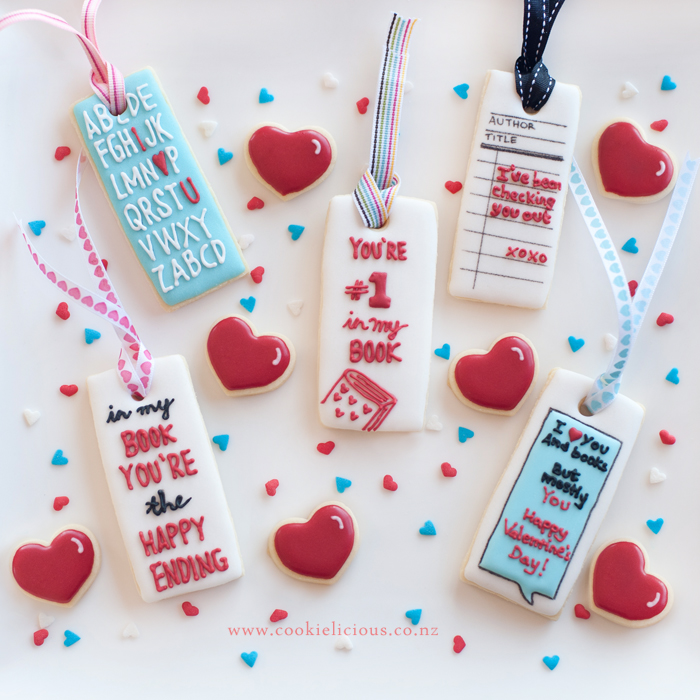 I didn't take any tutorial photos for these cookies but they are pretty simple and straight forward to make, flood the cookies with white flood icing and let it dry....then start writing whatever message you want to put in your bookmarks with a stiff consistency icing :) 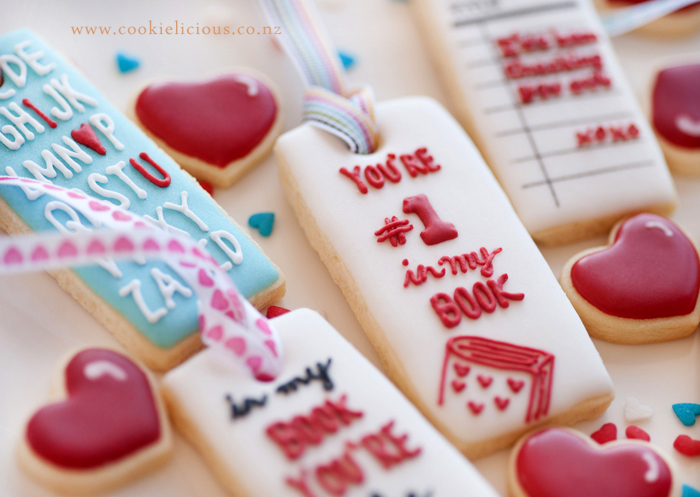 When they are ready, put different colour ribbons on top to make it into a bookmark and then box it up to give to your love ones ;-) 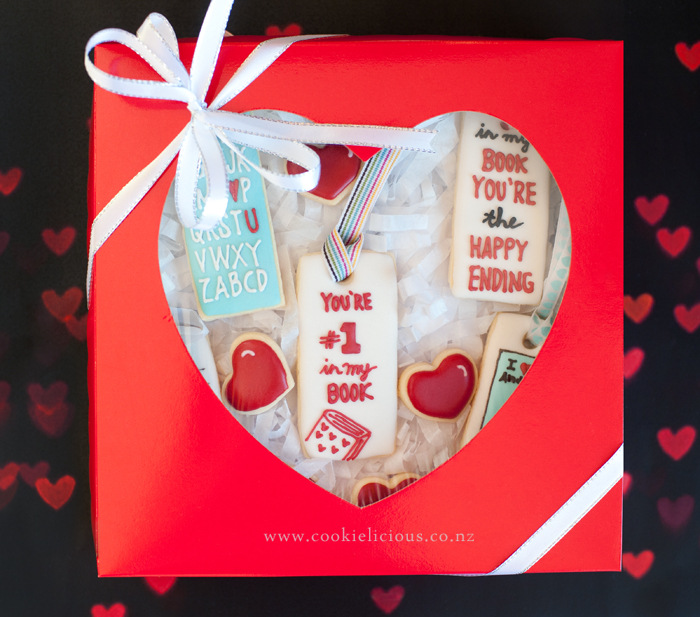 Happy Valentine's Day everyone! Hope you are enjoying your weekend with your love ones ;-)  One of Claudia's after school care teacher is leaving the school and she made a last minute request to make a special cookie gift pack for her. So we had to come up with something quickly. After a quick brainstorming session we decided to do up, up and away farewell cookies for her :) By the way this is also another excuse for me to practice painting on cookies again lol :P 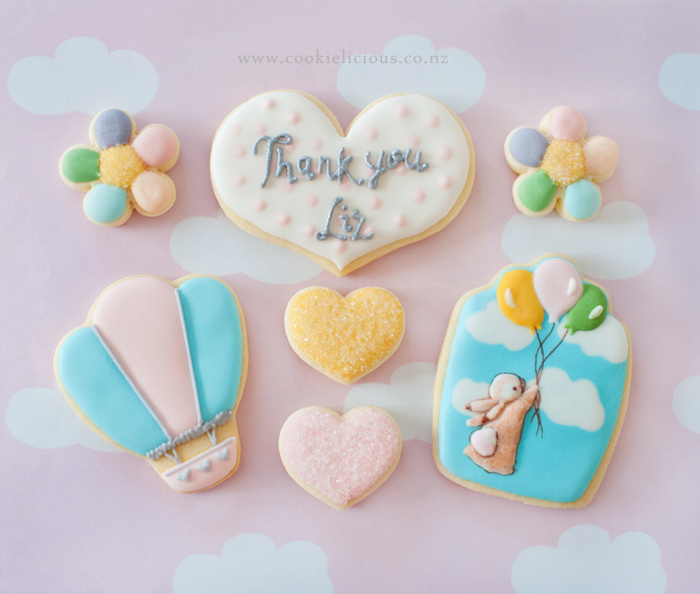 We used a gift tag cookie cutter to create the bunny holding the balloons. Started off with a wet-on-wet technique to make the background clouds. Flood the cookies with blue icing and while its still wet piped white flood icing in the shape of clouds - see picture below. 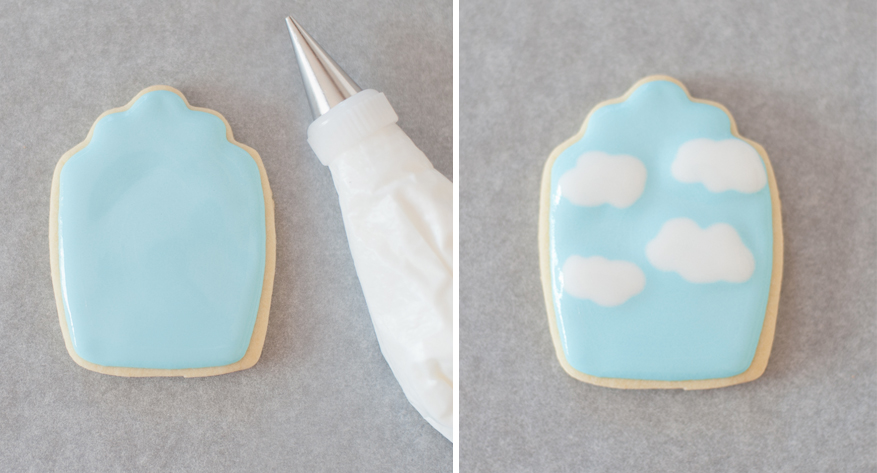 After the clouds background has dried, piped 3 different colours balloon on the top part of the cookie. Then make an outline shape of a bunny with an edible pen. Fill with white flood icing and let it dry. After the white icing on the bunny has dried its time to start painting. I used warm brown gel colouring and some water to get the speckled effect on the bunny. And lastly use a brown edible pen to draw the strings on the balloons :) 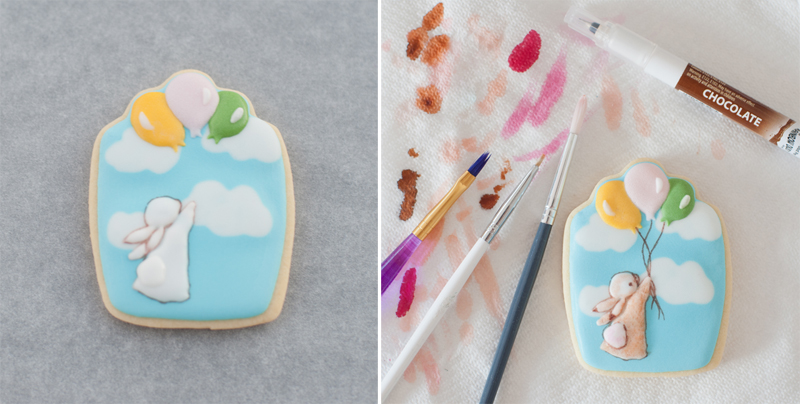 Next is the hot air balloon, its very simple, mark the area where you want the air balloon to end, you can free hand this but im not very good at free-hand so i always mark it just to be safe :P Then put the middle pink flood icing first and i put the blue icing on each side while the pink icing are still wet, and let it dry. Piped pink basket at the bottom of the hot air balloon. Then put stiff grey icing in squiggly lines on to the bottom of the hot air balloon and the 2 lines connecting the basket. Lastly put 2 little hearts on the basket and in between the lines on the hot air balloon.  Here are the two together :) 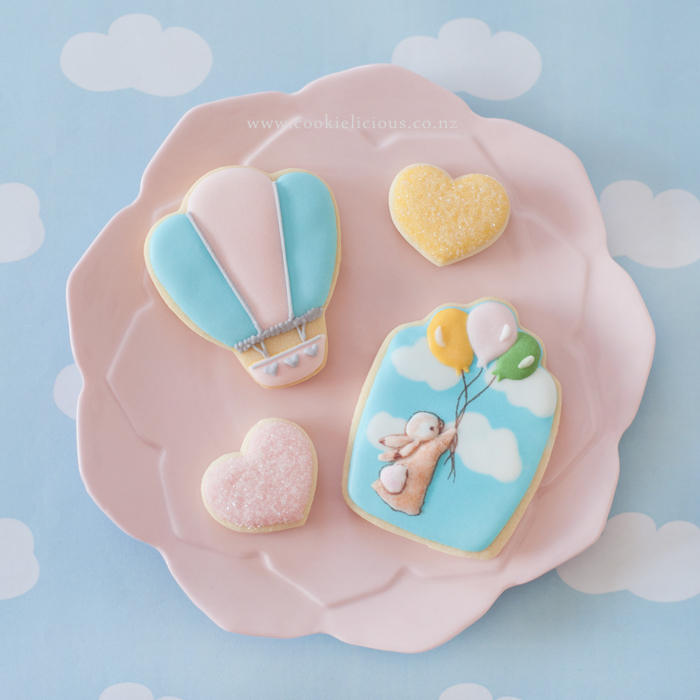 We put it into a gift pack ready to be given as a farewell gift to Claudia's after school care leader :) 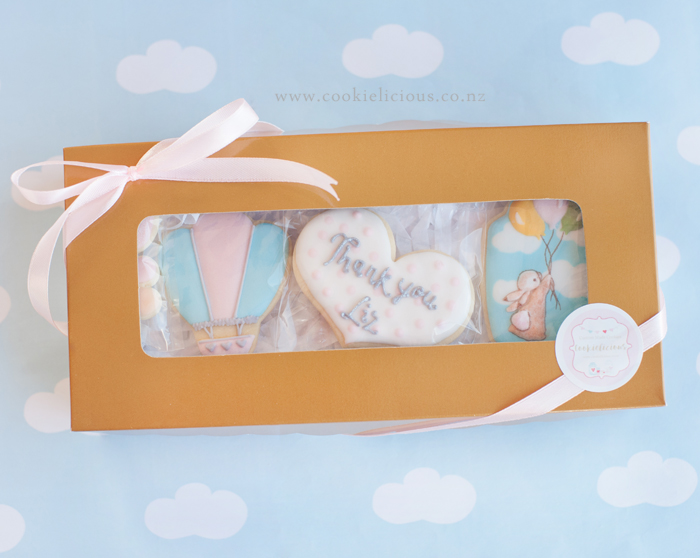 I was told that Liz loved the cookies, i hope she also likes the taste of them when she tries it at home :) Take care everyone & have a fabulous valentine weekend! ;-)  My hubby loves coffees, and what goes well with coffee is something sweet so donut is appropriate right? It was so much fun to make a donut cookie, that was super easy to make :) Claudia and I made these together and she will be giving these set as a valentine gift for her dad :) Isn't he lucky? I really love this set :) 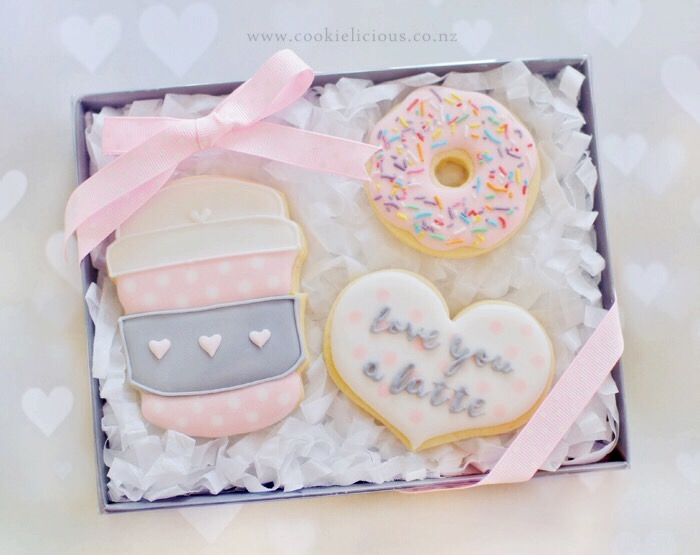 I know these set have been done a million times all over but this is our first time making these, it was a lot of fun and specially love making the donut cookie and the chubby heart :) The donut was the easiest and most fun to make, all you need to do while you are cutting the dough was to cut the middle of a round cutter with a bigger-ish piping tip to create the hole in the middle. Then when it comes to decorating, all you need to do is flood the middle of the donut cookie with pink icing and sprinkle some colourful sprinkles on top while its still wet....so simple and the result is so yumm! :) 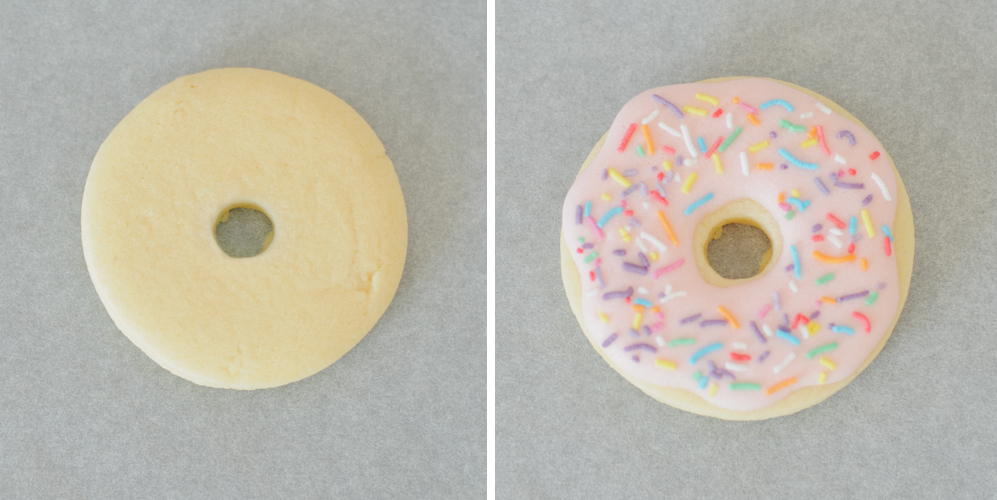 To make the heart is also simple, flood the cookie with white icing and while its still wet piped the pink dots all over to create the polkadots. Then piped the message in the middle with a stiff/outline consistency icing. I just love the cheesy saying 'love you a latte' to match the coffee set ;-) 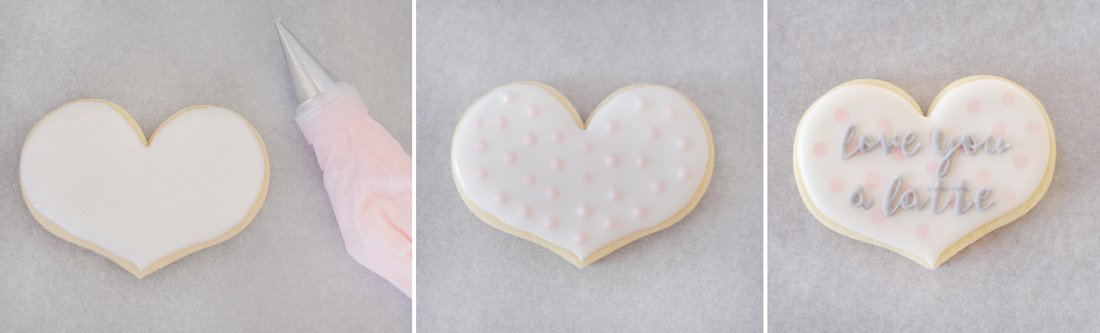 There you go, its simple and easy to make :) Hope you will give it a goi and try making this set for your love ones, specially if they love coffees ;-) 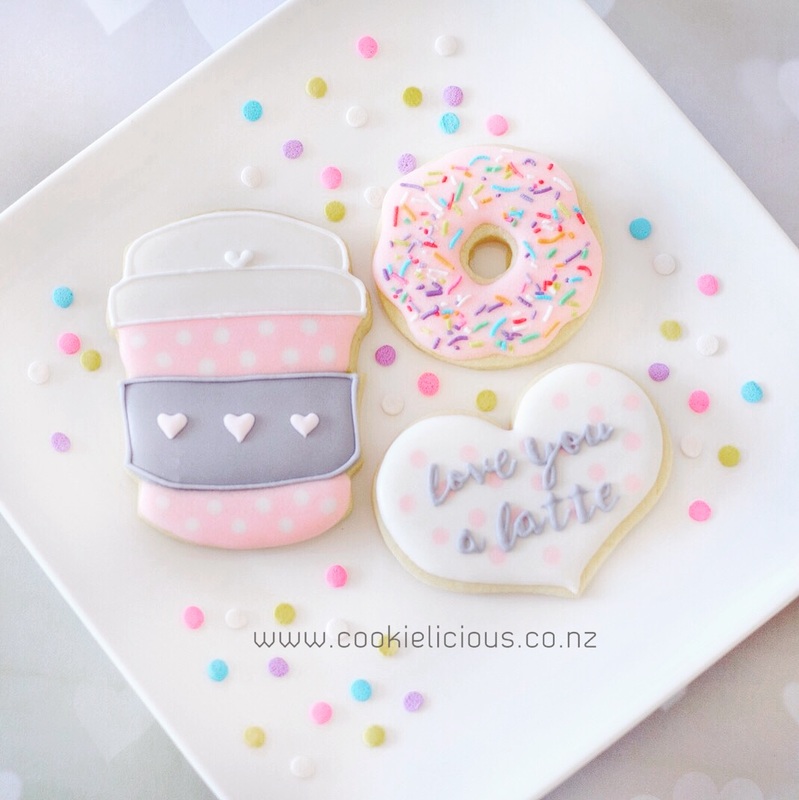 Hope everyone is having a fabulous week leading up to valentine's day weekend ;-)  Valentine’s Day is just around the corner...wow its crazy to believe, right? It feels like we were just getting into the new year and its almost half way to the second month already! So we have been playing around with some cute valentine theme cookies. Seeing that the theme is love, how can we not have cupid in there right? ;-) 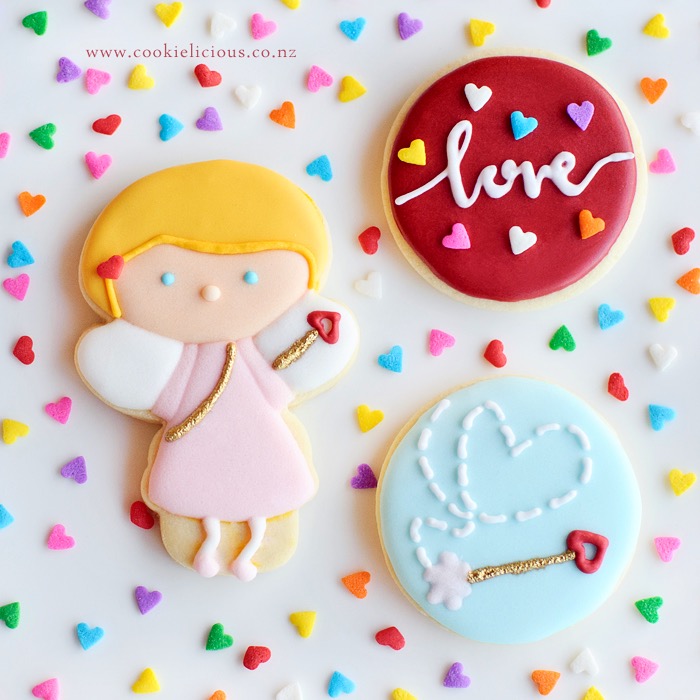 We were having so much fun making these that we forgot to take progress photos on how to make them, but i can tell you that these were made with a snowman cutter turned upside down :)  These looked super adorable as a valentine gift pack :) 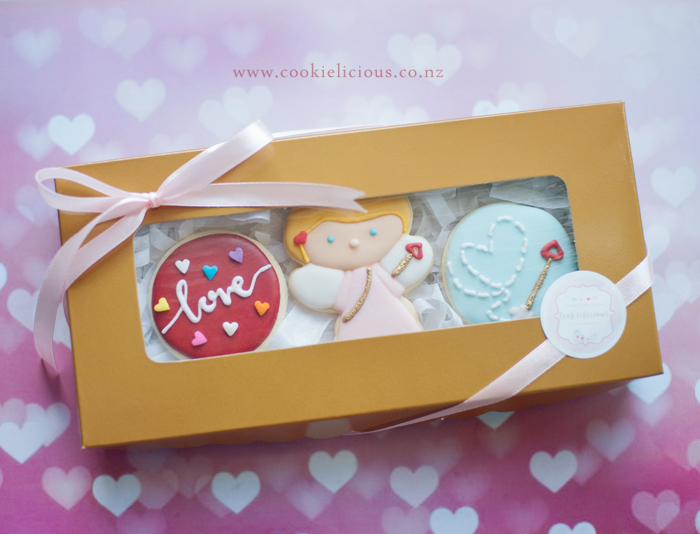 There will be more valentine cookies coming up leading to valentine's day. Stay tuned! ;-)  This is our first time making Chinese New Year cookies since we started getting into decorated cookies :) We ave quite a few things we want to try and make but because its so close to valentine's day we decided to keep it simple and stick with these set instead :) The china girl and boy was inspired by Cookie & Me, she is a super talented cookier who has had a lot more experience in cookie decorating than me. Im so happy that i found her in Facebook for inspirations. 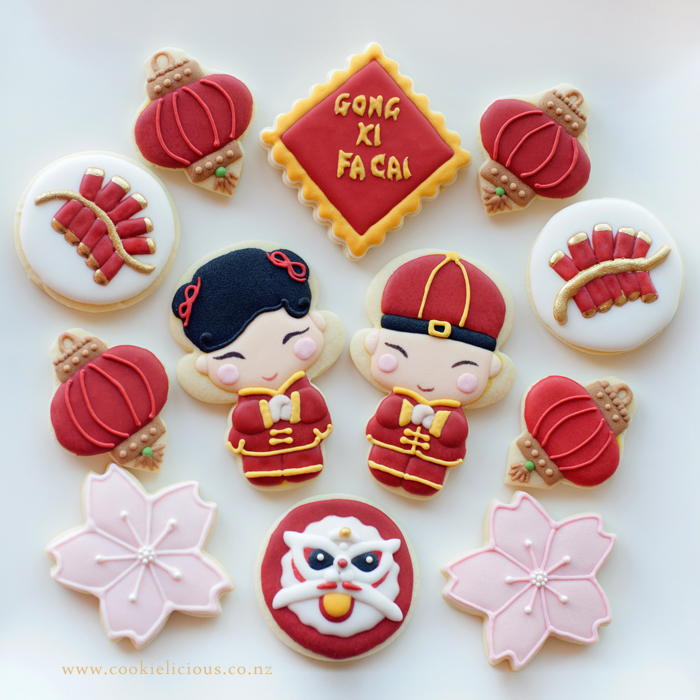 We took the progress photos of the china girl and boy so if you want to try making them you can follow the steps :) Firstly, we dont have the actual cutter to make a cutter so we used the versatile snowman cutter turned upside down to make the boy & girl. Start with marking the areas with the shape of the girl and boy with edible marker. 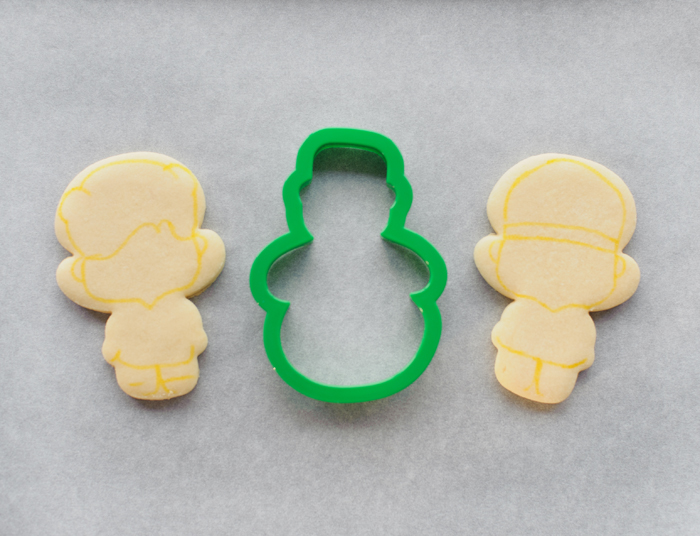 Then fill the face area with skin clour icing and let it dry. After the face is dry add the black hair with black icing and red icing for the body, let it dry for about 30-60mins, then add the legs with the same red icing. 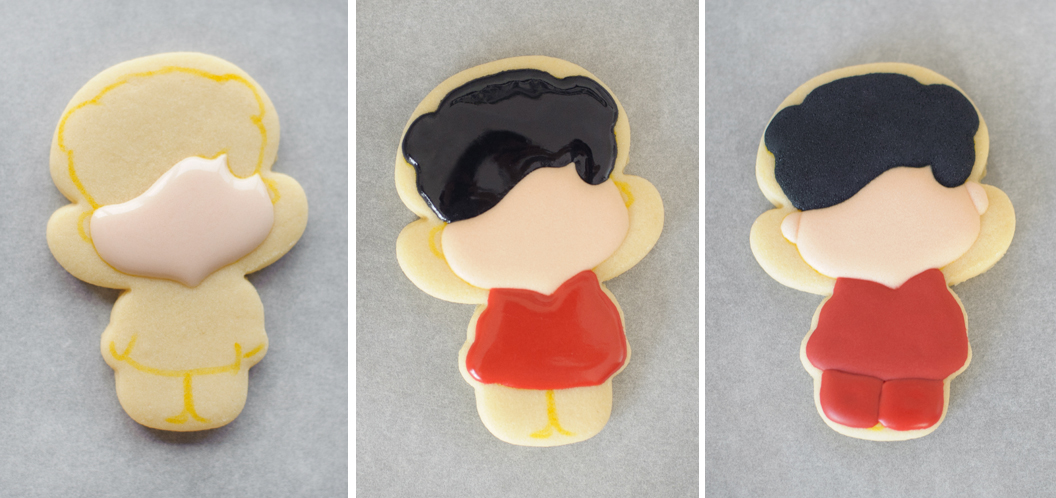 The next step is to add the details, we add the ribbon on each hair buns, then put an outline consistency black icing around the border of her forehead (see picture below) to give her hair a definition. Mark off the eyes and lips and the blushes for her cheeks with an edible marker. Also add the arms of her red clothes and mark the area for the sleeves to add the yellow trim later. 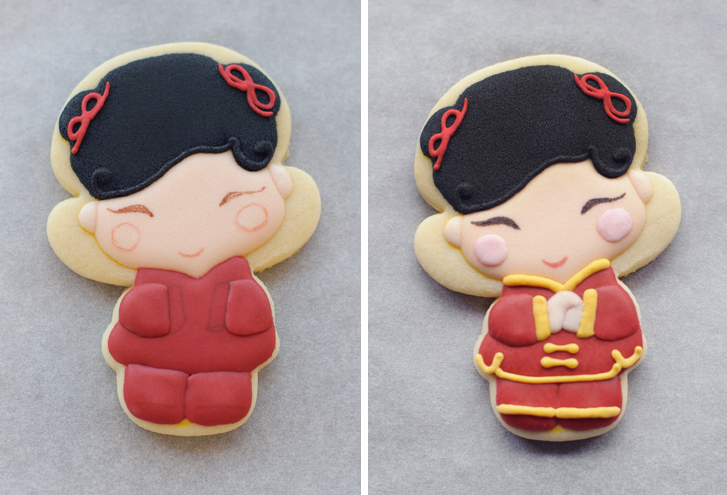 The China boy is a similar process as above, start with the face, then the top of the hat and body followed by the legs. 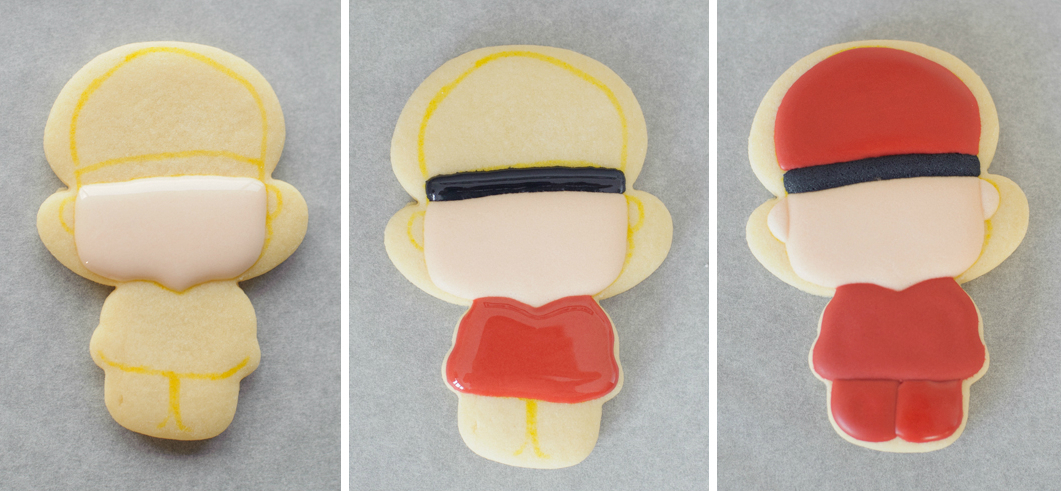 After the base icing are dry, continue with the details, add the face and arms and the trims of their cong-sam (chinese clothes) :) see below for progress details. 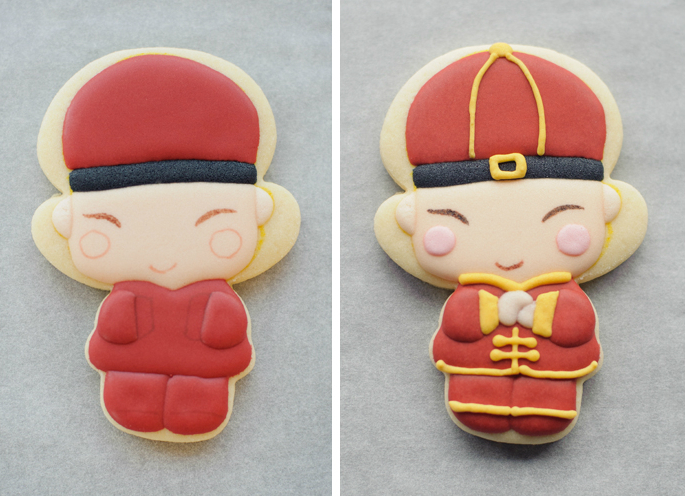 Next is how to make the chinese dragon face. I dont have a cutter for this too so we just use a normal round cutter. Add the white scallop base for the dragon's face, wait for a bit until its a bit dry and add the areas for the eyes and mouth - see below for a clearer idea. Then after the white icing is dry, add a thin coat of red icing around the corner of the eyes. Also add a thin line at the cheeks and the tongue. Then add the rest of the details as per picture below.  The chinese firecracker is easy, do the string first and alternately fill the crackers with red icing. See picture below. At the end brush the tip of the firecracker & the middle string with gold lustre dust. 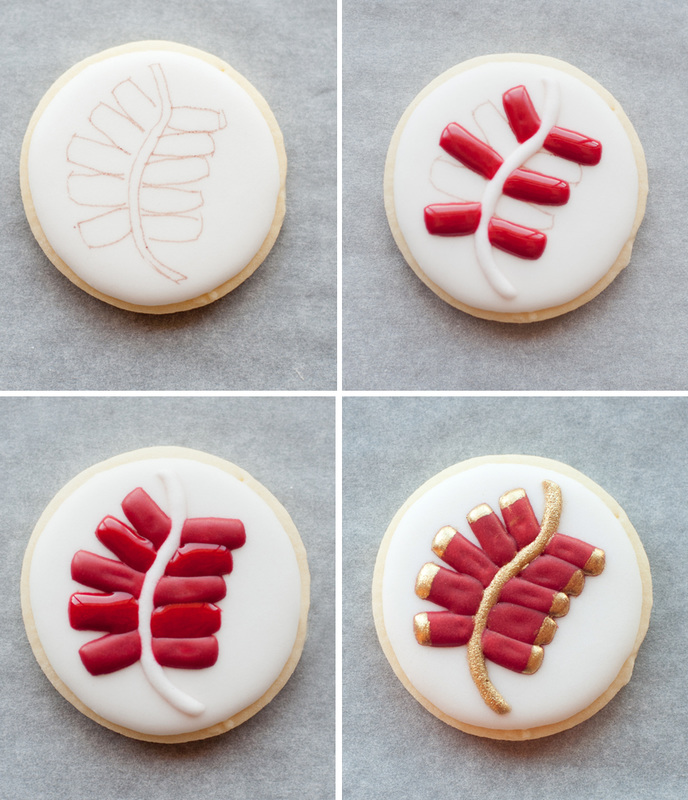 That was all the photo tutorial we made. We didn't do the chinese lantern as Sugarbelle has already done it so beautifully, best to go to her site and check how she does hers :) Happy Chinese New Year everyone! Wishing you success and prosperity in the year of the Monkey ;-) 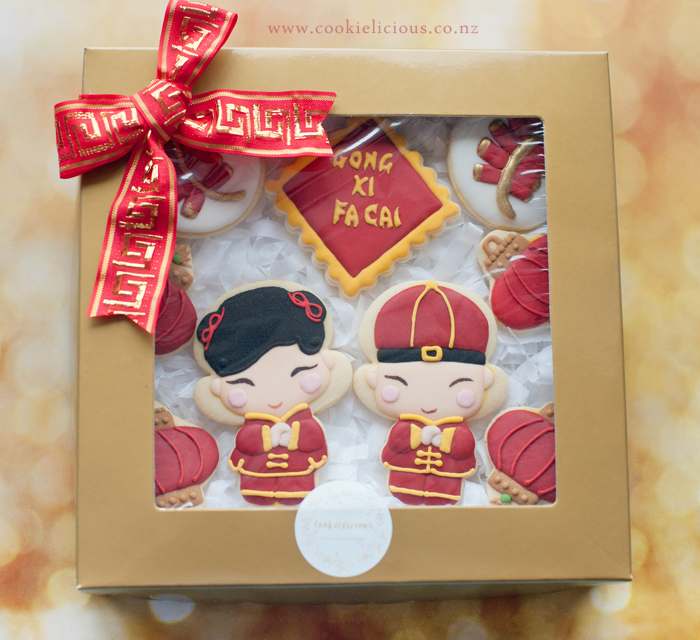  I suspect that these might be different from the Princess Diary you were thinking about...let me explain... One of my amazing friend sent a gorgeous diary for Claudia, all the way from Korea... thank you Aunty Danbee ;-) This diary has gorgeous pictures of princesses from all over the world. I was told that they are originally paintings from a known Artist in Korea. So when I saw the princesses i immediately thought "wow they are beautiful, i wonder if we can turn them into a cookie?" Okay so maybe not many of you will think that, but as a cookier my mind works differently lol :P So we have 2 cookies to play with and from the diary I personally like Miss China & Miss Vietnam, so we decided to try and make those two princesses from the book :) 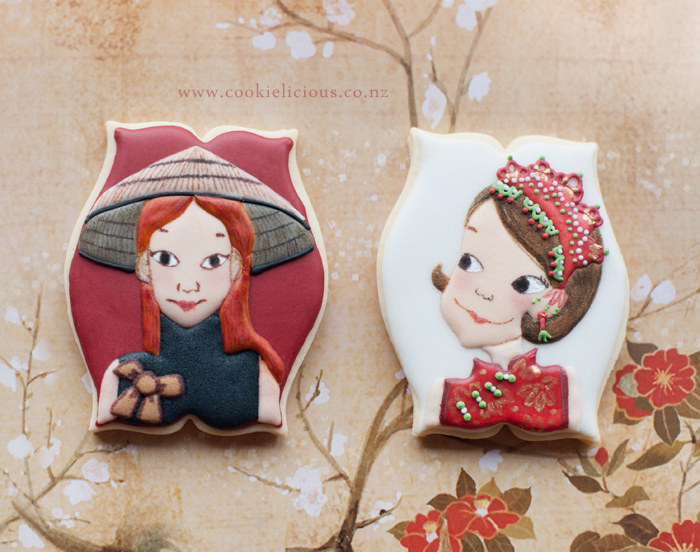 So lets look at Miss China first. Btw, this is the first time we are trying out hand painting a cookie, eventho its only partially hand painted it was a learning curve for us. It was fun but tricky at the same time :) Here is the progress photo of what we did to create Miss China :) Start with outlining the shape of the princess in the cookie. Then we start with her face, give it a few minutes to dry a bit and then add the neck and arms. After the skin colour icing are dry add the hair with brown icing. 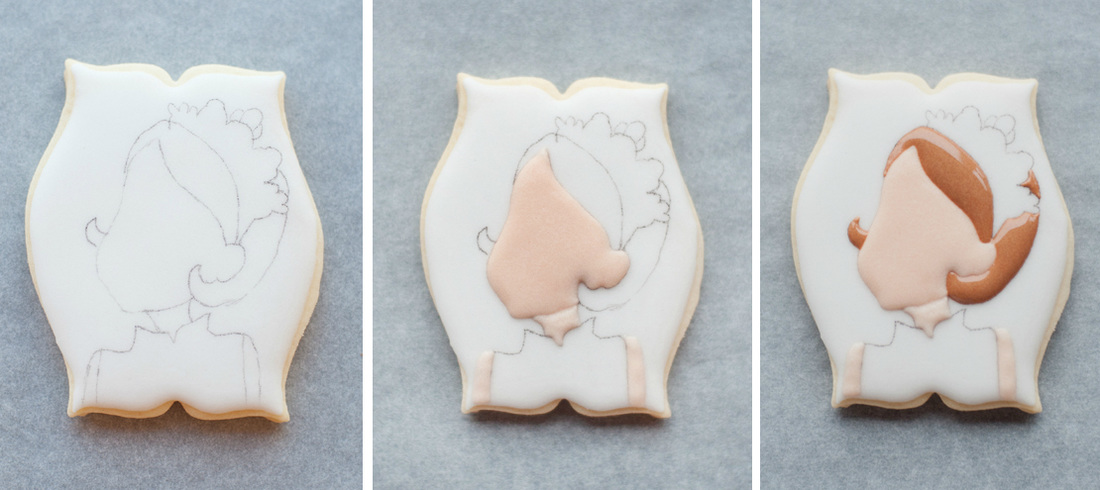 When her face and neck are dry start adding in the red top and her headband. Then mark off the face area with her eyes, nose, lips and with a thin brush use brown gel colouring and add some strokes into her hair to give definitions of hair strands. Lastly add all the details into her headband, add the earrings and the pattern into her red top. 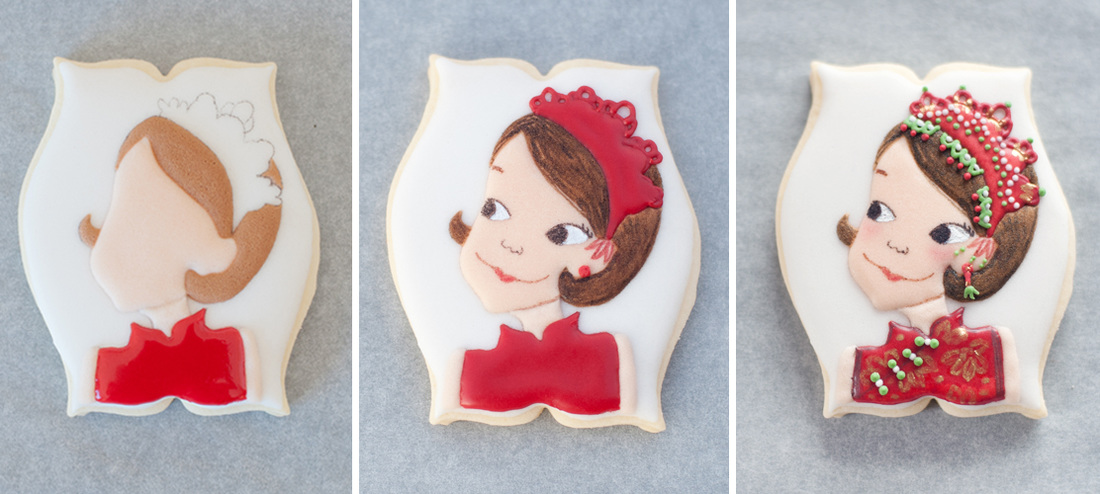 So this is what Miss China looks like in the diary and the finished cookie on the left :) 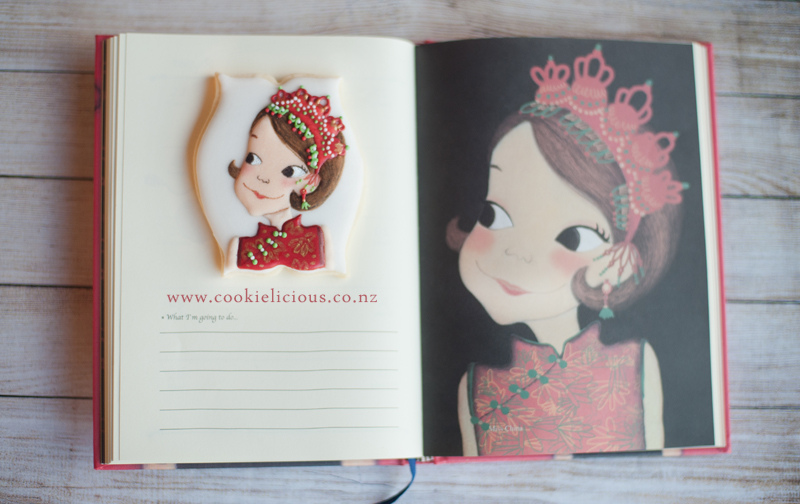 So next is Miss Vietnam. Similar to the steps above, starts with her face and arms, then add the hair with yellow or orange icing. We don't have any orange icing so we used yellow icing as a base colour (just note down that we are going to paint it with dark orange gel colour and add strands of brown-ish colours to give definition to her hair). 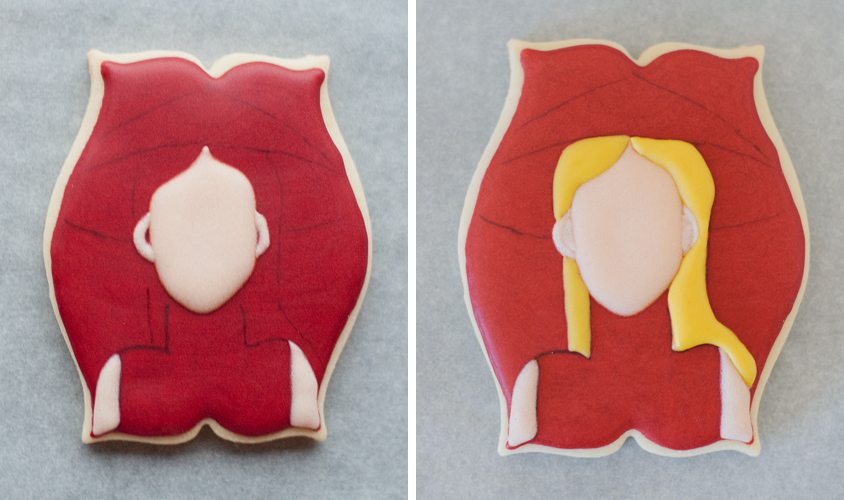 Next add her black top and her straw hat - see picture below for more details, and when the black icing for her black top is dry add brown bows on the left side as pictured. When the icing for her hat is dry, use a fine tip edible marker to put more details into her hat, and finish off the brown bow on her top as well. So we decided to leave out the strap from hat, coz we thought that if we make a mistake with it the princess might look like she is being strangled with a black strap LOL :P 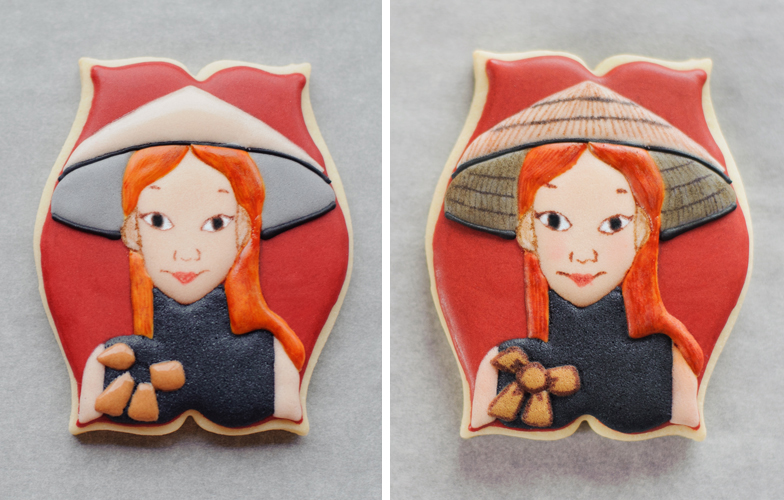 So this is what Miss Vietnam looks like in the diary and the finished cookie on the left :) 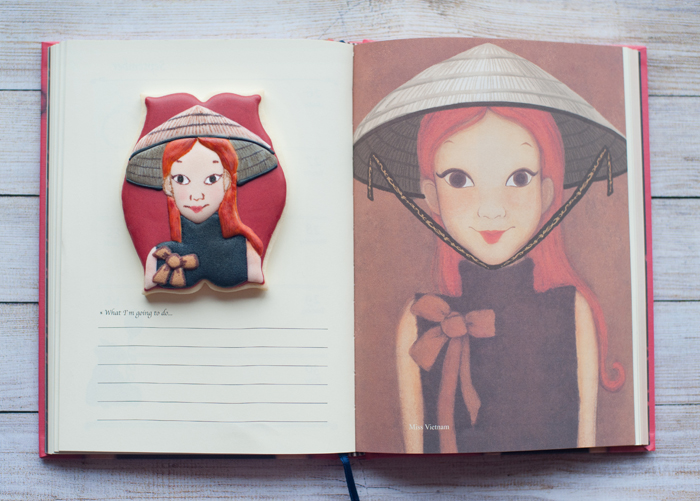 So there you go, all in all hand painting a cookie is not so bad...its a lot of fun but of course a lot more work is involved and i think these kind of stuff we enjoy doing for fun and just for the challenge of making cookie as art, but definitely not something that we want to make as an order for a client :P Anyway, it was a great fun as our first try at hand painting a cookie, I can see that this is more of a Claudia's thing as she loves painting and doing these kind of free-hand stuff. I will just leave the artistic part to my little lady and I'll just stick to decorating with icing lol ;-) 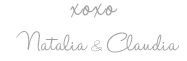 We got to make another set of Hello Kitty cookies and this time we made the matching red bows :) Claudia wanted to give a set of Hello Kitty cookies to her lovely friend in Jakarta and a very kind aunty who has given her HK gifts while she was in Jakarta last time. Both of them love Hello Kitty, so we decided to make them Hello Kitty cookie gift :)  We have done a hello kitty tutorial before so we didn't take any progress photo this time as they were made the same way as last time. You can find them HERE. This time we made matching bows and little hearts to match, the bigger bows were made using a bone cookie cutter, however the small bows we had to hand cut as we don't have any small bone cutter or any other cutter that works. 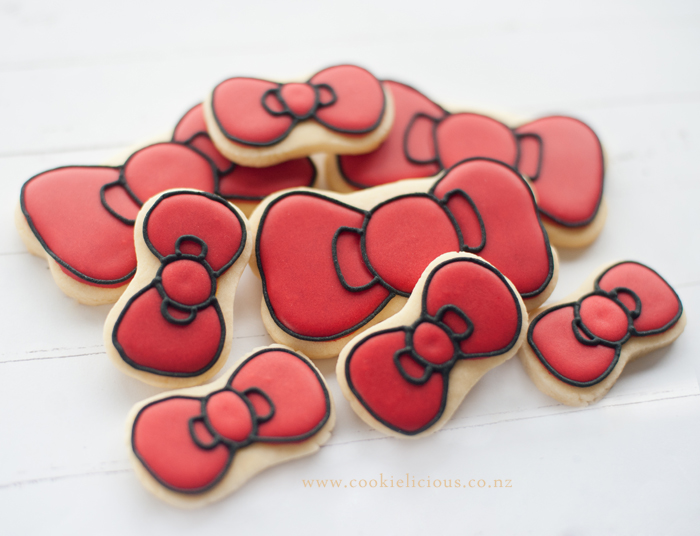 Here is a closer look at the full body Hello Kitty, her outfit is a bit more simpler than the last one we made. We decided to go with a plain pink dress rather than an overall like last time. 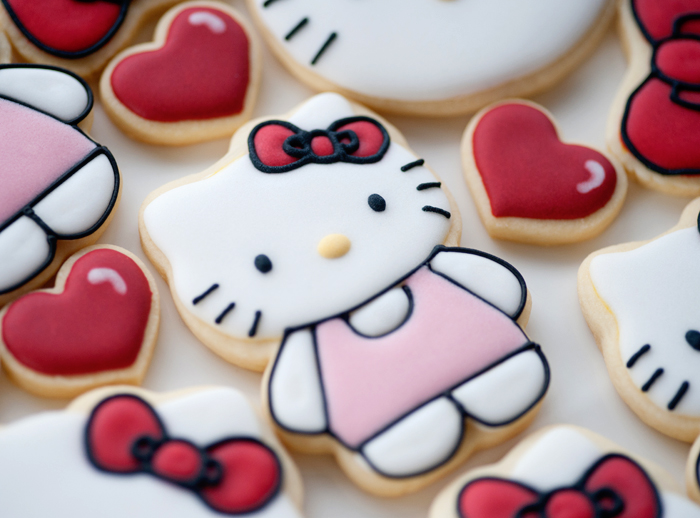 We packaged-up a set for Claudia's lovely friend in Jakarta, and we also include a heart shape cookie with her name on it, this is the gift set we prepared for her :)  We hope she enjoys these cookies, and of course being a Hello Kitty fan I'm sure she will love these as much as we do ;-)  When we first started decorating these cookies we had a different design in mind. Originally we were gonna spray the base icing with some pearl sheen with different pattern on the base icing so that it will give each a lovely background. However because our new airbrush tool were malfunctioning we had to improvise, and these are what we ended-up with :) 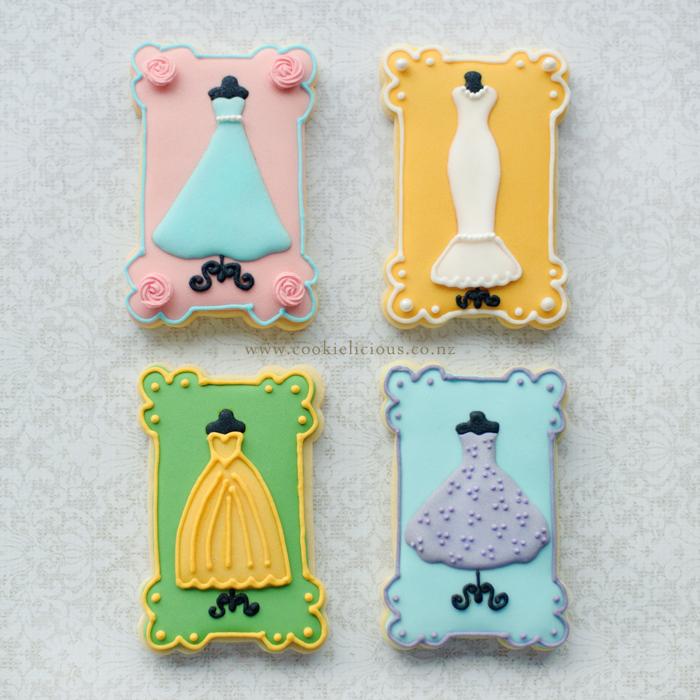 We started off with just 3 cookies and we ended up adding the green one at the end to even up the numbers. Draw the different dresses designs on the cookies with edible markers. 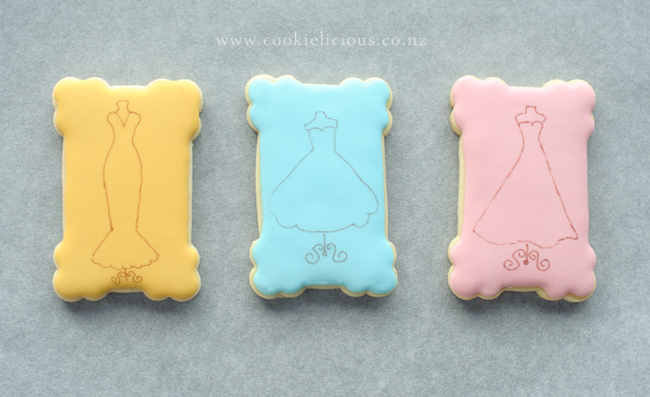 Then fill them with flood icing with the dress colour that you want, and let it dry. 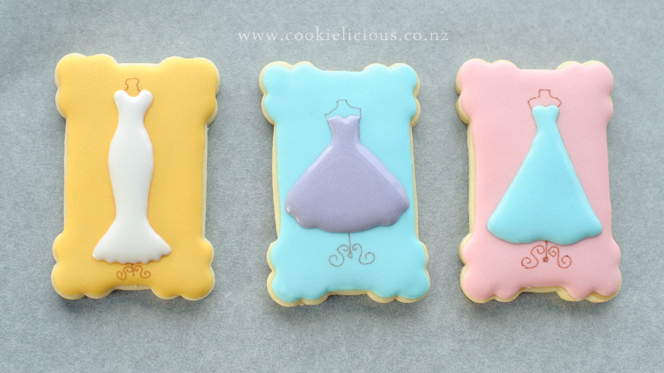 When the dresses icing are dry, add the mannequin body on top and the stand at the bottom with black icing. 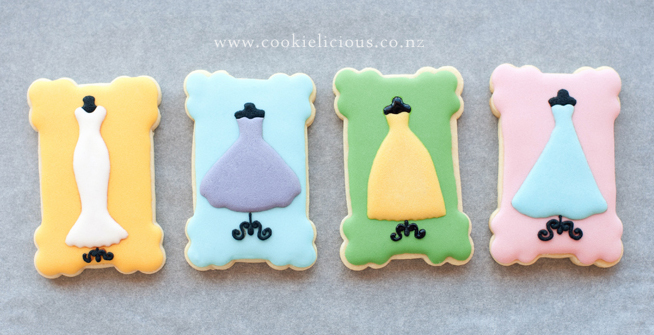 Then you can decorate the dresses as you please with different designs that you want and lastly add the different border colours to make them stand-out and decorate as you please :) 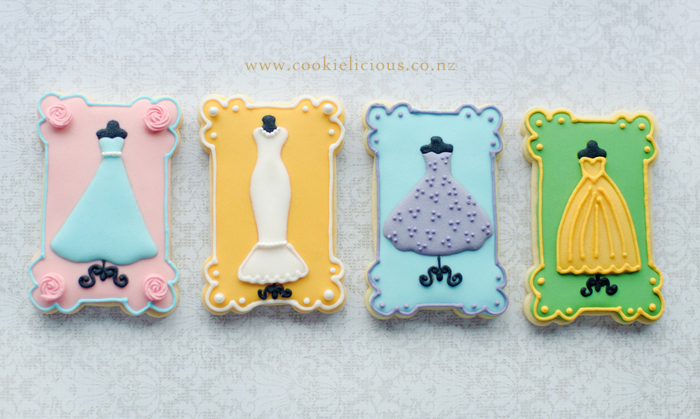 Here they are all packaged up ready to go for a special gift ;-) 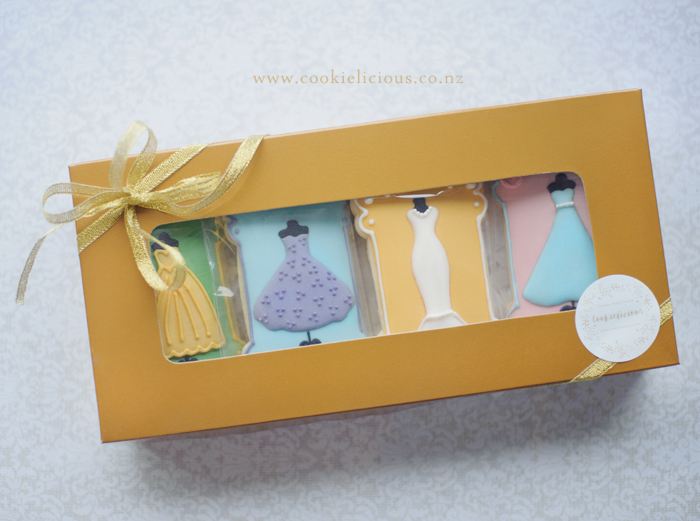 Hope you are having a fabulous day and have fun experimenting with different stuff ;-)  |
About MeCookie Artist & Content Creator, who loves spreading the cookie love. 

Archives
February 2020
Categories
All
|
 RSS Feed