
|
Today is my daughter's birthday. She is turning 11 today and so incredibly excited to have her party this weekend. She was already up before i left for work early this morning at 6.30am :) That should show you how excited she is because she is usually still snooring away and her dad has to wake her up a few times in the morning lol :P She has specifically requested to have an Owl theme party as she is really into owls right now. So we have been busy creating owls goodie bag as well as owl party favours for her party this weekend. She has also given me a drawing of what she wants her birthday cake to look like, so i will be posting her drawing along with the finished cake this weekend. In the mean here is the cookies we made as part of her party favours.  I wasn't sure how we want the owls to look like from the cookie cutter we had, we can make all sort of different kind of owls....so we made a little sketch of what we thought would look cute :) 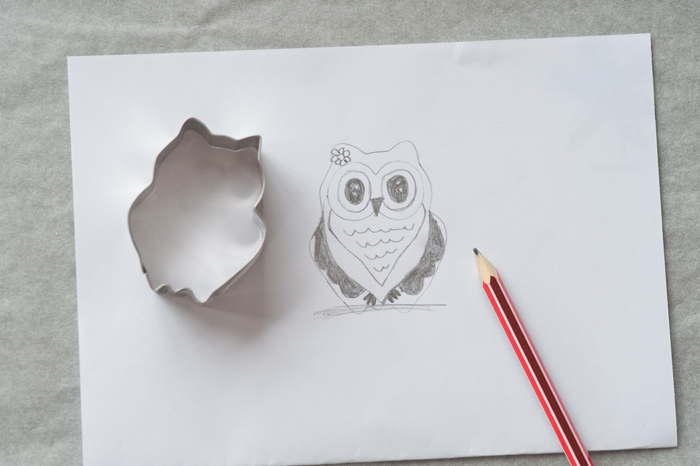 As you can see, we didn't ended up putting a flower on the owl but it doesn't really need it anyway :) So we start off by trimming the bottom of the owl. We didn't like how the cutter was uneven...the right side of the feet area was bigger than the left side for some strange reason. So we just decided to trim it off. See the photo below. 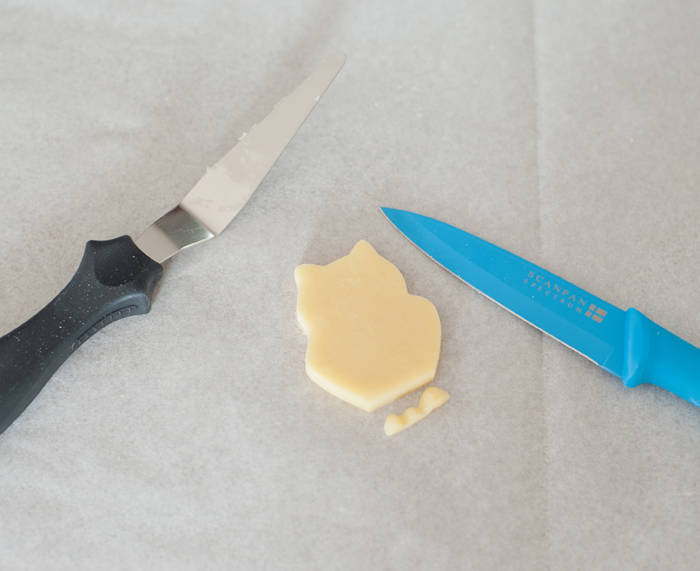 When the cookies were baked and cooled-off, start by marking the area with an edible marker. 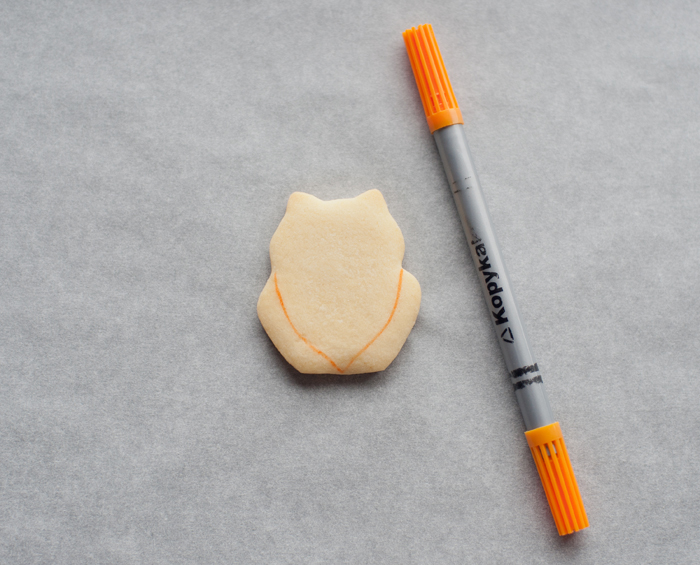 Once you have marked the area, fill it with dark pink icing. We used 20 second icing for this. Let it dry for an hour or so and then start piping in the wings with blue icing. Let it dry. 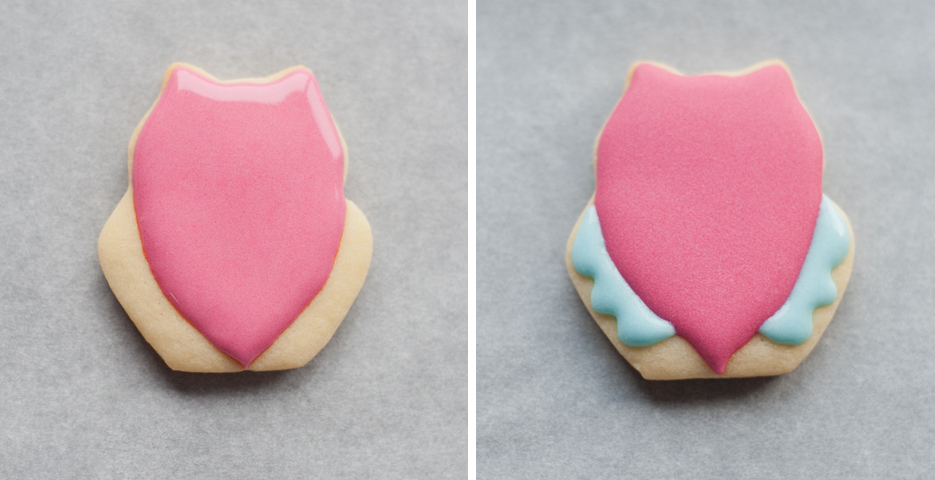 When the dark pink icing is completely dry piped the eye area with light pink icing, and let it dry. After the light pink icing is completely dry (we waited at least 4-6 hours for this one to avoid bleeding issues) start piping in the while icing and while the white icing is still wet piped the black icing on top and then put another white dots on top of the black icing while it was also still wet....got it? So its kindda a triple dip wet on wet :) Black icing on top of a wet white icing, and then white icing on top of a wet black icing, did i confused you? Yep, that sounded confusing even for me, but you know what i mean right? ;-) 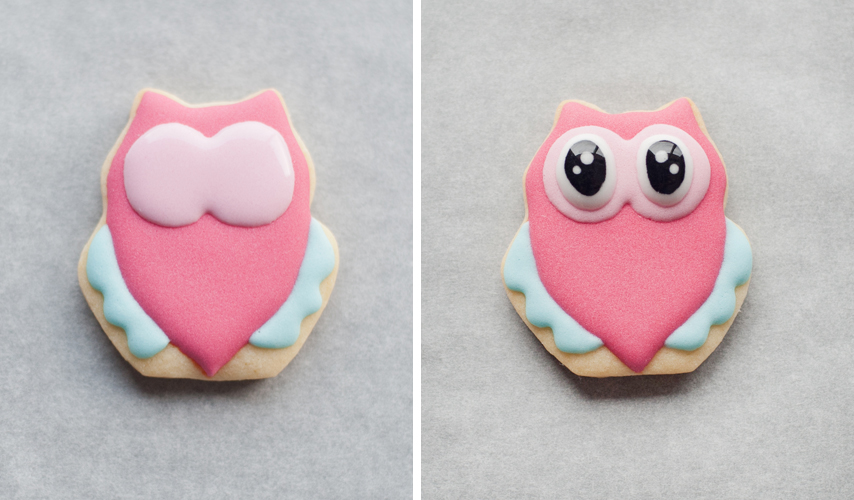 Okay, so you let the eyes dry and in the mean time piped the white chest area (as shown in the picture below) and let it dry. When the white chest area is dry, piped the details. We added the orange beak, and the little pink V on the chest area for the fur. Then using an outline consistency icing, piped a dark pink icing along the lines of the white chest area and also with an outline consistency icing, piped a blue icing on the outter edges of the blue wings. Lastly, add the owl's feet on each side of the bottom area using the same orange icing we used for the beak. 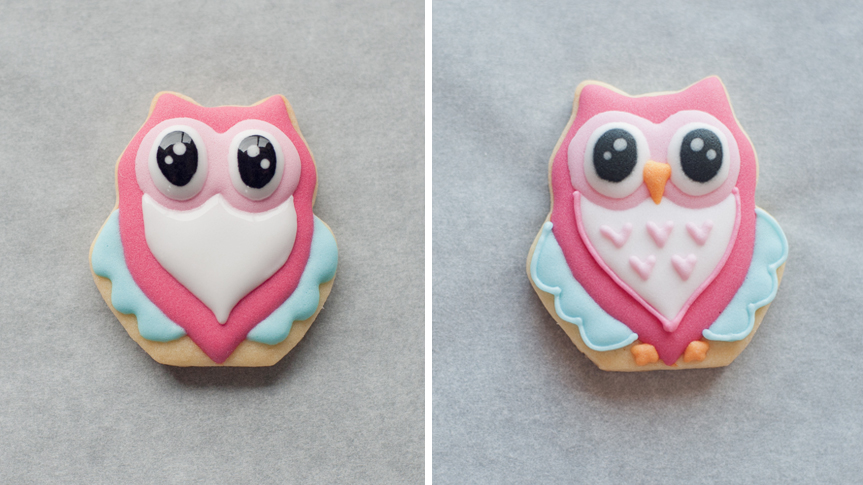 That was all the steps we did to make Claudia's owl. We decided to skip the flower on their ears, they dont really need it as there isn't much space on top of their head to put one without covering their eyes. But that's not to say that you can't put a tiny bow or a tiny flower if you want to do yours a bit differently :) Okay, so here they are ready for the party! 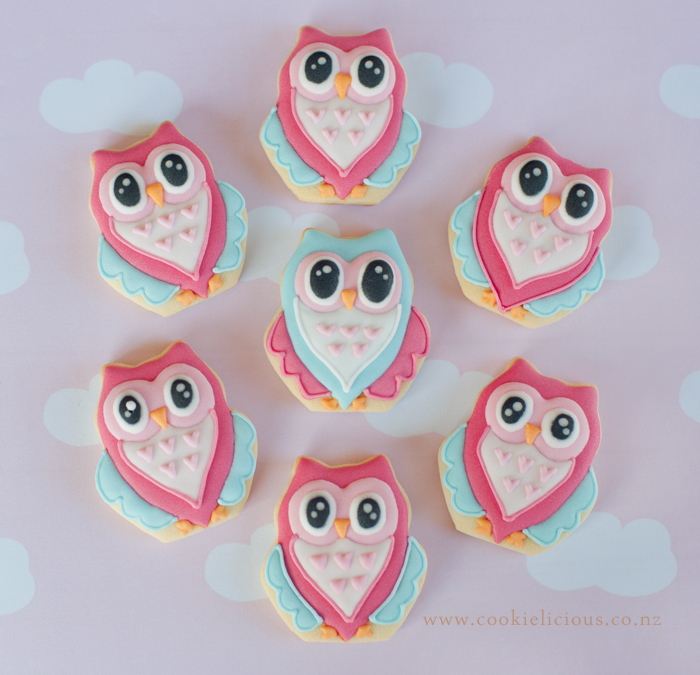 Oh, almost forgot that to compliment the owl we decided to make number 11 and heart shape cookies with a simple flower. 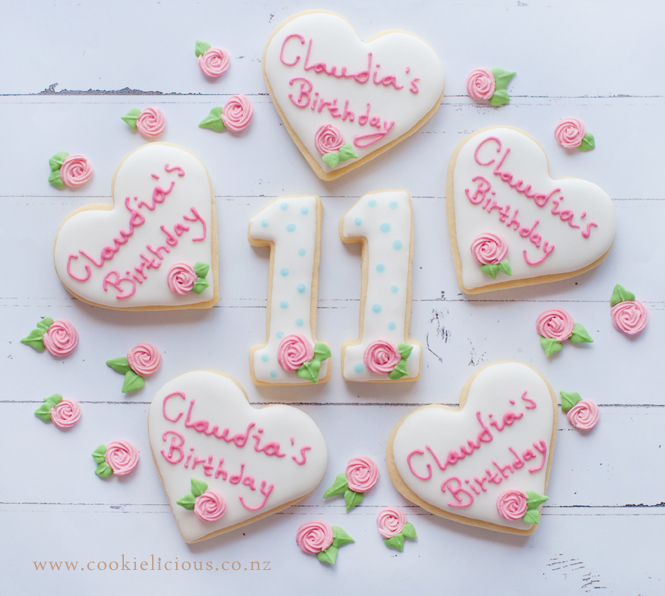 And here they are all packaged up, ready to go as party favours for her birthday party this weekend :) 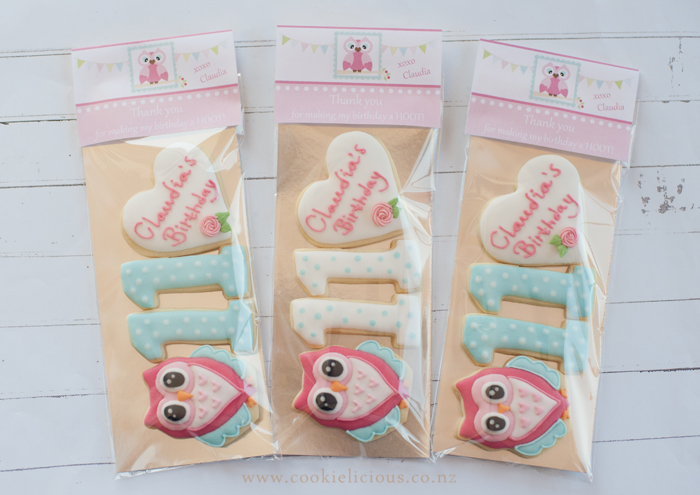 Well I just want to use this opportunity to wish my daughter a very Happy Birthday... she is growing up to be the kindest, loving, caring, and just an amazing young lady. We are so proud of what you have achieved and who you are becoming. We love you to the moon and back. Have a wonderful day sweetheart! ;-)
xoxo Mummy, Daddy & Logan :)
2 Comments
Gosh we cannot believe how fast Christmas is approaching! We have not got our Christmas tree out yet and there are still a few things to get from our Christmas shopping list (read: have not started christmas shopping yet! lol). But aside from that, we attempted to get into the Christmas spirit by creating our first ever Christmas theme cookies. We have been wanting to create these cute Gingy for a while, they were inspired by a very talented lady from her Facebook Blog - Life's a Batch. Nicole is super talented, and seeing that its near Christmas, we thought its more appropriate to try re-creating these cuties now, so here they are :) 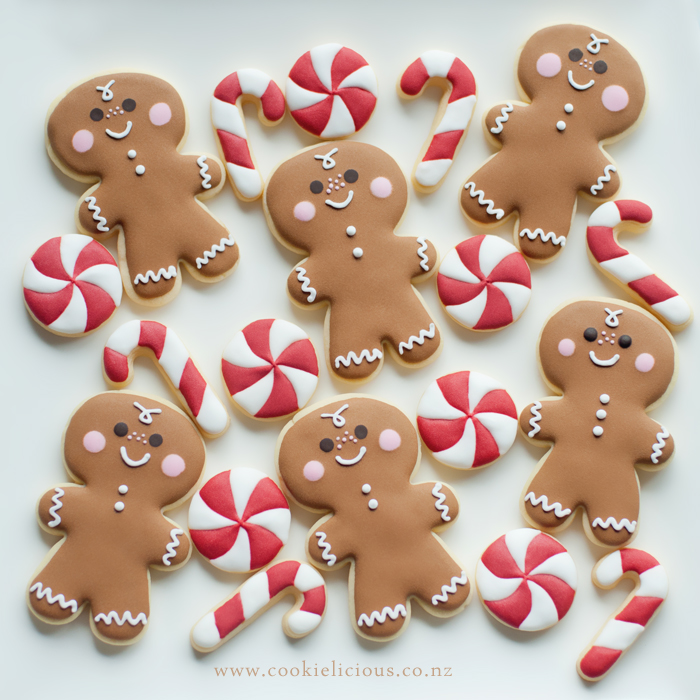 To make these gingerbread men, we start with using a cookie cutter that we already have, its made by Wilton and it came as a set, a gingerbread boy & girl and a candy cane cutter. BUT the gingerbread boy's head was bitten off, so we had to patch his head :) See picture below for a visual. 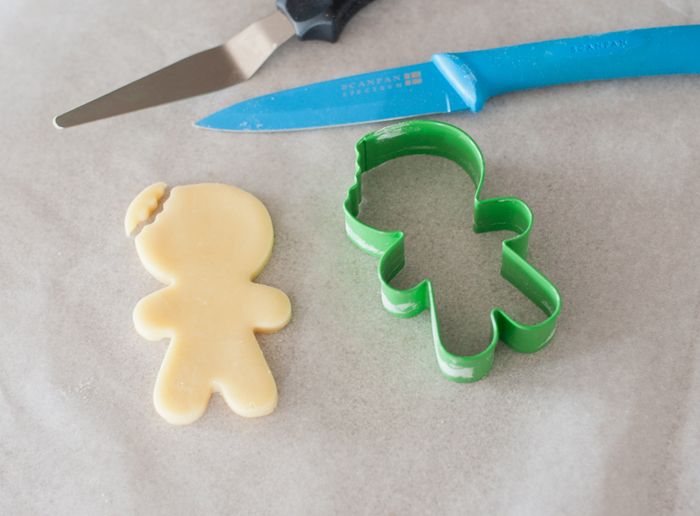 Once we patch his head and all the cookies are cooled, we start off by outlining and filling-in the cookies with brown colour icing. We used 20 second icing and tip #2 to do this. 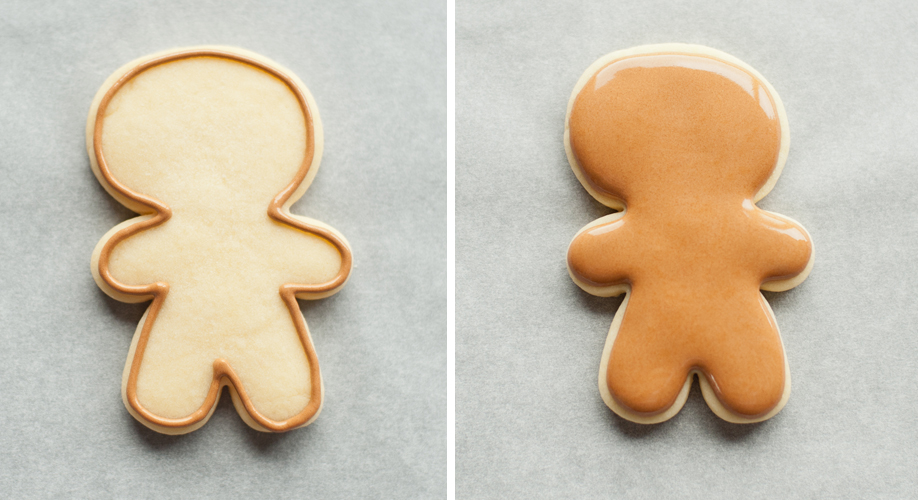 While the brown icing is still wet, piped his eyes with dark brown icing and the blush on his cheeks with pink flood icing. Let it dry. After the brown icing is dry, we add the freckles in between the eyes. We use the same pink icing as the blush on their cheeks. 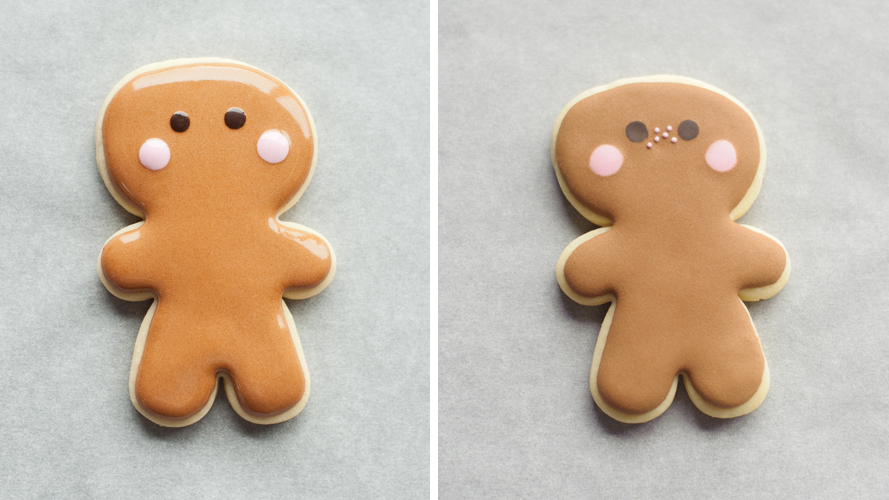 After the freckles, its time to add in their mouth and the white swirl on top of their head with white icing. When that's done, add two white buttons and all the squiggly lines on their hands and feet with the same white icing. 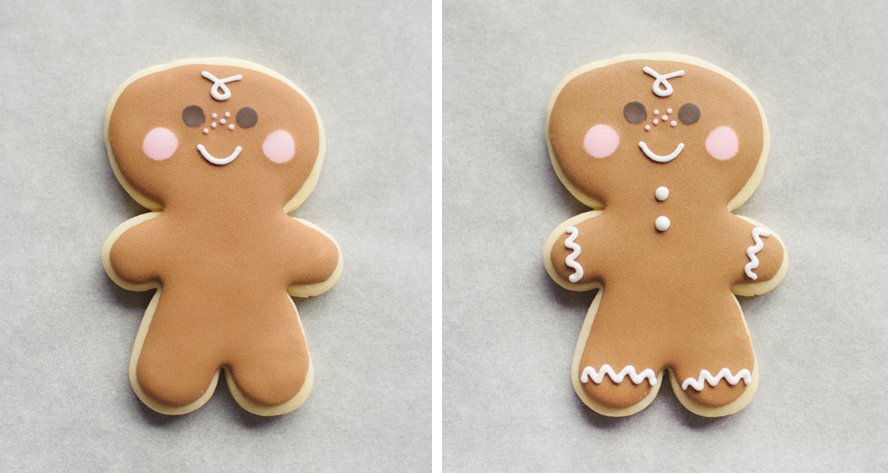 Here they are in a smiley group :) 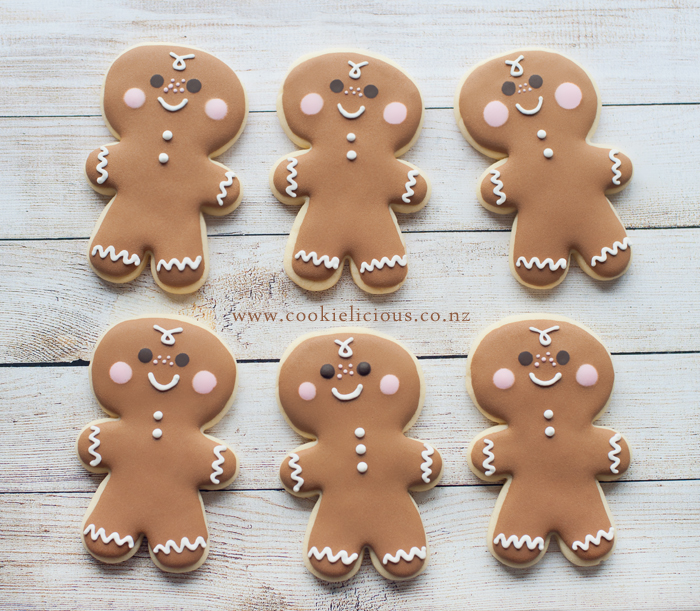 Next we make the peppermint candy cookies. We start off by marking the area, because we are not so great at doing any freehand icing work, its best to be on the safe side and mark it off with edible marker. Fill the alternate areas with white icing, and let it dry. After several hours pipe the red icing on the left over areas, we use tip#1 and 20 second red icing. 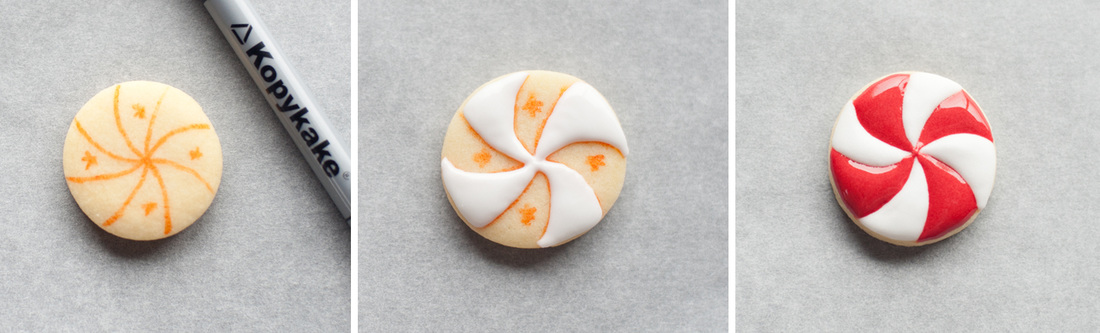 For the candy cane cookies, they are pretty much using the same technique as the one for the peppermint candy. Mark the areas with edible marker, fill alternate spaces with white icing, let it dry and fill the rest with red icing :) 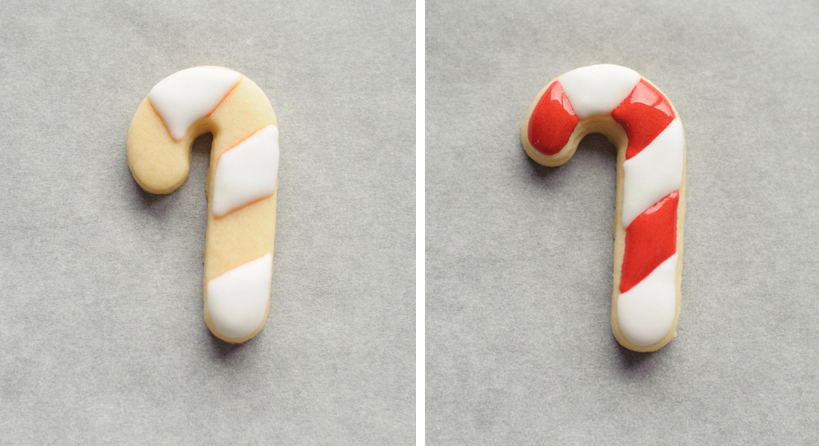 There you go, pretty simple :) And we made a whole bunch to go with the gingerbread man cookies :) 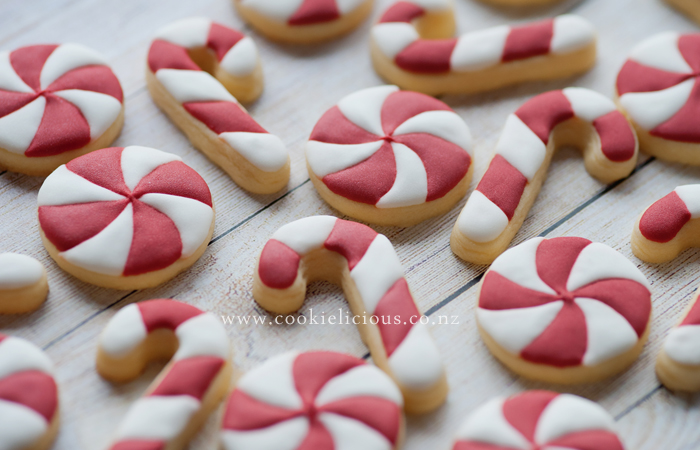 Okay that's officially our first Christmas cookies post this year. We are pretty happy with how they turn out, but hoping to do more Christmas cookies in December :) Lets hope we will get our Christmas shopping sorted out before December, just to make life easier for everyone :P 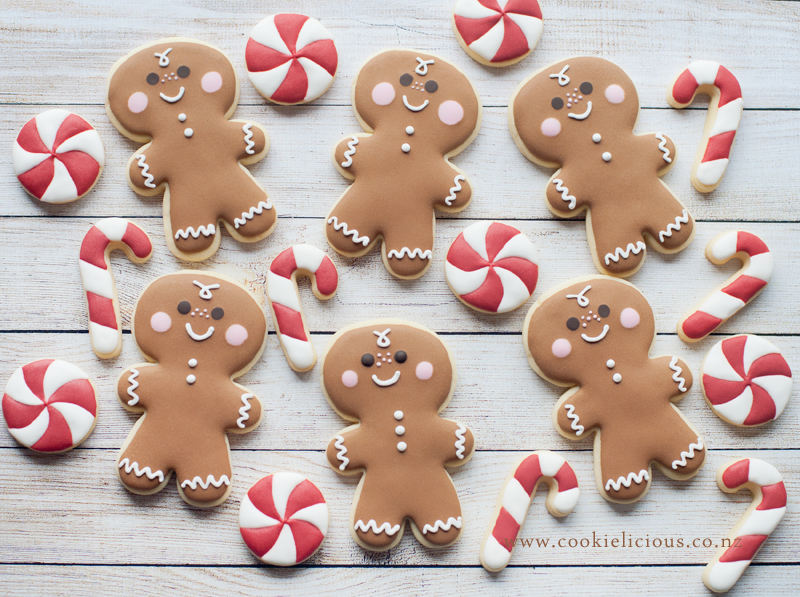 Have a great week everyone! :)  I have been wanting to try making these cute Totoro character for a while :) Totoro is the character in the Japanese animated film – My Neighbor Totoro. He’s a fuzzy, giant, furry, pointy-eared creature with wide eyes and a fantastic smile :) And of course we had to include the Dustbunnies, they are little black fuzzy things, about the size of a ping-pong ball. In Japanese, they were called "Makkuro Kurosuke" (a literal translation would be "Pitch-black Blackie") So when we finally got the cookie cutter from eBay so we couldnt wait to make these cute cookies! lol :) 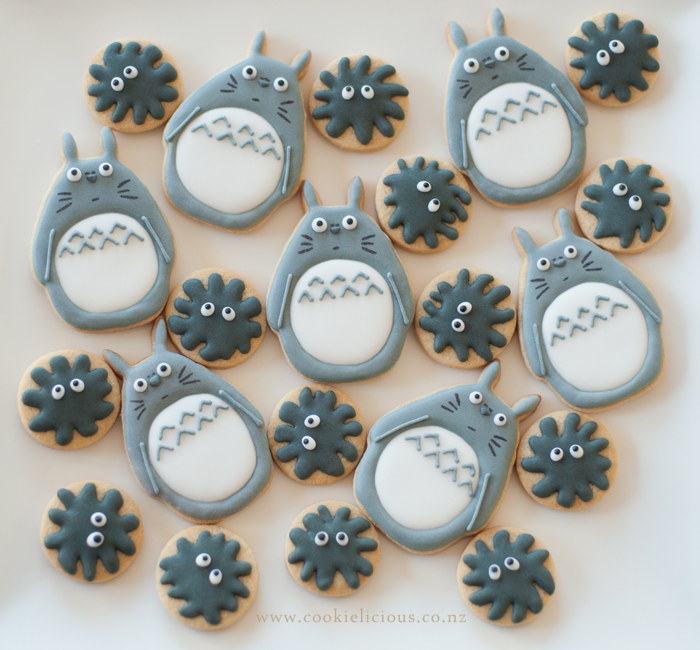 Okay so let go over how to decorate these cuties :) We start off by marking the area for Totoro's white belly with edible marker. 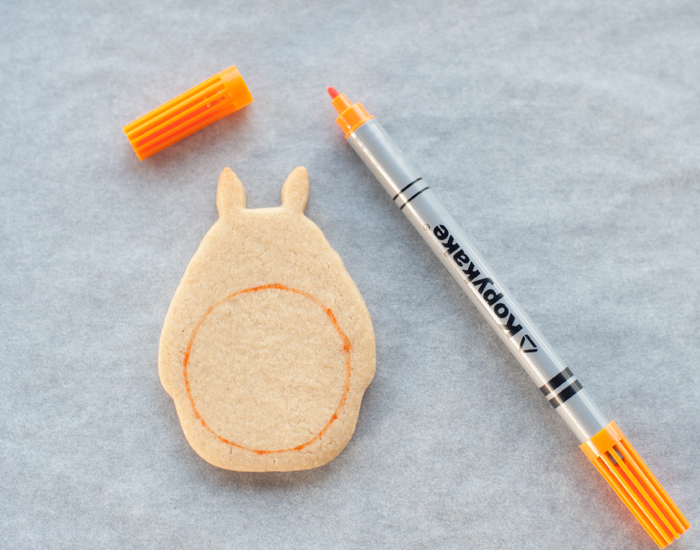 Fill the round belly area that you have marked off with white icing and let it dry. Then Fill the rest of the cookie with grey icing. Let it dry. 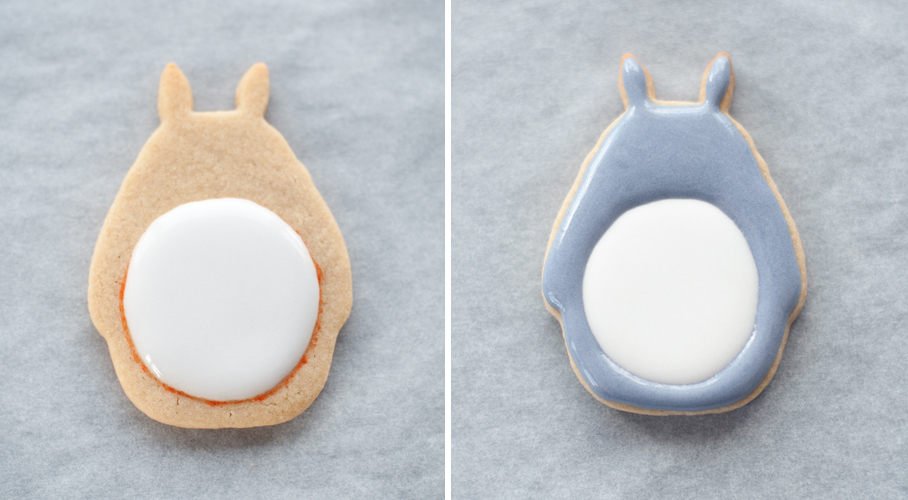 Next we pipe the little details. With outline consistency grey icing, piped a slightly diagonal line on each side of the body to give the impression of his hands on each side. then piped upside down V on his belly using grey icing. 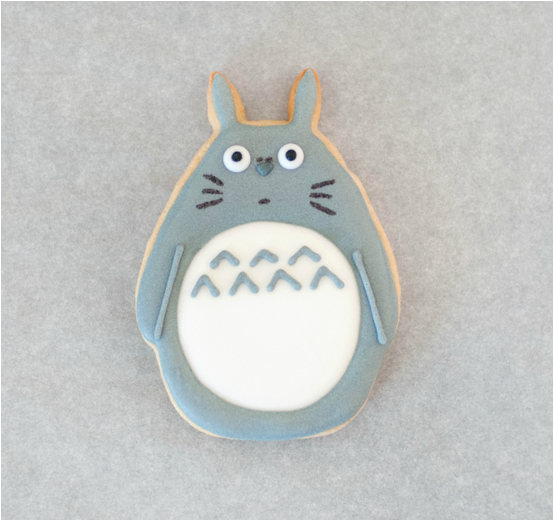 Then piped the white round eyes and while its still wet put a tiny black dot in the centre of the eyes to give him the wide-eyed look. Then add his little triangle nose in the middle. Lastly, we draw his whiskers and a tiny mouth line with black edible marker :) Taadaa....one cute Totoro! 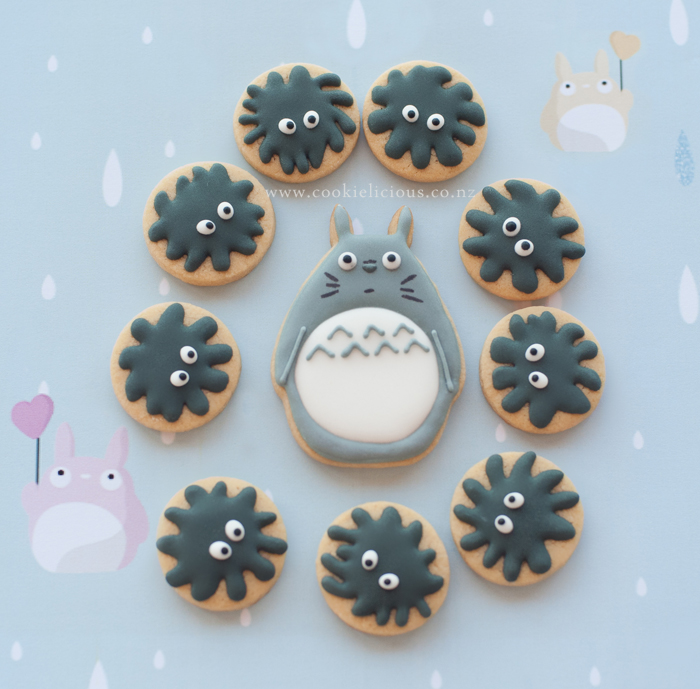 Next is the cute and super easy Dustbunnies :) All we did was piped a random splatter shape on top of the cookies and fill it with dark grey icing. Let it dry. Then lastly piped the white eyes and put a tiny black dot with black icing in the center of the white. 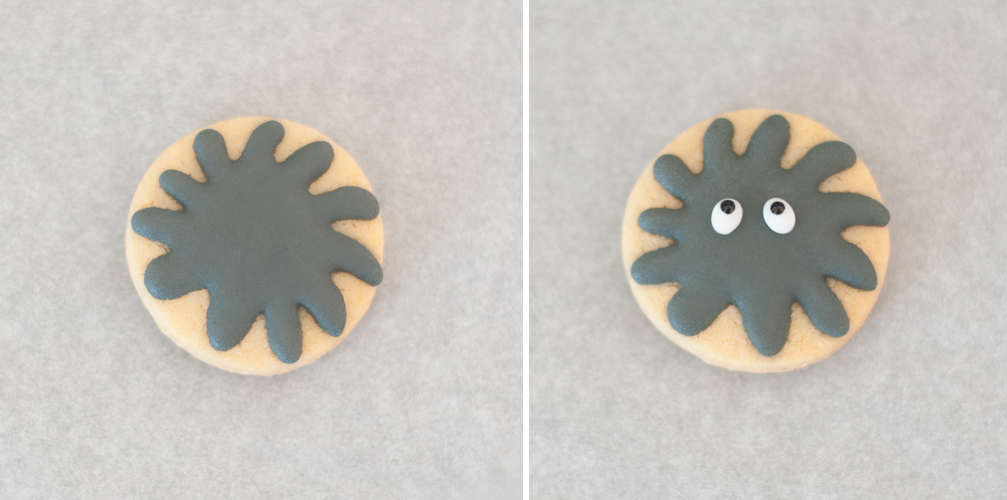 Here are all the dustbunies together, they are such cute little black fuzzy things :P 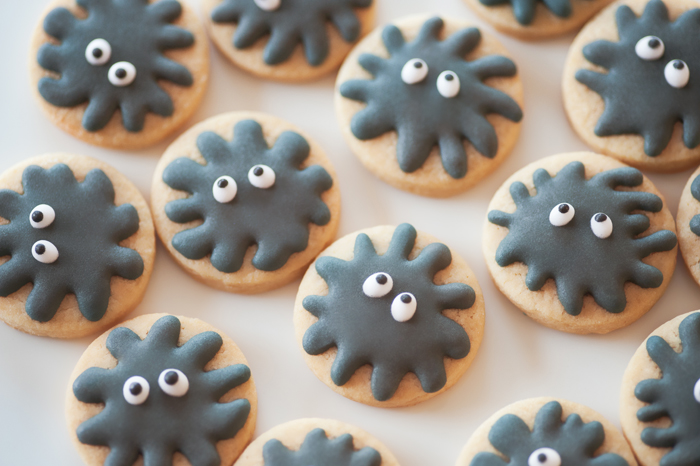 That's all we did....super simple and easy, and super fun to make :) 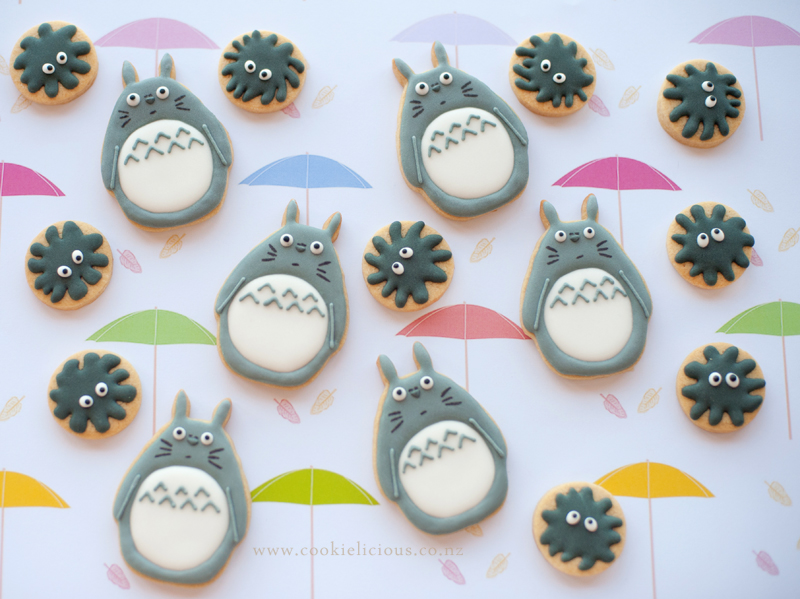 Here is one cute Totoro in his packaging, complete with the dustbunnies :) 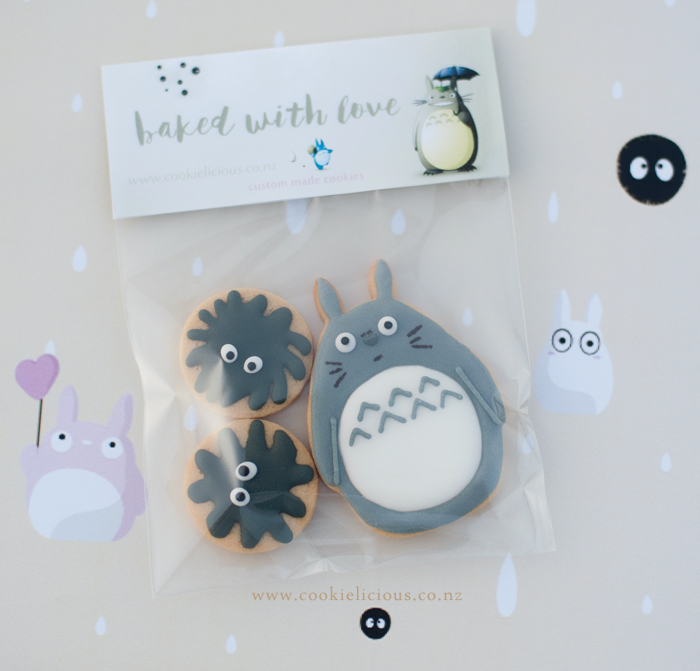 Hope this will encourage you to try and make these cute characters ;-)  Our family enjoys watching Ninjago, but my boy specially loves them so we decided to give him a surprise and made him a set of Ninjago: Masters of Spinjitzu cookies :) We decided to include Lloyd the green ninja as he is the leader of the ninja & also Sensei Wu, the ninja master & trainer.  So let me give you a bit of a background story of these cool characters, the original ninjago was the 4 ninja with their master trainer. Cole (Black Ninja) - the Earth Ninja Kai (Red Ninja) - the Fire Ninja Jay (Blue Ninja) - the Lighting Ninja Zane (White Ninja) - the Ice Ninja Sensei Wu - the Ninja Master & Trainer The green ninja - Lloyd Garmadon comes a bit later on, he is Garmadon's son, Sensei Wu's nephew and also the First Spinjitzu Master's paternal grandson. His destiny as the Green Ninja was revealed at a young age and he was destined to defeat the Dark Lord in the Final Battle as the Ultimate Spinjitzu Master. So now that you know all that stuff, you will understand why its appropriate to include him in our Ninjago set of cookies :) Unfortunately because we don't have a cookie cutter for these guys, we decided to use an egg cutter and trimmed the sides and do a bit of molding at the bottom of the cookie dough to get them into the shape we want. 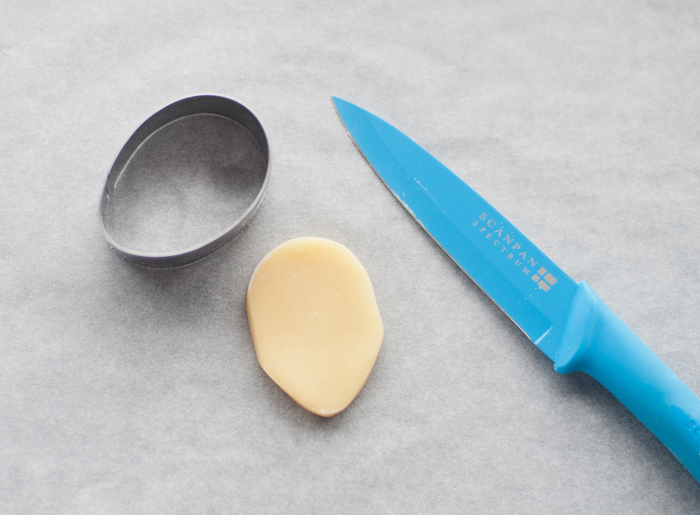 Start off with a yellow icing to create the eye area as shown on the cookie below. We marked off the eyes area with edible marker as we are not great at doing it free-hand. 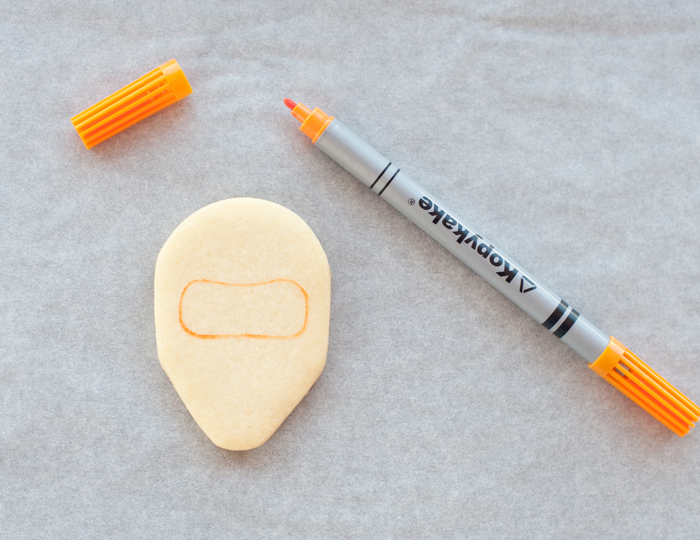 Fill the eyes area with yellow icing and let it dry. Then fill the rest of the area with icing of the ninja colour (black, red, blue, white or green) and let it dry.  Then pipe the eyes with black icing, and while the black icing is till wet, we put one white nonpareils to create the white iris. If you don't have any nonpareils you can also use a tiny white icing to create the same look. Wait for at least 10mins for the eyes to dry a bit then piped the eyebrows. Let it dry. The last step is to create the lines on their mask to give the impression of wrinkles in their mask and some definition around it. Repeat the same steps for all the other colour ninjas. 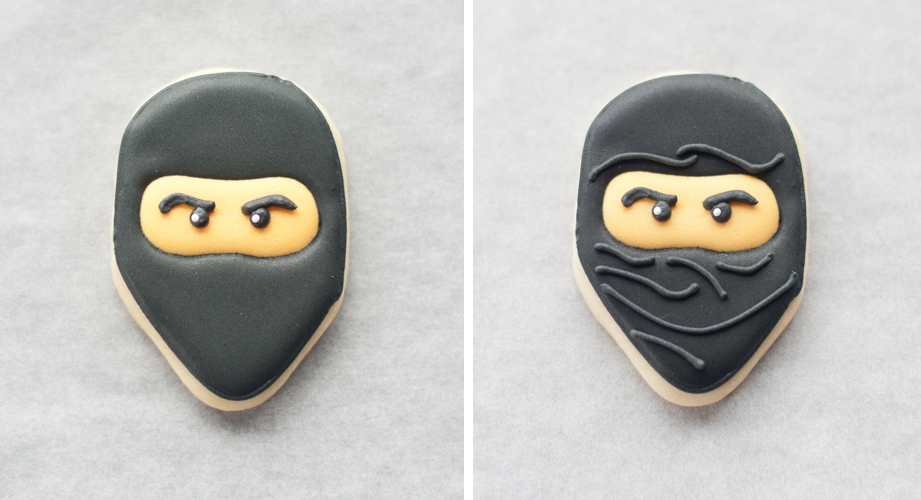 For Sensei Wu, we had to hand-cut his shape using a paper template. Start the decorating process by filling the top triangle area of his hat & his beard and let it dry. Then fill his face area with yellow icing and let it dry - see photos below. 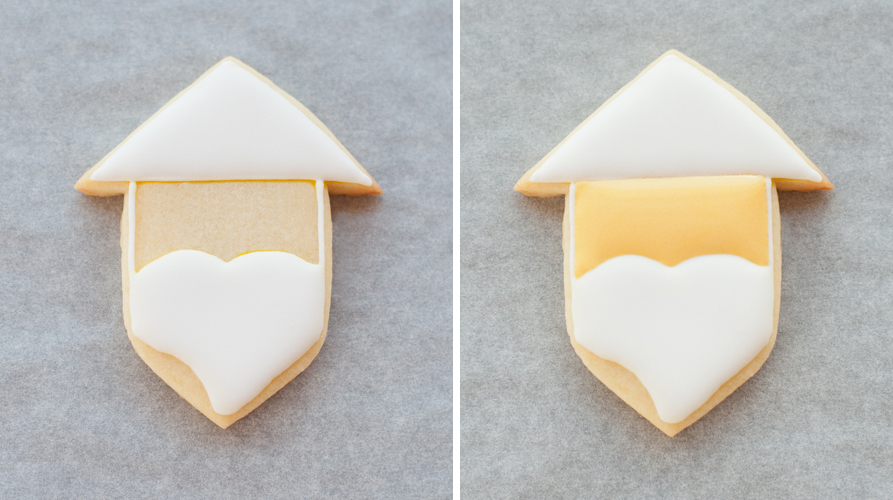 While we are waiting for the yellow icing to dry, we can pipe a yellow icing on his hat to give the look of the straw hat that he wears as well as the two lines in his beard area. 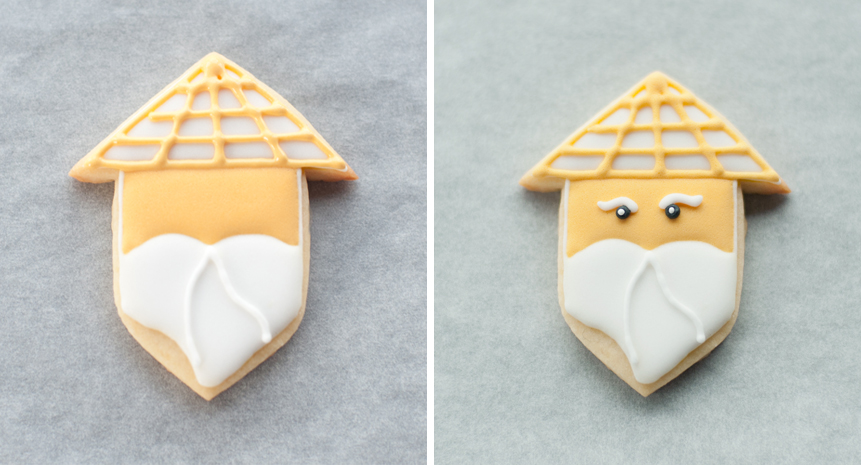 That's all, they are pretty simple to make and we love these cool ninjas :) 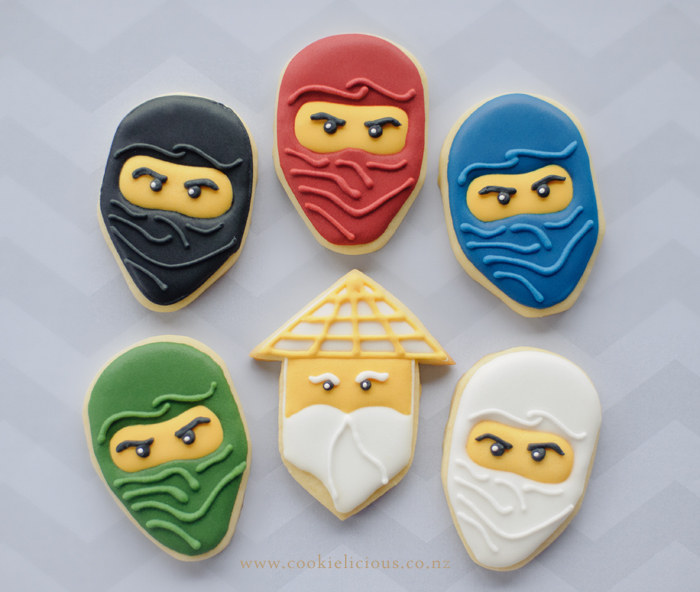 Here is my boy with his favorite ninja - Kai the fire ninja ;-) 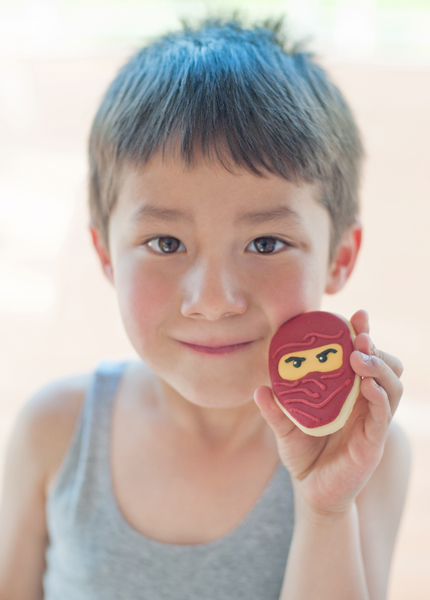 Have a great day everyone! One more sleep and then bring on the weekend! ;-)  Ever since I saw the post on Lisa's blog at Bearfoot Baker about how to make girl bat cookies i have always wanted to try making them. The only problem is that we don't have the airbrush tool that made the cookies look wayyyy cool... so unfortunately we have to make do without it. Another thing that we also cannot get in New Zealand is the chocolate covered sunflower seeds....she uses it to make the fang on the bats, so we had to get creative in replacing them :) If you want to see Lisa's original tutorial, you can find them HERE. The ones we made without the airbrush, doesn't look quite as polished as Lisa's but we still like them anyway, we thought they look pretty cute & sweet :) 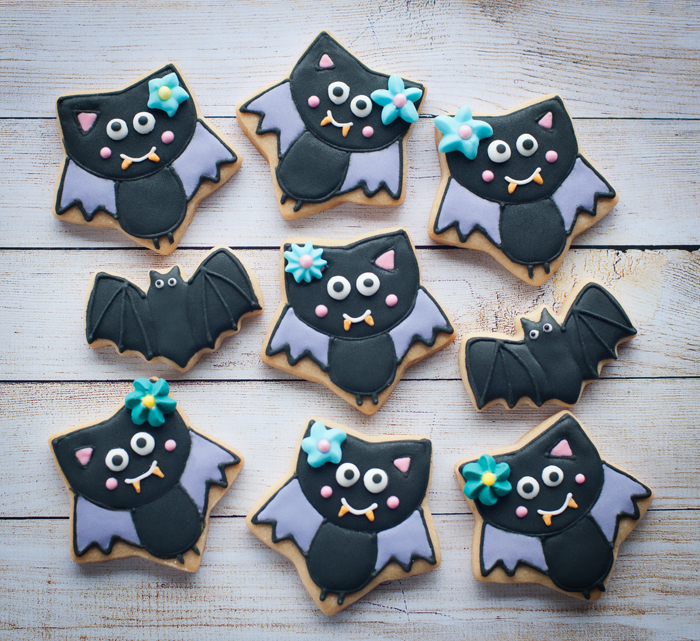 These bats were made using a simple star cookie cutter, anyone has a star cookie cutter right? The first thing we do after the star cookies are cooled, is to mark the areas we want to decorate with edible marker. You can do them free-hand like Lisa's tutorial but we are not so good at doing that, so we play it safe and we marked the head and body areas with edible marker :) 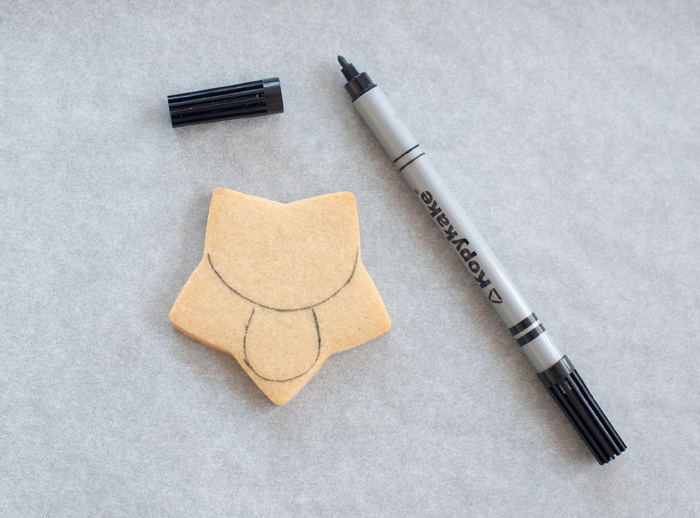 After we finished marking the cookies we outlined the areas with black outline consistency icing. When the outline is done, start off with filling in the ears with pink icing & the wings with purple icing. 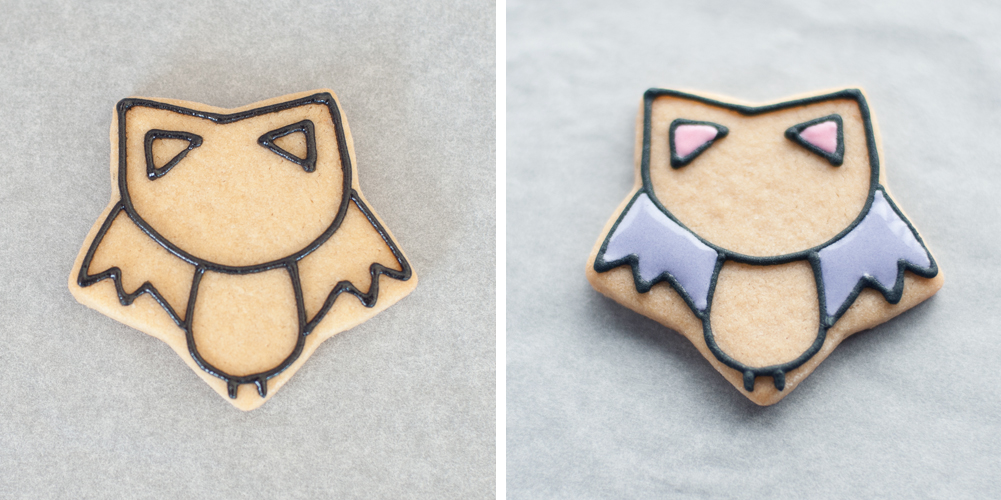 The next step is to fill the body & head area with black icing and let it dry. After the black icing is dry add the eyes (we use royal icing eyes - Lisa also have a tutorial on how to make them) and the royal icing flowers. Now this is the different part from Lisa's bat cookies, since we cannot buy chocolate covered sunflower seed we tried piping-in the fang on its on and it looks a bit odd to us, so we decided to add a mouth with the fangs and also add in pink cheeks to make it even more girly :P 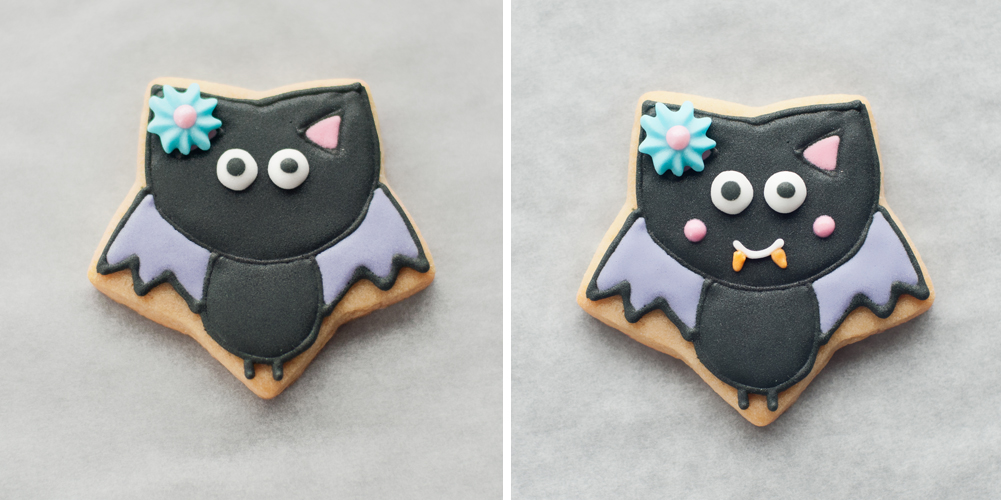 As you can see, the wings and ears area were not airbrushed and they don't look as fancy as the airbrushed version, but the kids still adore them and what you can also do is turn them into a cookie pop, all you need to do is glue them on a stick using royal icing, like the way we do it with the other bats i posted yesterday HERE. 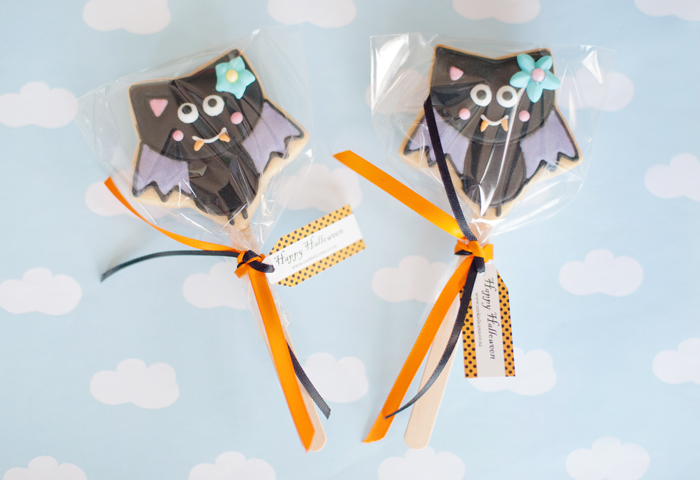 So there you go, either have them as normal cookies or turn your girl bat cookies into cookie pops :) Hope everyone is having a fabulous weekend! ;-)  Two blog post in one day....i think that is definitely a record for us :) We just wanted to share simple Halloween cookies this time :) 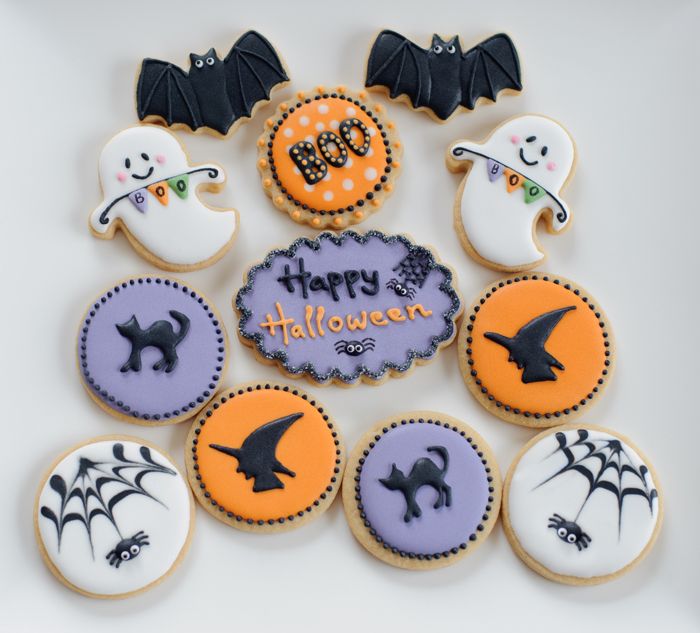 So you've seen the ghost and the bats from our previous blog posts. The ones we have not share are the plain round cookies and the spider webs cookies. The round cookies were very simple, you just need to iced them with any Halloween colour, either orange or purple or even black icing if you want to, then let it dry for a few hours. When they are ready you can attach any royal icing transfer on top as a black silhouette. For these set of cookies, we made a witch silhouette and a black cat silhouette. After the royal icing transfer dries you can then attach them with some royal icing. Then the last step was to pipe the black dots surrounding the cookie :) 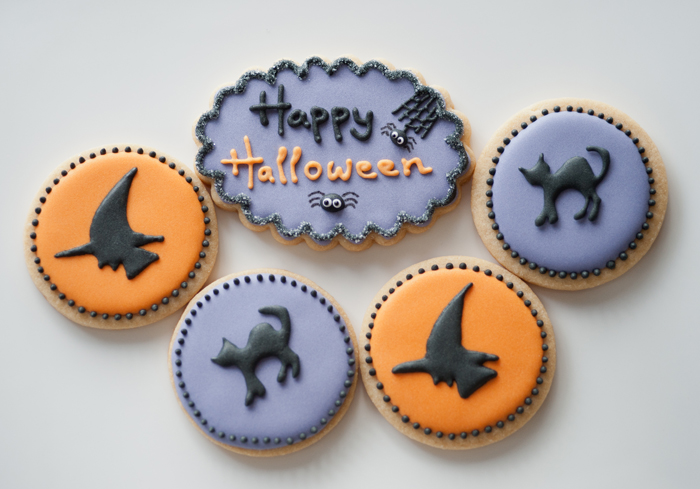 The other set of cookies that we have were the spider web cookies, they were made with "wet on wet technique". We didn't get a chance to take a step by step photos for them, so sorry about that. We simply iced the cookies with royal icing, for ours we choose white & green. Then while the icing is still wet draw either a few full circle or 3 half circles then drag the icing from the outer point into the middle with a toothpick or a scribe tool to create a spider web look. Then let it dry. 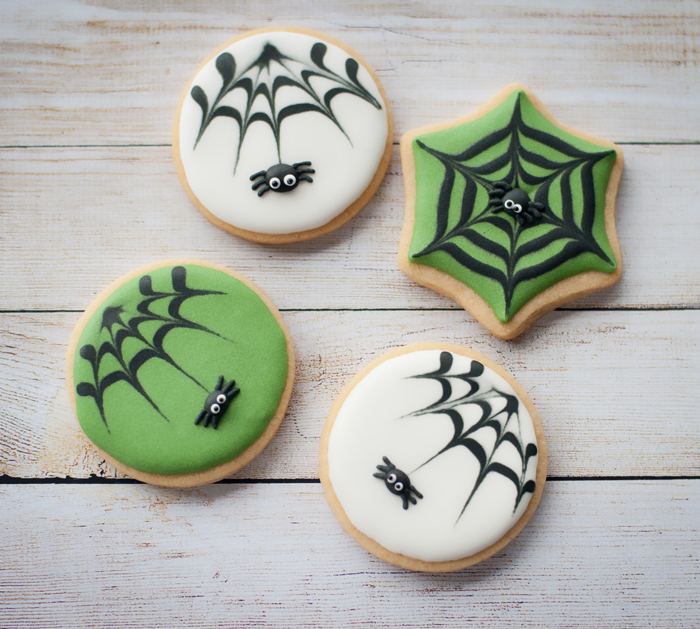 After the base icing colour is dry then add the little spider on top, put a blob of black icing for the body and let it dry for a few minutes and then add the spider legs. We waited a bit longer before putting the eyes on the spider because we want to make extra sure that the black icing were dried completely as we don't want any colour bleeding into the white eyes. 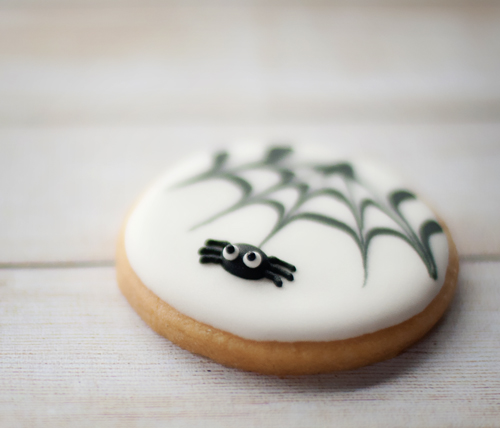 With the green spider webs, we put a few black circle while the icing are still wet and then drag the icing from the middle to the outer part of the cookies with either a toothpick or a scribe tool. 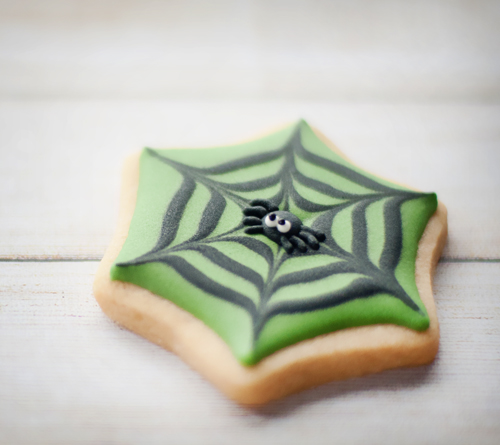 Okay, that was all the Halloween cookies we have today. We are really sorry that we completely forgot to take a step by step photo of how to make them. I did try to explain how to do them on my post, hopefully that's clear enough :) Here is one last photo of the spider cookies in their packaging. 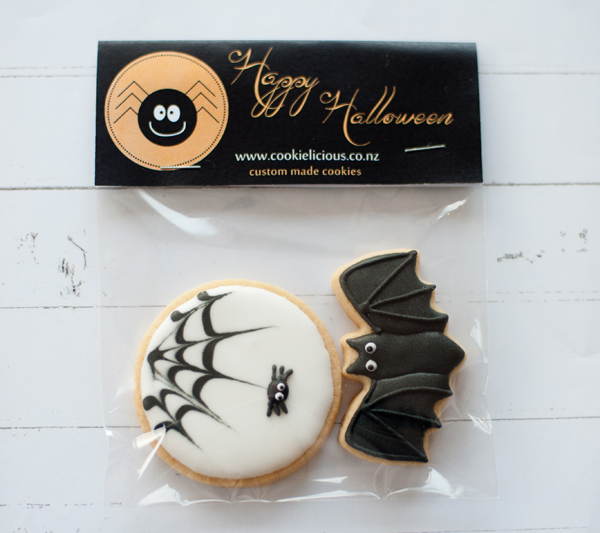 Happy Halloween everyone and enjoy your spooky weekend! ;-)  |
About MeCookie Artist & Content Creator, who loves spreading the cookie love. 

Archives
February 2020
Categories
All
|
 RSS Feed