
|
My daughter's school Principal is leaving her school, and both my kids are so sad because they really like their Principal. Today is the last day of school and Claudia has specifically requested to make her a special cookie package to say thank you and to show our appreciation for what she has done for their school. We searched for some inspiration of what to make and we found a set of Teacher's Appreciation cookies at the Cookie Connection website that we really love. The set was made by Jackie and was posted on Cookie Con, thank you for the inspiration Jackie :) Its the usual set of pencils, ruler, apples, crayons and a plaque cookies in the middle. We thought the whole set looks really amazing so we set out to make the same set. This is probably as close as we can get it without having an airbrush tool or a projector to make the set.  We didn't take a tutorial photo for all of the cookies but my favorite cookie was the short stubby pencil so we took some photos on how to make it :) We didn't have a cookie cutter for it, so we cut out a paper template and use it for both the pencil and the blue crayons. Start by piping the pink eraser at the end and the top part of the pencil as pictured below. Then add the orange or yellow icing (both colour works well) to the middle of the pencil. 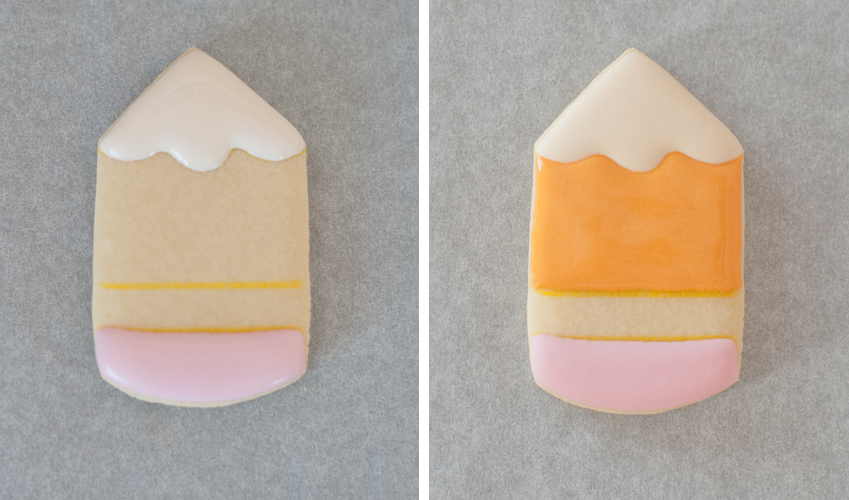 The next step is to add the grey area in between the middle of the pencil & the eraser. Wait until the the grey flood icing is dry and add the squiggly lines to create the look of the eraser holder. Then add the lines in the middle of the pencils to create the pencil groove and colour the tip of the pencil with a black edible marker. See picture below. 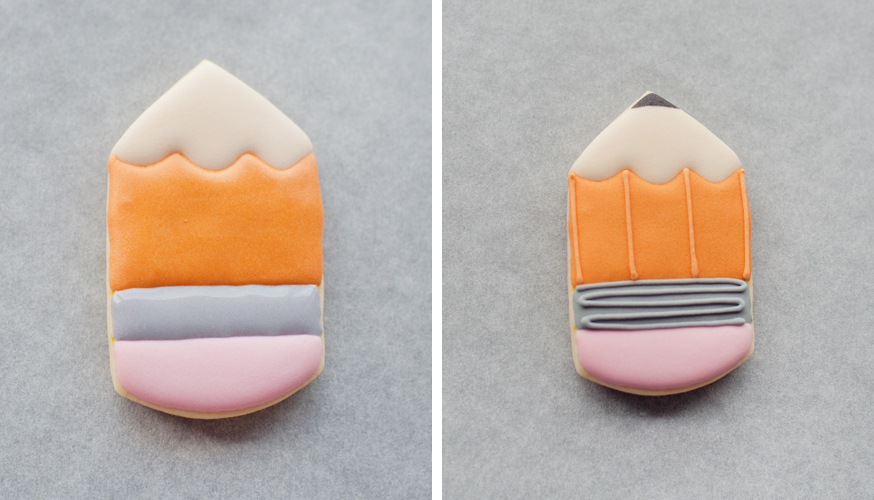 Creating the plaque was quite tricky without a projector, so we trace the letters into a baking paper and using a needle tool or scribe tool mark the letters on top of the cookie to create the outline of the letters. Its really hard to describe and unfortunately i didn't get a chance to take a photo of the process, but i will do it the next time we have do this again :)  We packaged it up inside a gift box we have prepared for her. Here they are ready to be given to the School Principal. I hope she likes them and enjoys them :)  Have a great week everyone! Its only 10 more sleeps until Christmas, i hope you have done all your Christmas shopping so you can just sit back and trelax next week ;-) 
0 Comments
I almost forgot to post these cuties :) We made them for a friend's birthday as a gift. Because of time constraint we wanted to make something quick and simple, but still cute so we these were our choice :) 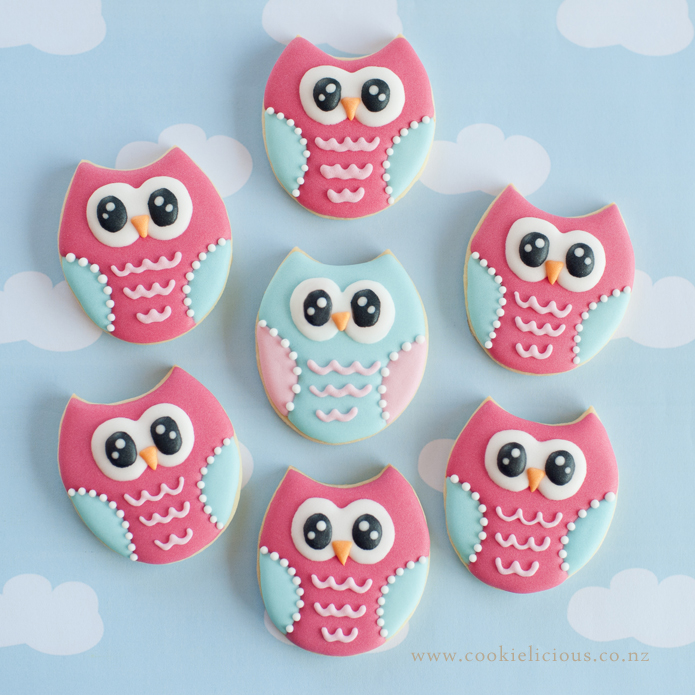 These were made from a simple egg cutter. I think there is already a tutorial by Sugar Belle. However we made it even simpler with the eyes and I'll go over a few quick steps here. With an egg cutter you just snip off the top part with the egg cutter to create the pointy ears. Then mark off the area for the wings with an edible marker.  Then fill the body area with 20 second icing, you can choose any colour you like....we decided to go with pink here, let it dry. Then fill the wings area with blue 20 second icing, let it dry again. 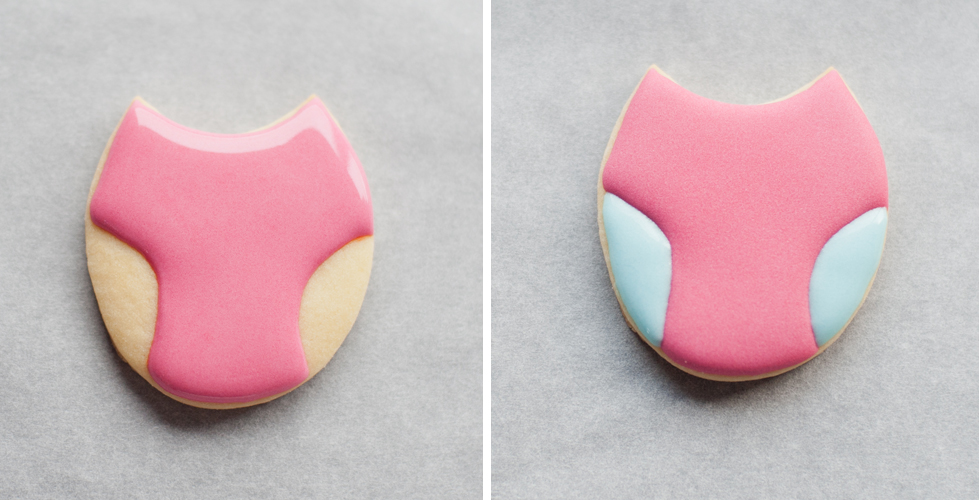 Once the pink icing is dry, piped a white flooding icing to make the bottom of their eye shape & let it dry - see picture below for a clearer visual. Then piped a black flood icing on each eye area, while the black icing is still wet, add 2 white dots to give a definition for the eyes. Let it dry. 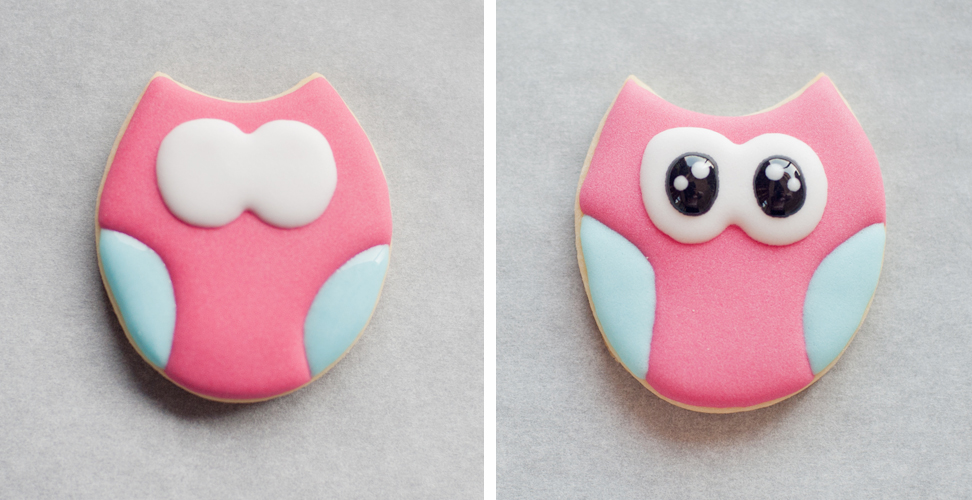 Once the eyes are dry, then we can start piping all the little details. We added the beak with orange icing, white dots around the wings with a piping consistency icing, then lastly the squiggly lines in the middle of their body to add the fur. We used light pink 20 second icing for the squiggly lines in the middle. 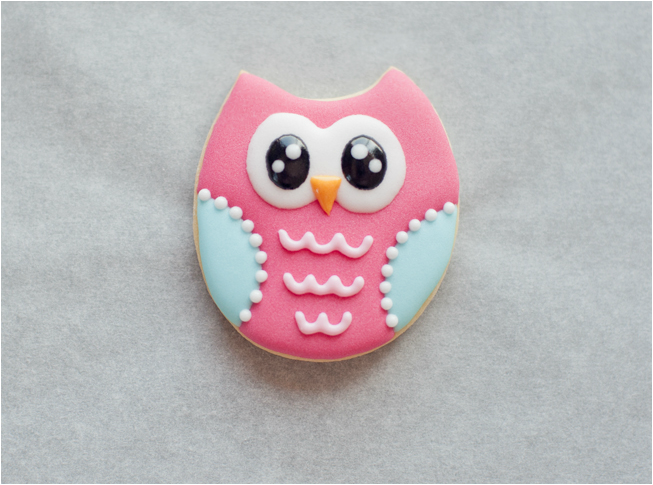 So there you go, simple & easy :) Hope this encourages you to try making these cuties ;-) 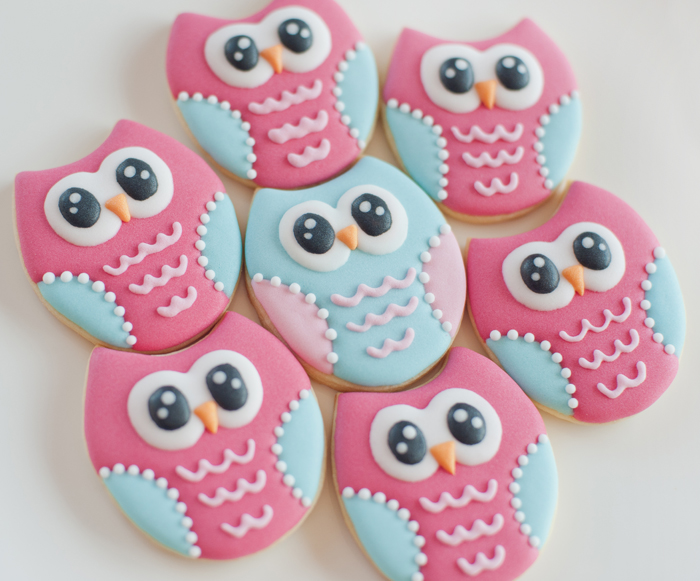 Hope everyone is having a great start to the week ;-)  I'm fortunate to be a member of a group in Facebook with all the other Cookier in Australia & NZ. So one of the ladies in the group organized a "Kris Kringle Secret Santa" between all of us cookie decorators. It was pretty intimidating to create Christmas cookies for someone who has been at this a lot longer than i have, but it was also exciting at the same time coz i will be receiving cookies from one of them too, yay! So looking forward to receive mine :) My secret Santa recipient has received hers yesterday, I've got the talented Laura from Cookie B Mine, so that means i can post my cookies here :) This is part of the set I made for her. I decided to make mocha flavoured cookies instead of the usual sugar cookies, i really hope she likes them! *fingers crossed* 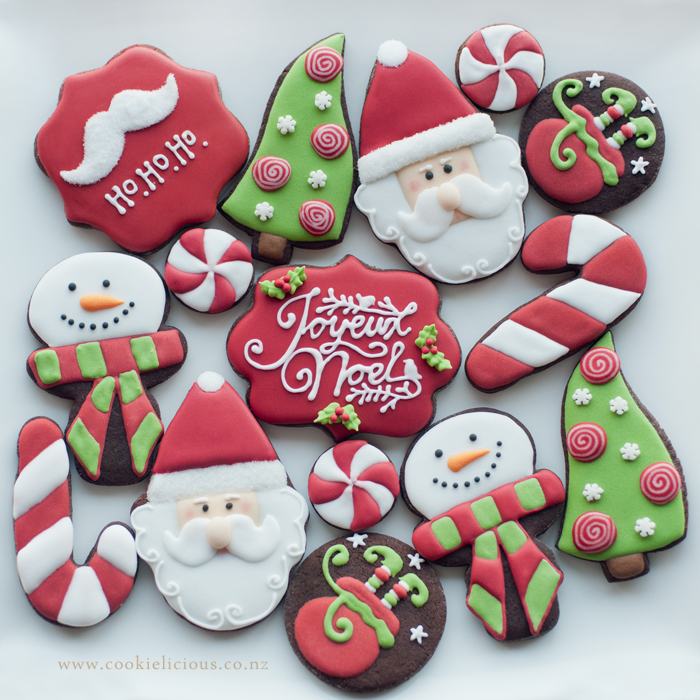 I didn't have an actual Santa cookie cutter so i searched online for an alternative and found a tutorial in Haniela's site to use an ice cream cone cutter to make a Santa. So that's what i did here :) 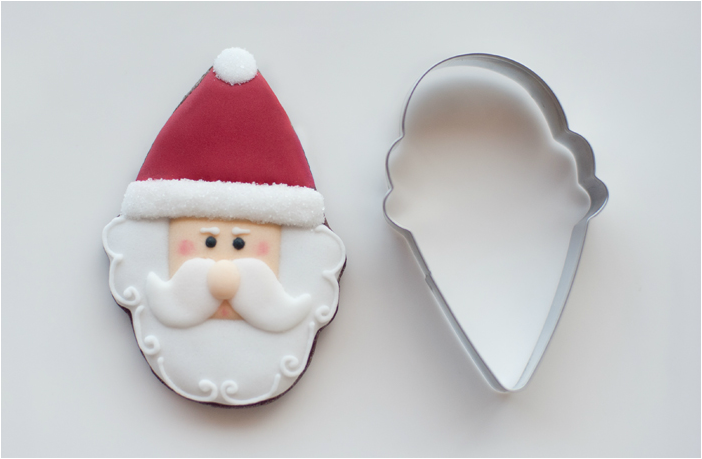 We also use a full body snowman cutter to make a snowman head with a Christmas scarf. This was a tutorial from Sugar Belle :) 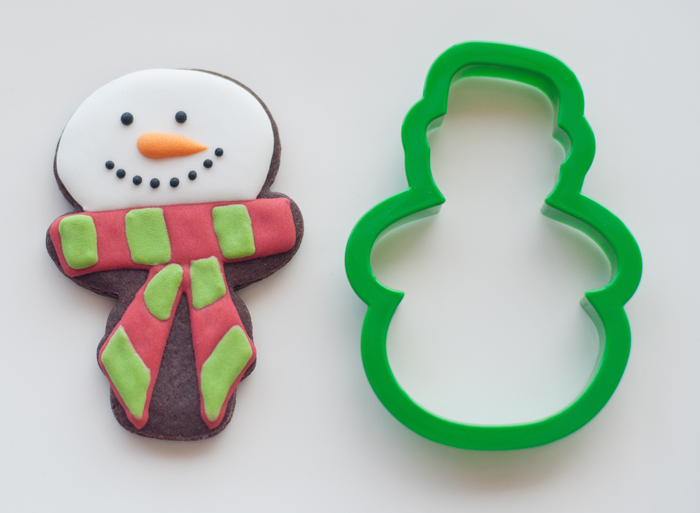 Because all the tutorials have been done by others, we didn't take any tutorial photos for any of these cookies. My absolute favorite was actually the red plaque in the middle with the writing "Joyeux Noel". I didn't own a projector so i had to use baking paper to trace the writing on to the cookies :) 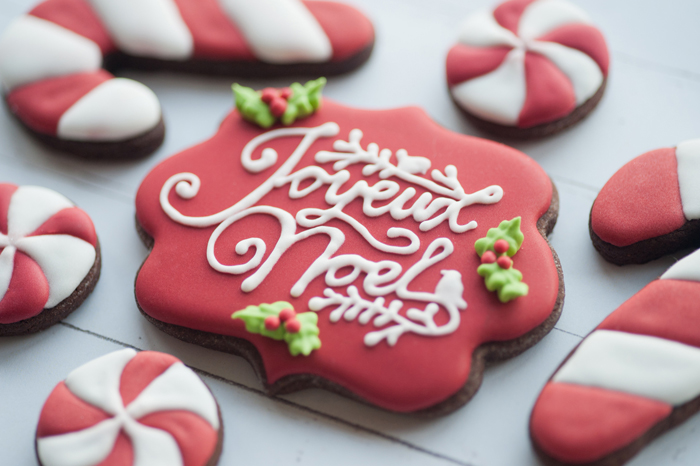 Here are a closer look at some of the Santa & Snowman cookies :) 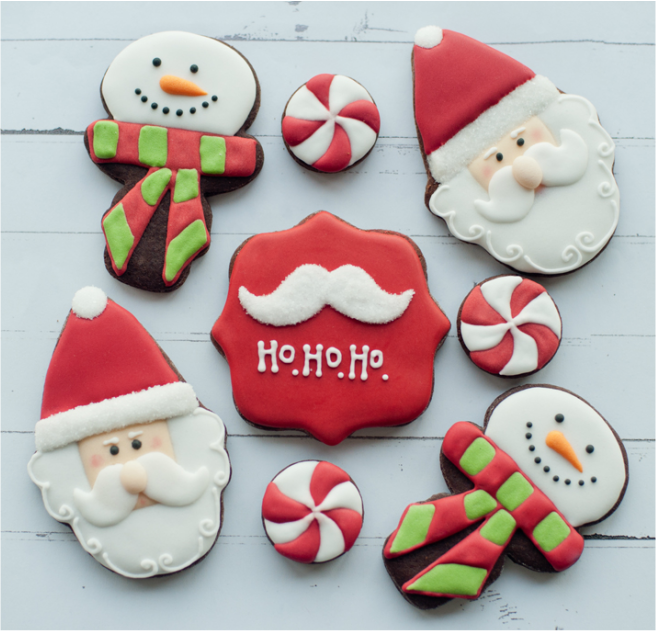 Christmas Trees and elf in a sack :) 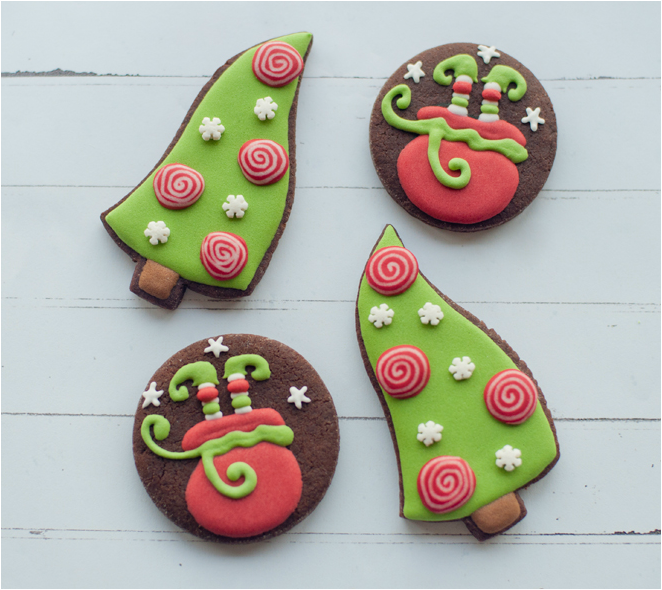 I really hope Laura likes them and also like the mocha flavour of these cookies ;-) Merry Christmas to Laura & her family! 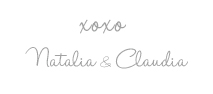 I have been wanting to try making these cookies for a while. When i saw some gorgeous dresses cookies in pinterest, I can't quite remember who the original poster was, however they just inspired me so much that i want to try making some too :) The problem is that i dont own the cookie cutter so i had to hand-cut the dough, you might see some are a bit wonky as i had to hand-cut them without the proper cutter. They are quite simple designs but so much fun to decorate :) I want to do more different designs on these dresses so I finally decided to buy the cutter for this dress shape, just to make it easier to do more in the future :)  I was having so much fun decorating these cookies that i totally forgot to take any photos of the decorating progress. They are pretty simple designs anyway so im sure its pretty easy to see :) Instead I'm just gonna show you the close up photos of each dresses, just for funsies ;-) These three dresses are my favorite :) 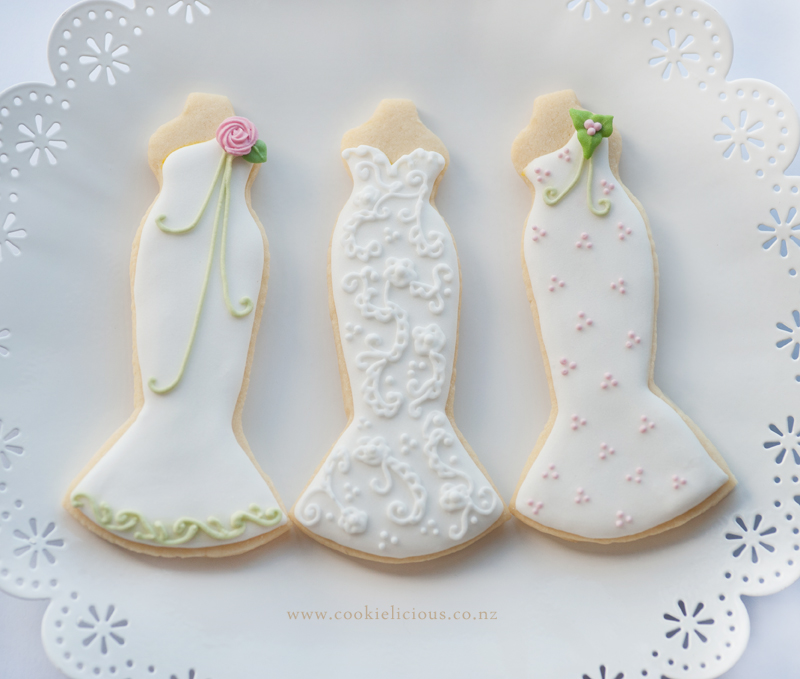 I tried some texture on the bodice of this dress and i also dusted some pearl dust on it but unfortunately it doesnt show up really well in photos.  This dress is actually my least fave dress, i think its because i messed up the polkadot a bit and it wasn't quite perfect, but i still like the colours and the simple style :) 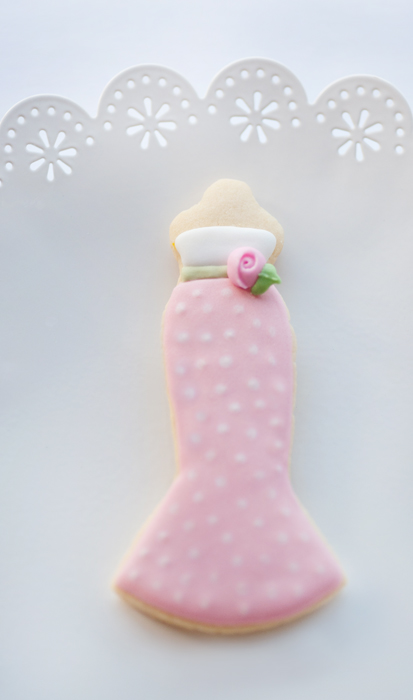 So that's all i've got to share this week. Happy to say that the sun is out and its lovely out there. Lets hope it stays until the weekend! Have a great week everyone! :)  These fan were made for a lovely lady whom I just recently connected with from Instagram & Facebook. She is so talented in her work, she creates cookies as edible art and im so blessed to have her as a friend. She has a wealth of knowledge and experiences that she shares with me and they are really invaluable to me. If you have some time, i would highly recommend checking out her work, Ibicci NZ So we have made these fan before when i first started getting into cookie decorating. I posted some photos here. So glad to see that my piping skills have improved since then :) 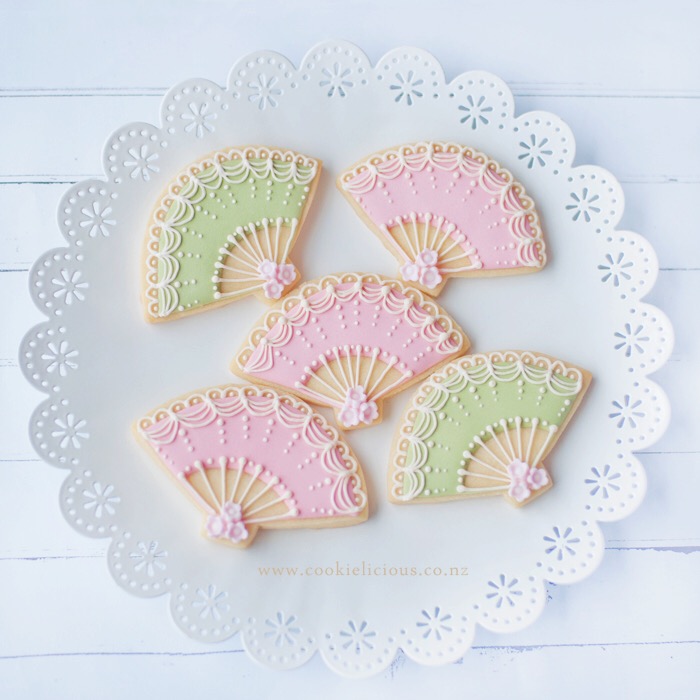 The original design was inspired by Sweetopia, they are not incredibly hard to do but you will need to have quite a small piping tip and the right consistency icing :) Start with the base of the fan, fill the cookie with a flood consistency icing as shown in the picture below. Let it dry for a few hours and then start piping in the lace details. We use tip #1 and a stiff consistency icing for the lace detail work. 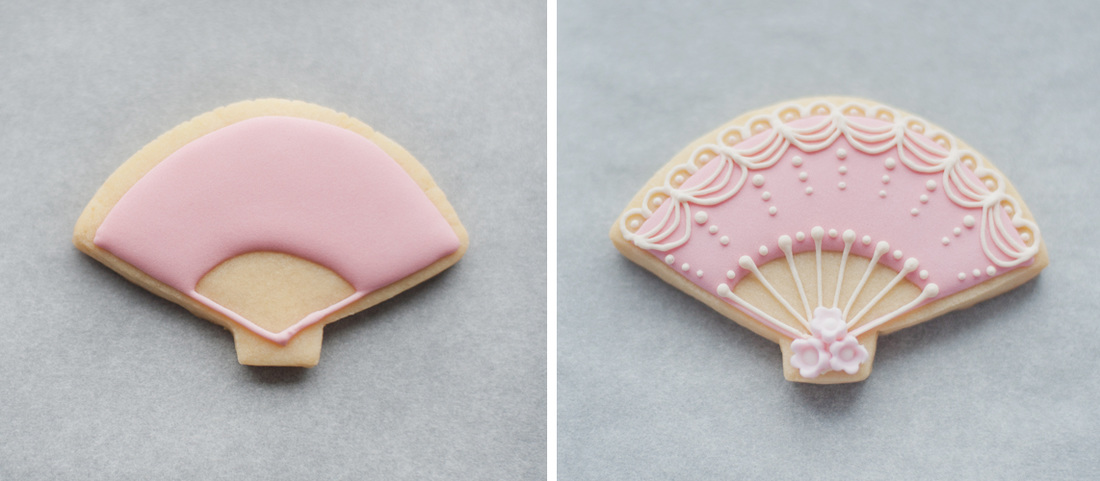 Unfortunately we dont have the right size sugar pearl to add into the lace design. The 4mm sugar pearl was too big for this small dainty fan :) Here is a closer look at the cookies... 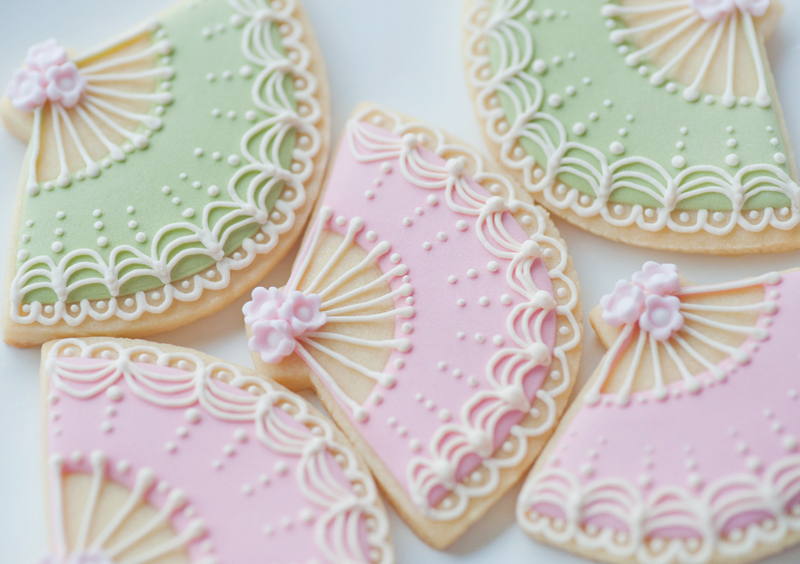 Have a great weekend everyone! :)  Today is my daughter's birthday. She is turning 11 today and so incredibly excited to have her party this weekend. She was already up before i left for work early this morning at 6.30am :) That should show you how excited she is because she is usually still snooring away and her dad has to wake her up a few times in the morning lol :P She has specifically requested to have an Owl theme party as she is really into owls right now. So we have been busy creating owls goodie bag as well as owl party favours for her party this weekend. She has also given me a drawing of what she wants her birthday cake to look like, so i will be posting her drawing along with the finished cake this weekend. In the mean here is the cookies we made as part of her party favours.  I wasn't sure how we want the owls to look like from the cookie cutter we had, we can make all sort of different kind of owls....so we made a little sketch of what we thought would look cute :) 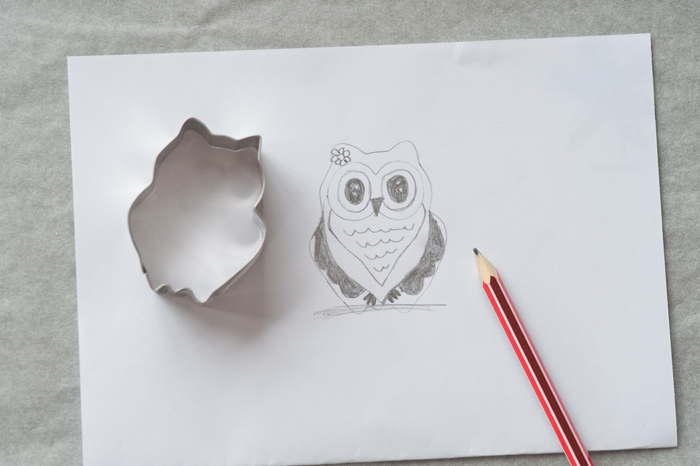 As you can see, we didn't ended up putting a flower on the owl but it doesn't really need it anyway :) So we start off by trimming the bottom of the owl. We didn't like how the cutter was uneven...the right side of the feet area was bigger than the left side for some strange reason. So we just decided to trim it off. See the photo below. 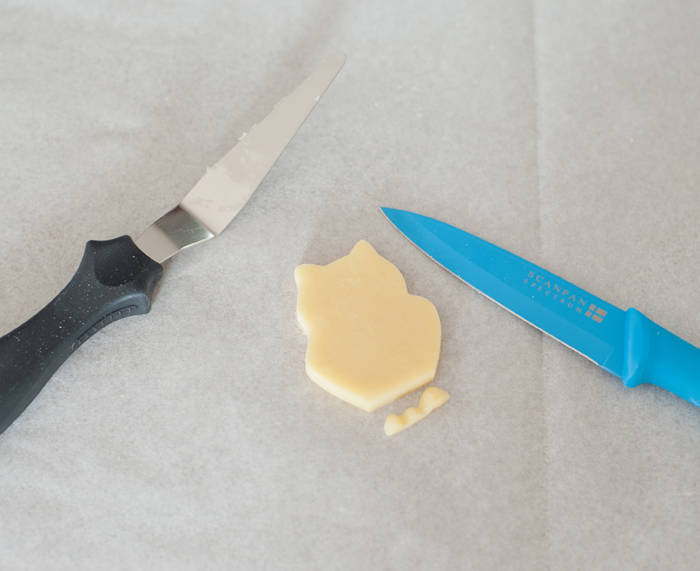 When the cookies were baked and cooled-off, start by marking the area with an edible marker. 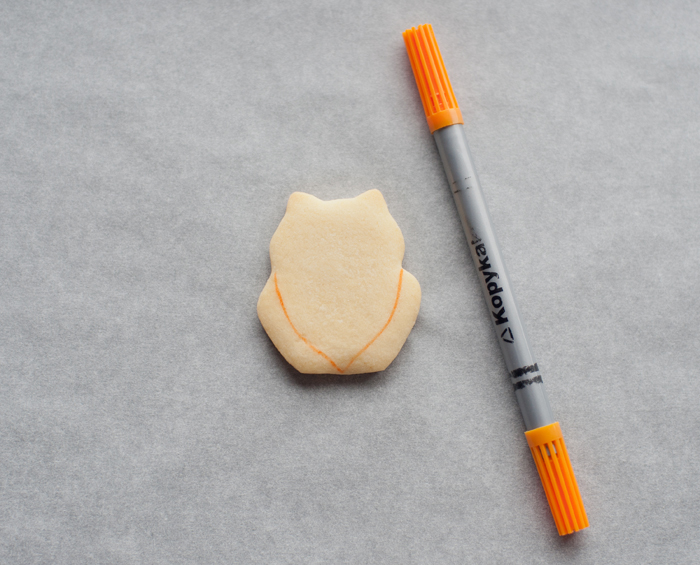 Once you have marked the area, fill it with dark pink icing. We used 20 second icing for this. Let it dry for an hour or so and then start piping in the wings with blue icing. Let it dry. 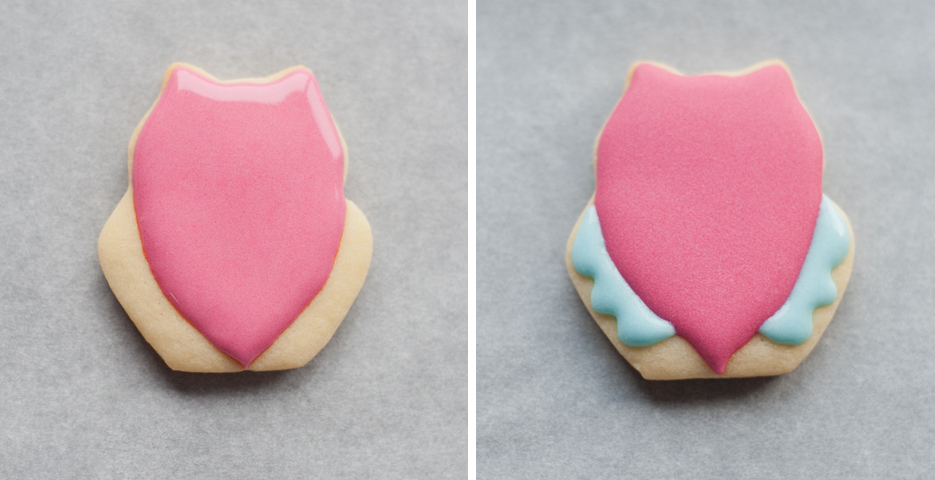 When the dark pink icing is completely dry piped the eye area with light pink icing, and let it dry. After the light pink icing is completely dry (we waited at least 4-6 hours for this one to avoid bleeding issues) start piping in the while icing and while the white icing is still wet piped the black icing on top and then put another white dots on top of the black icing while it was also still wet....got it? So its kindda a triple dip wet on wet :) Black icing on top of a wet white icing, and then white icing on top of a wet black icing, did i confused you? Yep, that sounded confusing even for me, but you know what i mean right? ;-) 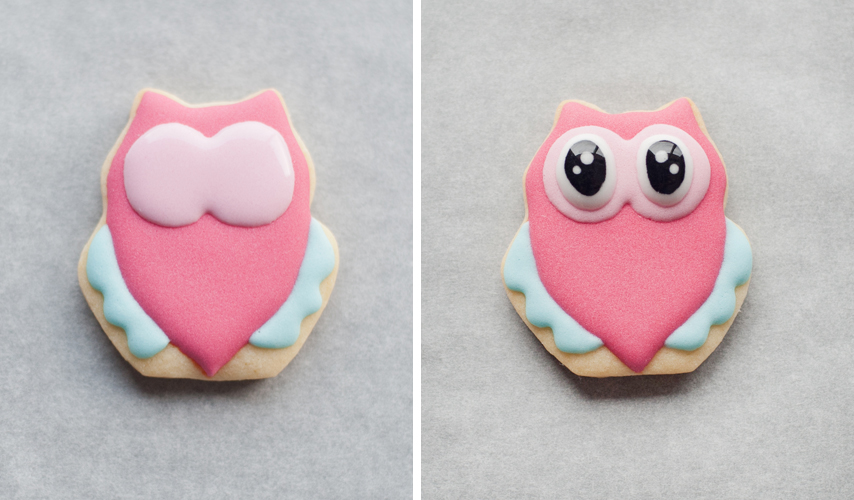 Okay, so you let the eyes dry and in the mean time piped the white chest area (as shown in the picture below) and let it dry. When the white chest area is dry, piped the details. We added the orange beak, and the little pink V on the chest area for the fur. Then using an outline consistency icing, piped a dark pink icing along the lines of the white chest area and also with an outline consistency icing, piped a blue icing on the outter edges of the blue wings. Lastly, add the owl's feet on each side of the bottom area using the same orange icing we used for the beak. 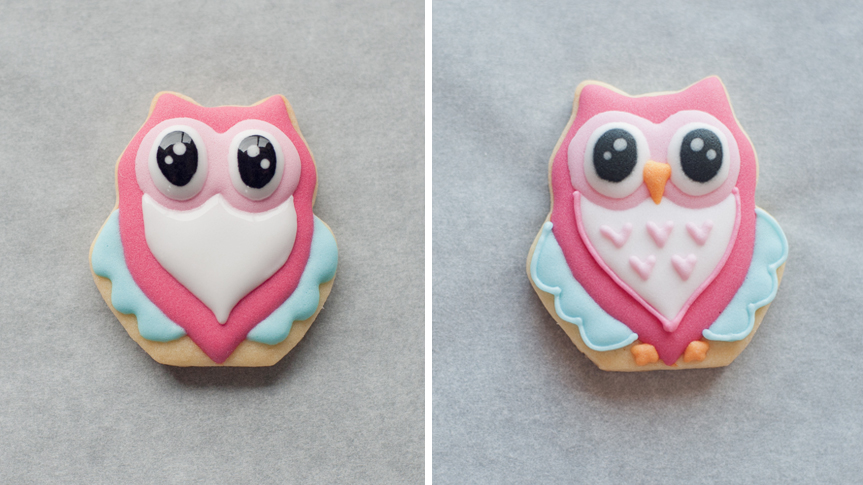 That was all the steps we did to make Claudia's owl. We decided to skip the flower on their ears, they dont really need it as there isn't much space on top of their head to put one without covering their eyes. But that's not to say that you can't put a tiny bow or a tiny flower if you want to do yours a bit differently :) Okay, so here they are ready for the party! 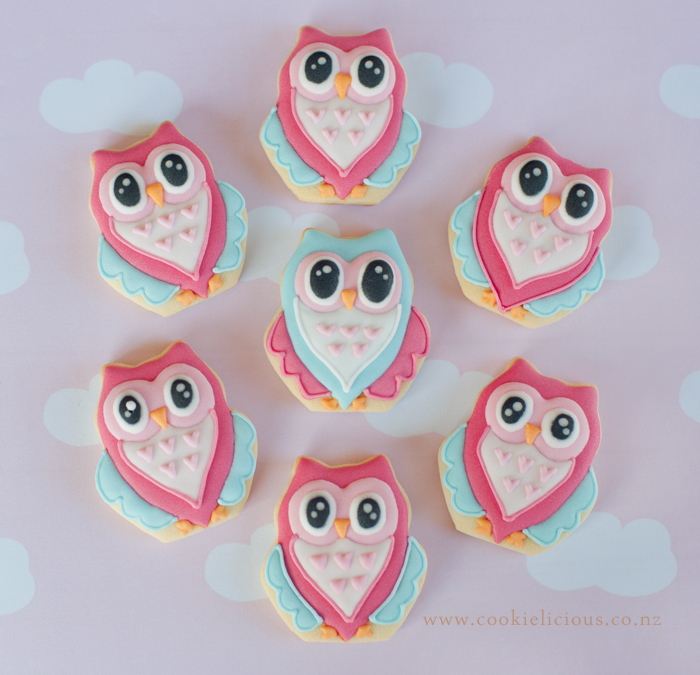 Oh, almost forgot that to compliment the owl we decided to make number 11 and heart shape cookies with a simple flower. 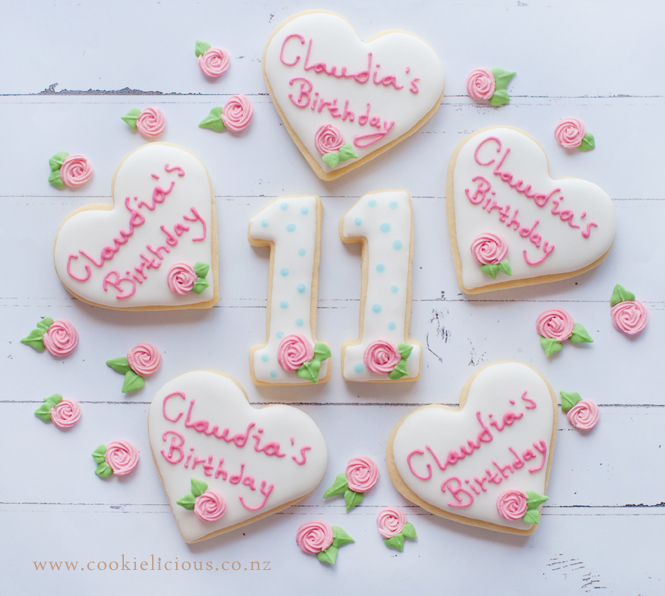 And here they are all packaged up, ready to go as party favours for her birthday party this weekend :) 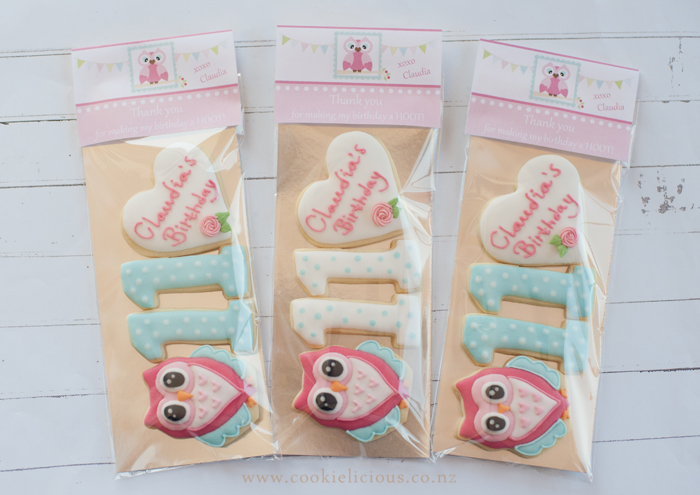 Well I just want to use this opportunity to wish my daughter a very Happy Birthday... she is growing up to be the kindest, loving, caring, and just an amazing young lady. We are so proud of what you have achieved and who you are becoming. We love you to the moon and back. Have a wonderful day sweetheart! ;-)
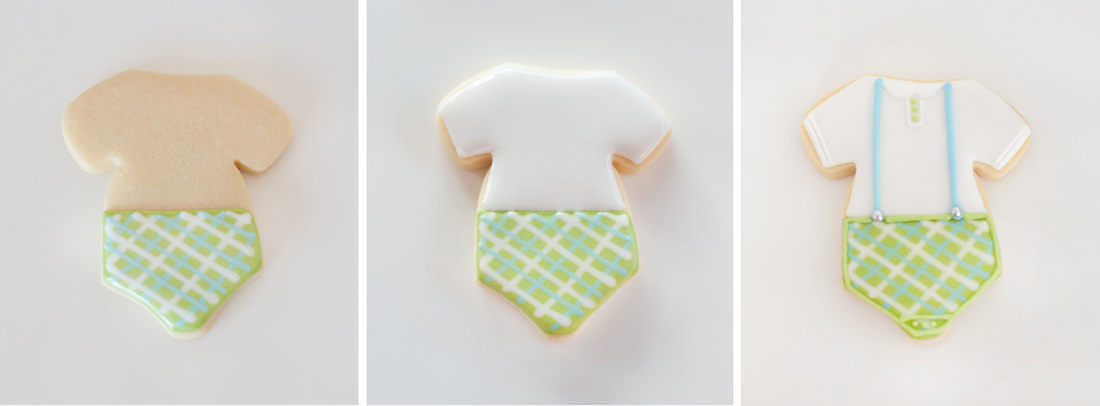
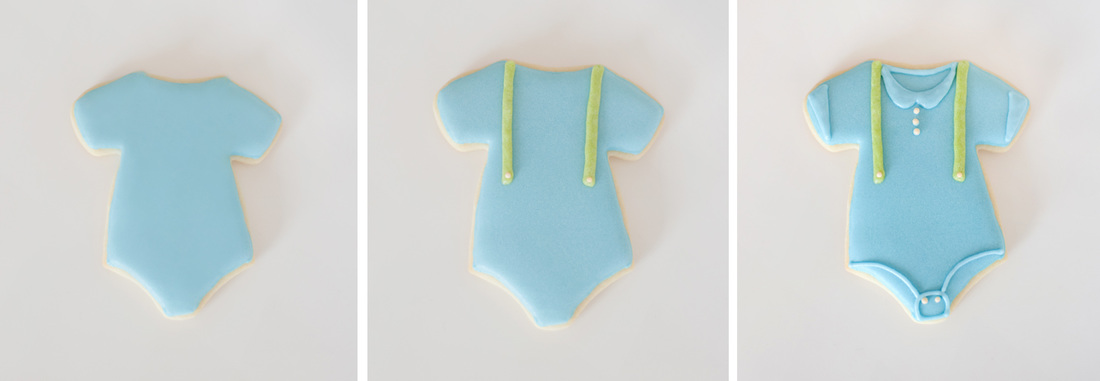
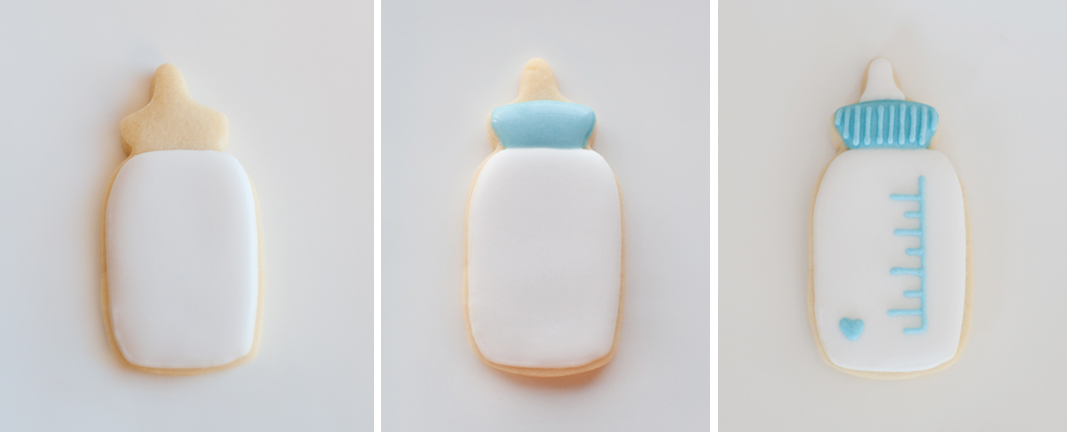
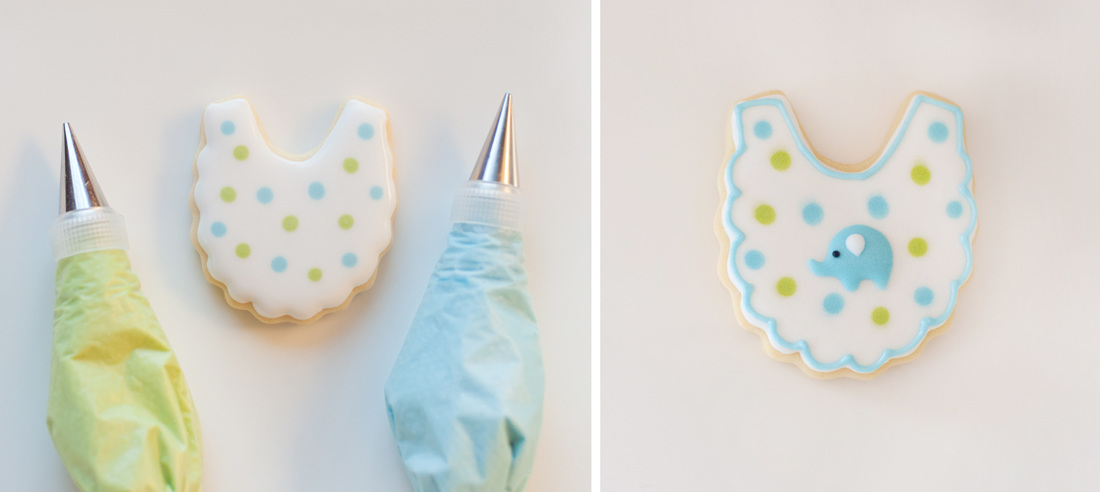
xoxo Mummy, Daddy & Logan :) Gosh we cannot believe how fast Christmas is approaching! We have not got our Christmas tree out yet and there are still a few things to get from our Christmas shopping list (read: have not started christmas shopping yet! lol). But aside from that, we attempted to get into the Christmas spirit by creating our first ever Christmas theme cookies. We have been wanting to create these cute Gingy for a while, they were inspired by a very talented lady from her Facebook Blog - Life's a Batch. Nicole is super talented, and seeing that its near Christmas, we thought its more appropriate to try re-creating these cuties now, so here they are :) 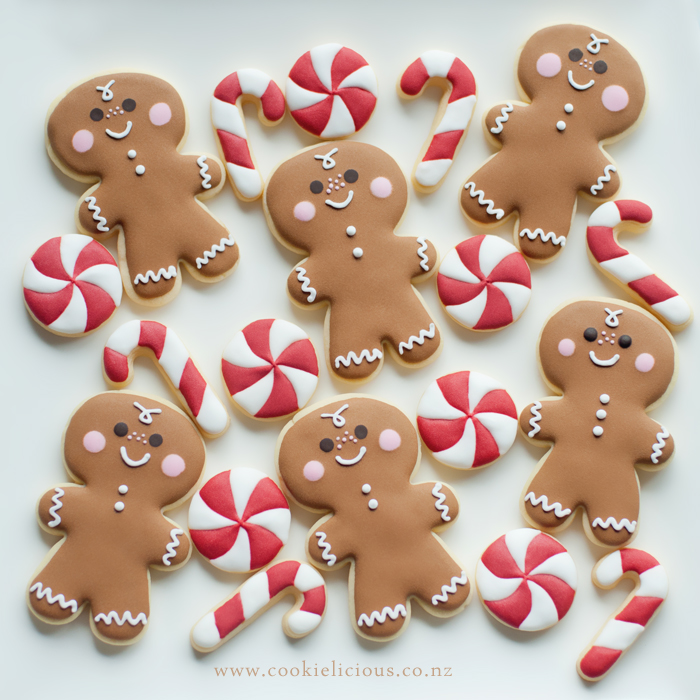 To make these gingerbread men, we start with using a cookie cutter that we already have, its made by Wilton and it came as a set, a gingerbread boy & girl and a candy cane cutter. BUT the gingerbread boy's head was bitten off, so we had to patch his head :) See picture below for a visual. 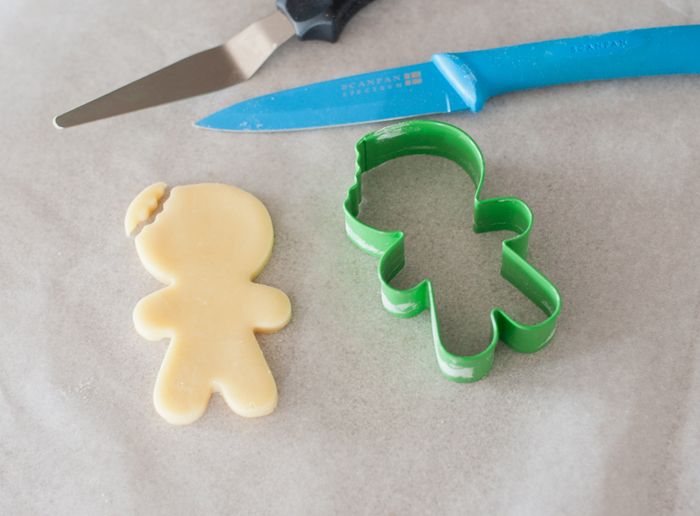 Once we patch his head and all the cookies are cooled, we start off by outlining and filling-in the cookies with brown colour icing. We used 20 second icing and tip #2 to do this. 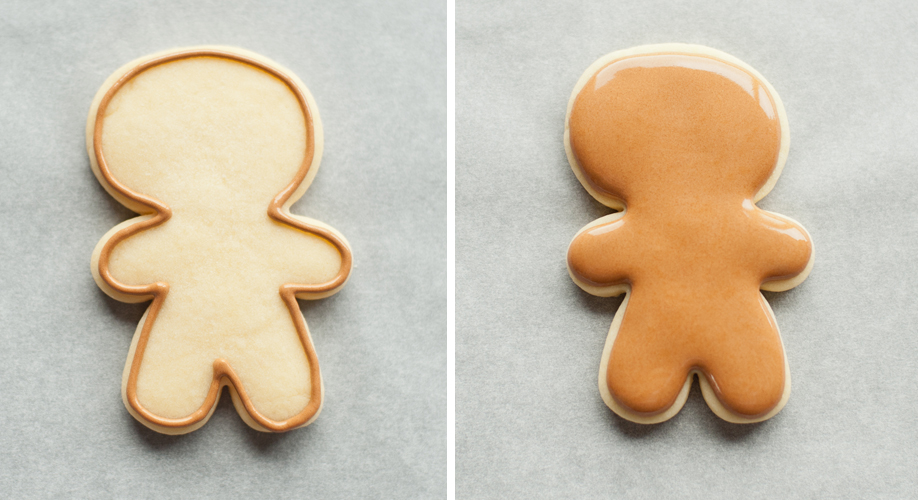 While the brown icing is still wet, piped his eyes with dark brown icing and the blush on his cheeks with pink flood icing. Let it dry. After the brown icing is dry, we add the freckles in between the eyes. We use the same pink icing as the blush on their cheeks. 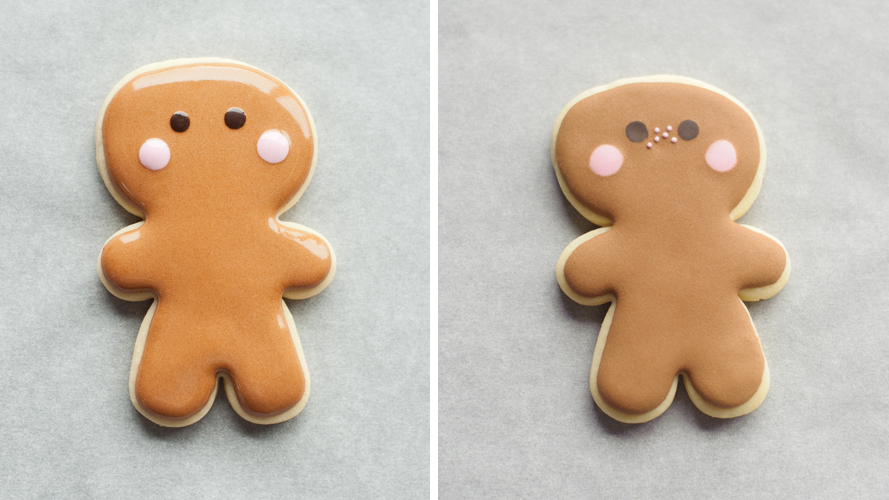 After the freckles, its time to add in their mouth and the white swirl on top of their head with white icing. When that's done, add two white buttons and all the squiggly lines on their hands and feet with the same white icing. 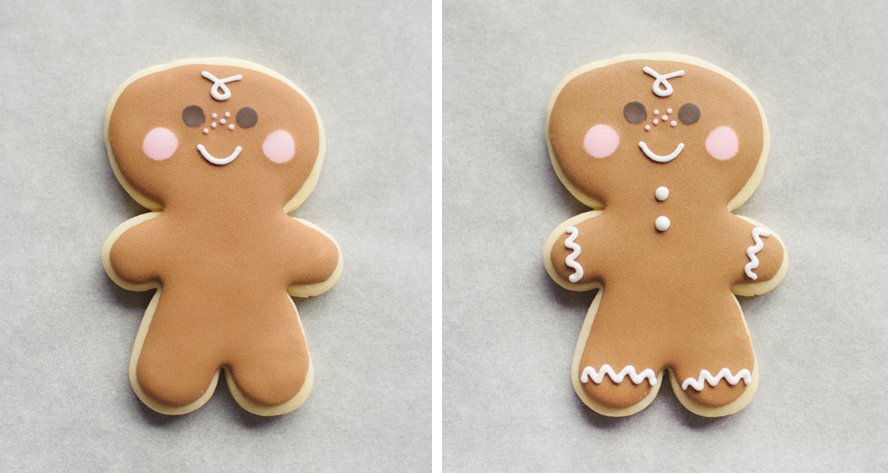 Here they are in a smiley group :) 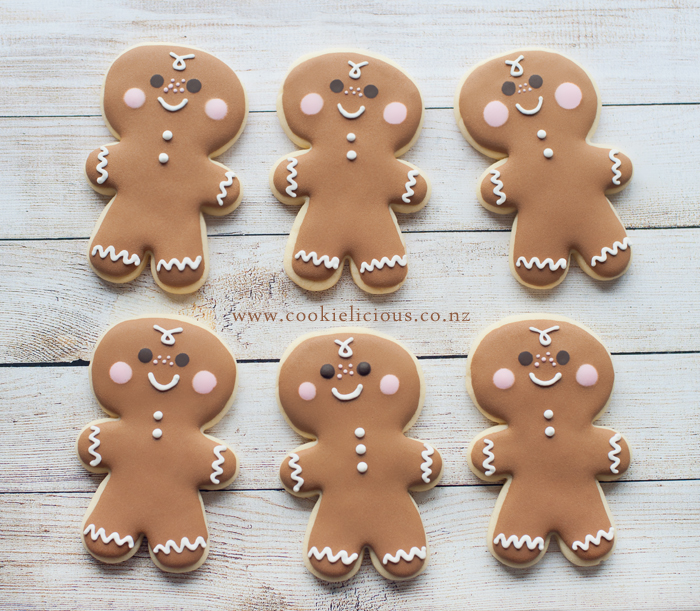 Next we make the peppermint candy cookies. We start off by marking the area, because we are not so great at doing any freehand icing work, its best to be on the safe side and mark it off with edible marker. Fill the alternate areas with white icing, and let it dry. After several hours pipe the red icing on the left over areas, we use tip#1 and 20 second red icing. 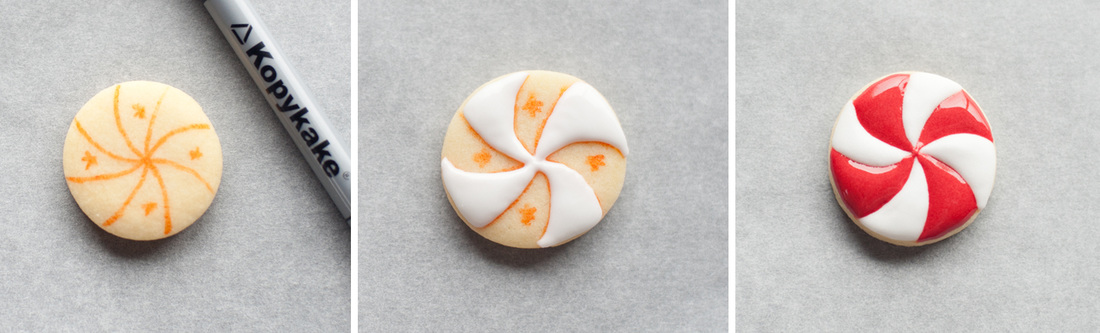 For the candy cane cookies, they are pretty much using the same technique as the one for the peppermint candy. Mark the areas with edible marker, fill alternate spaces with white icing, let it dry and fill the rest with red icing :) 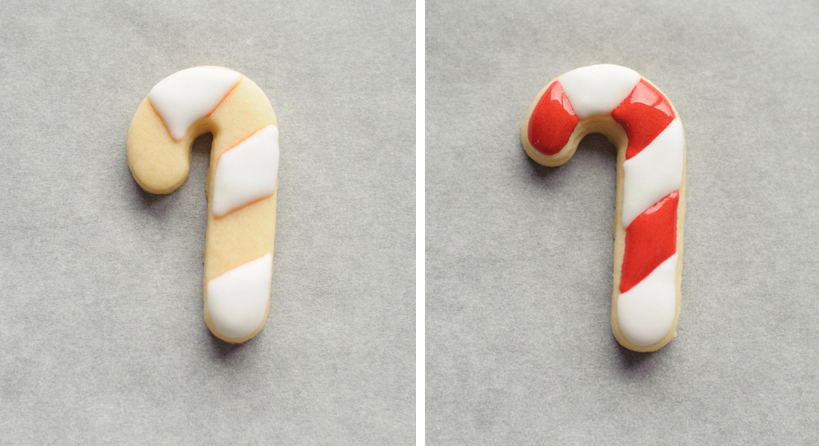 There you go, pretty simple :) And we made a whole bunch to go with the gingerbread man cookies :) 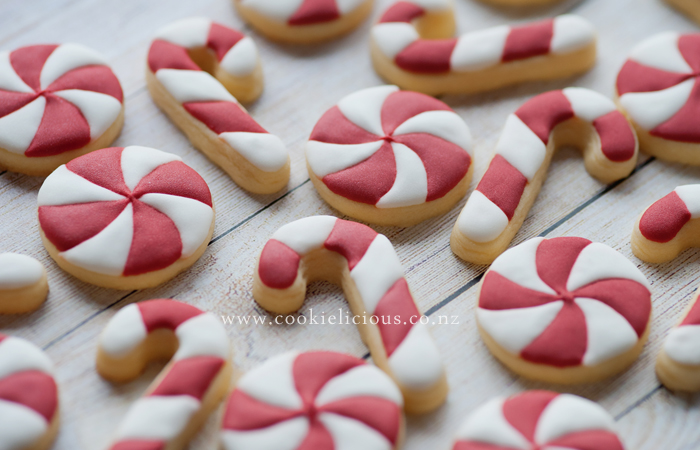 Okay that's officially our first Christmas cookies post this year. We are pretty happy with how they turn out, but hoping to do more Christmas cookies in December :) Lets hope we will get our Christmas shopping sorted out before December, just to make life easier for everyone :P 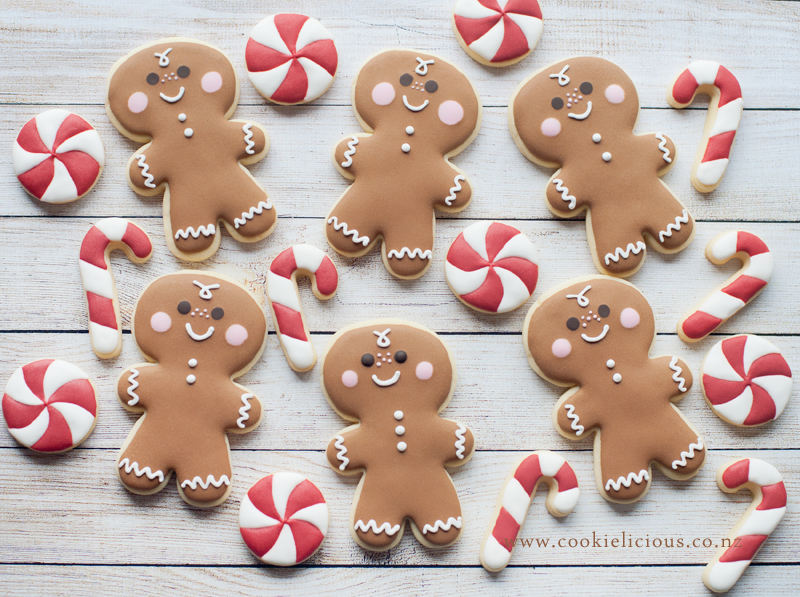 Have a great week everyone! :)  I have been wanting to try making these cute Totoro character for a while :) Totoro is the character in the Japanese animated film – My Neighbor Totoro. He’s a fuzzy, giant, furry, pointy-eared creature with wide eyes and a fantastic smile :) And of course we had to include the Dustbunnies, they are little black fuzzy things, about the size of a ping-pong ball. In Japanese, they were called "Makkuro Kurosuke" (a literal translation would be "Pitch-black Blackie") So when we finally got the cookie cutter from eBay so we couldnt wait to make these cute cookies! lol :) 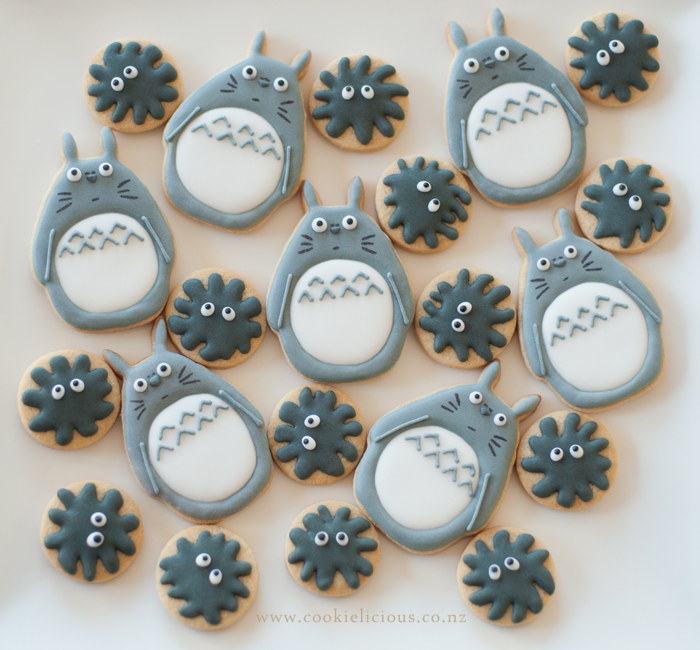 Okay so let go over how to decorate these cuties :) We start off by marking the area for Totoro's white belly with edible marker. 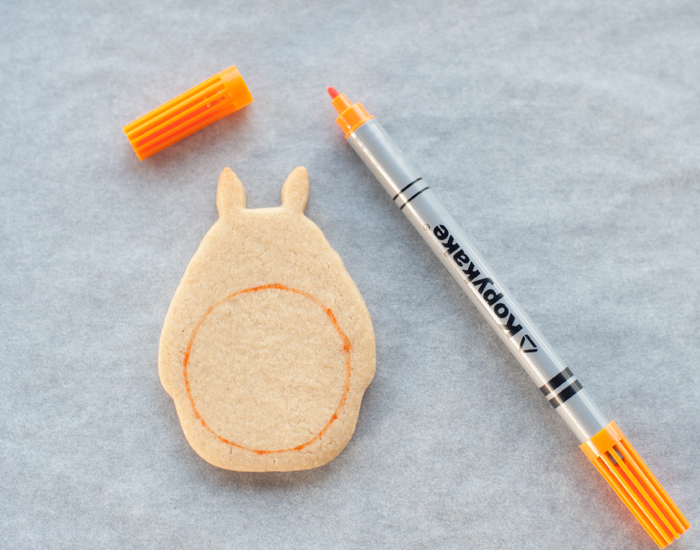 Fill the round belly area that you have marked off with white icing and let it dry. Then Fill the rest of the cookie with grey icing. Let it dry. 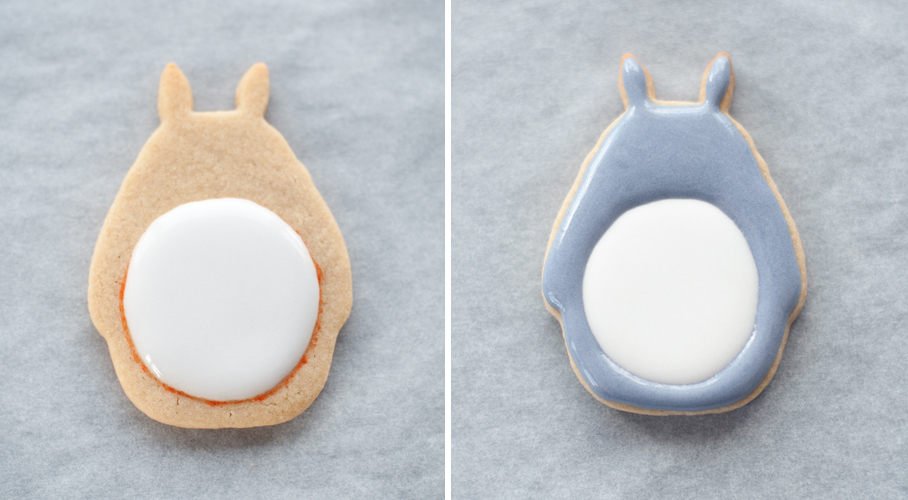 Next we pipe the little details. With outline consistency grey icing, piped a slightly diagonal line on each side of the body to give the impression of his hands on each side. then piped upside down V on his belly using grey icing. 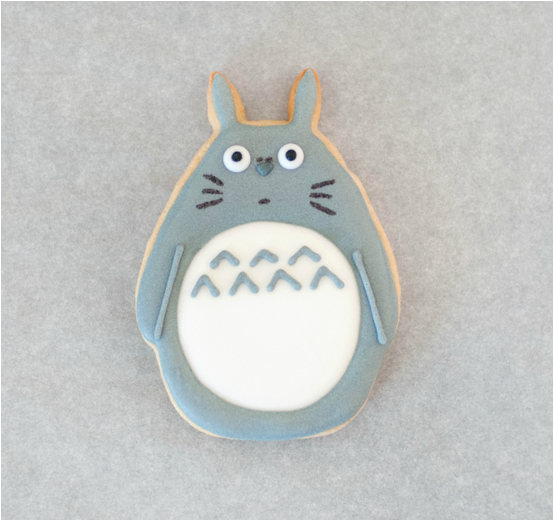 Then piped the white round eyes and while its still wet put a tiny black dot in the centre of the eyes to give him the wide-eyed look. Then add his little triangle nose in the middle. Lastly, we draw his whiskers and a tiny mouth line with black edible marker :) Taadaa....one cute Totoro! 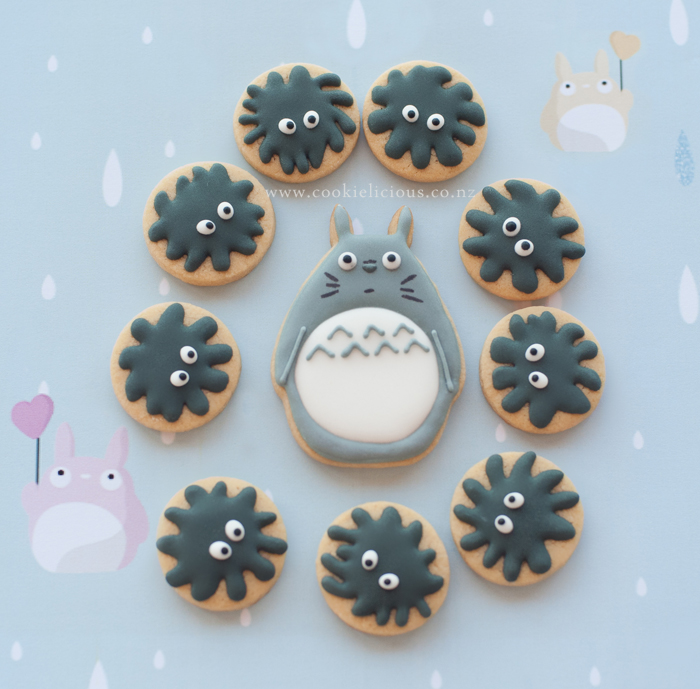 Next is the cute and super easy Dustbunnies :) All we did was piped a random splatter shape on top of the cookies and fill it with dark grey icing. Let it dry. Then lastly piped the white eyes and put a tiny black dot with black icing in the center of the white. 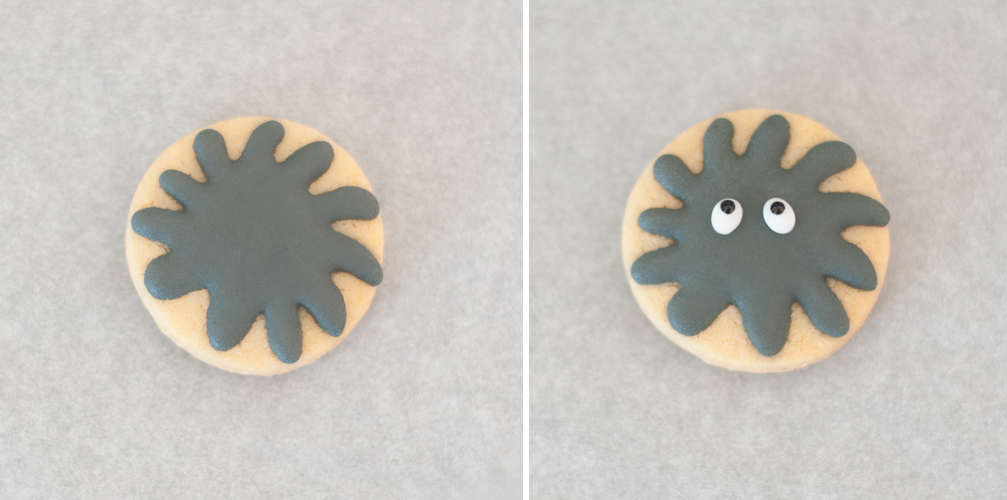 Here are all the dustbunies together, they are such cute little black fuzzy things :P 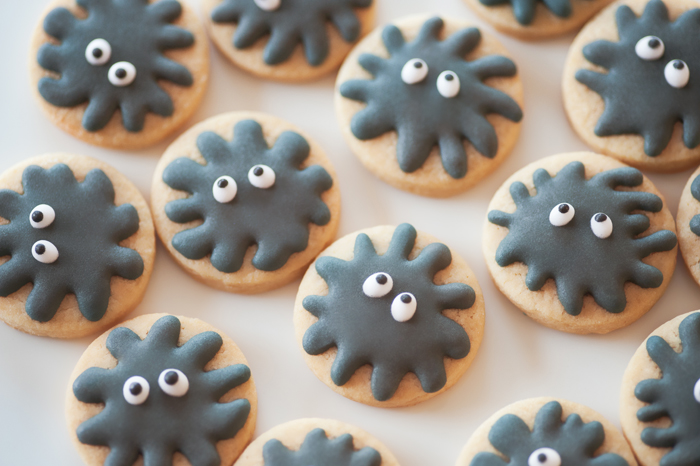 That's all we did....super simple and easy, and super fun to make :) 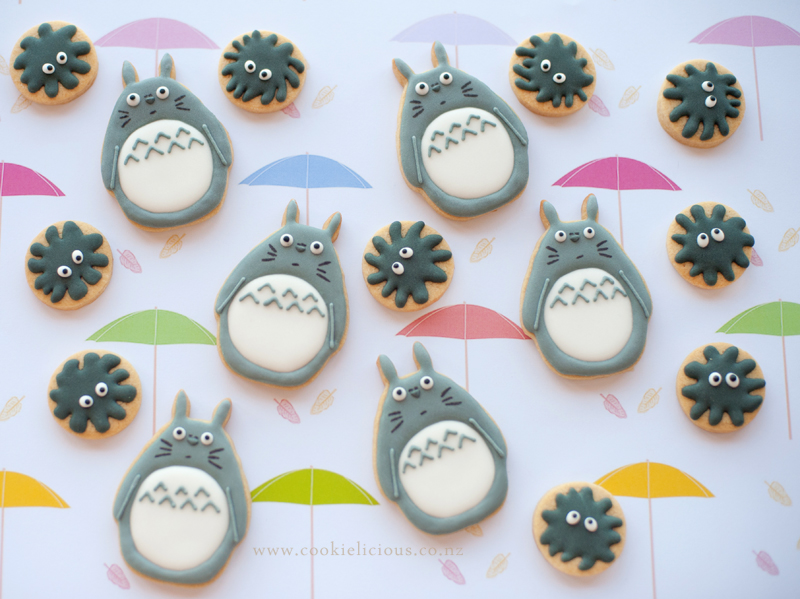 Here is one cute Totoro in his packaging, complete with the dustbunnies :) 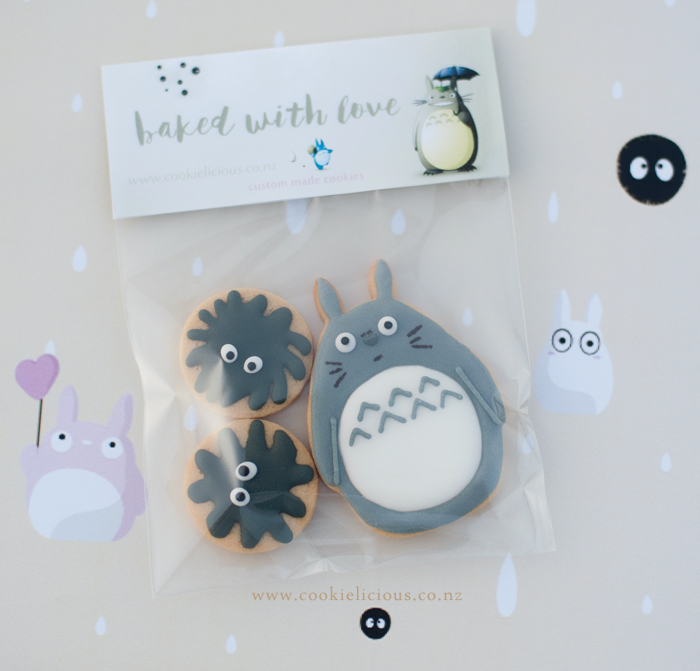 Hope this will encourage you to try and make these cute characters ;-)  Our family enjoys watching Ninjago, but my boy specially loves them so we decided to give him a surprise and made him a set of Ninjago: Masters of Spinjitzu cookies :) We decided to include Lloyd the green ninja as he is the leader of the ninja & also Sensei Wu, the ninja master & trainer.  So let me give you a bit of a background story of these cool characters, the original ninjago was the 4 ninja with their master trainer. Cole (Black Ninja) - the Earth Ninja Kai (Red Ninja) - the Fire Ninja Jay (Blue Ninja) - the Lighting Ninja Zane (White Ninja) - the Ice Ninja Sensei Wu - the Ninja Master & Trainer The green ninja - Lloyd Garmadon comes a bit later on, he is Garmadon's son, Sensei Wu's nephew and also the First Spinjitzu Master's paternal grandson. His destiny as the Green Ninja was revealed at a young age and he was destined to defeat the Dark Lord in the Final Battle as the Ultimate Spinjitzu Master. So now that you know all that stuff, you will understand why its appropriate to include him in our Ninjago set of cookies :) Unfortunately because we don't have a cookie cutter for these guys, we decided to use an egg cutter and trimmed the sides and do a bit of molding at the bottom of the cookie dough to get them into the shape we want. 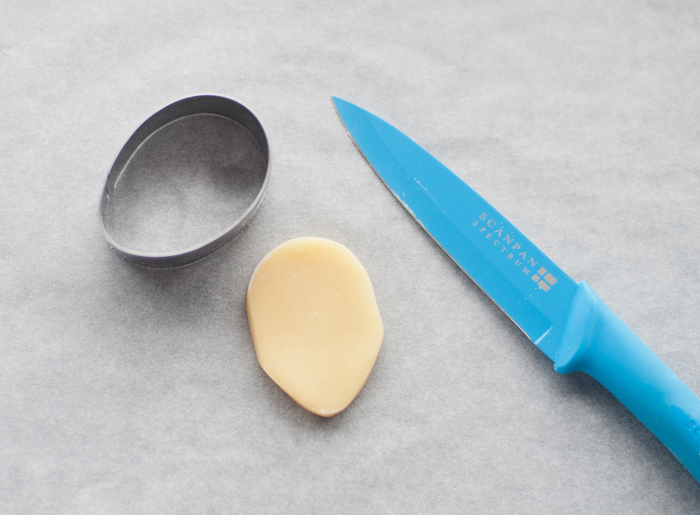 Start off with a yellow icing to create the eye area as shown on the cookie below. We marked off the eyes area with edible marker as we are not great at doing it free-hand. 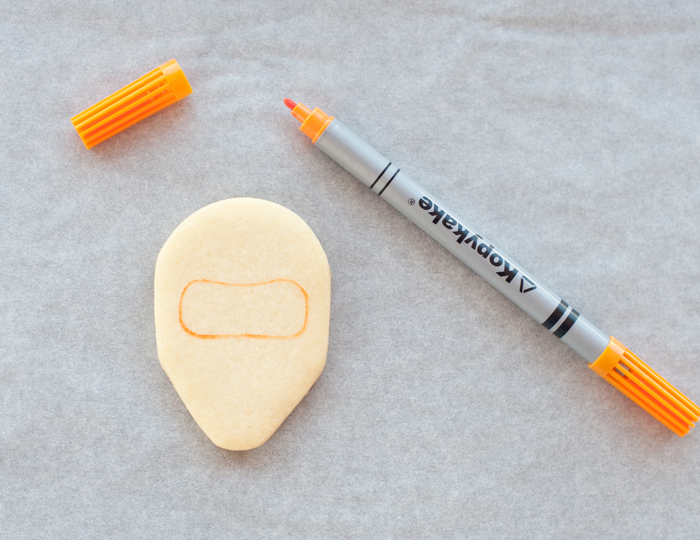 Fill the eyes area with yellow icing and let it dry. Then fill the rest of the area with icing of the ninja colour (black, red, blue, white or green) and let it dry.  Then pipe the eyes with black icing, and while the black icing is till wet, we put one white nonpareils to create the white iris. If you don't have any nonpareils you can also use a tiny white icing to create the same look. Wait for at least 10mins for the eyes to dry a bit then piped the eyebrows. Let it dry. The last step is to create the lines on their mask to give the impression of wrinkles in their mask and some definition around it. Repeat the same steps for all the other colour ninjas. 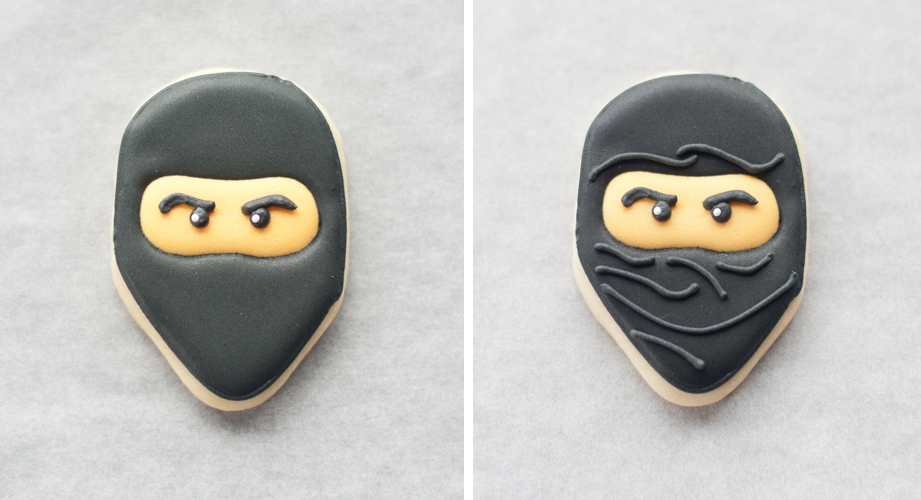 For Sensei Wu, we had to hand-cut his shape using a paper template. Start the decorating process by filling the top triangle area of his hat & his beard and let it dry. Then fill his face area with yellow icing and let it dry - see photos below. 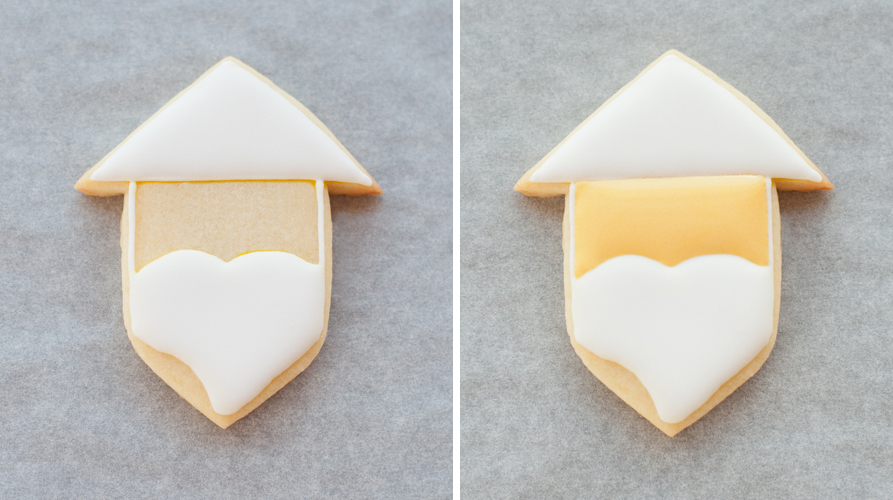 While we are waiting for the yellow icing to dry, we can pipe a yellow icing on his hat to give the look of the straw hat that he wears as well as the two lines in his beard area. 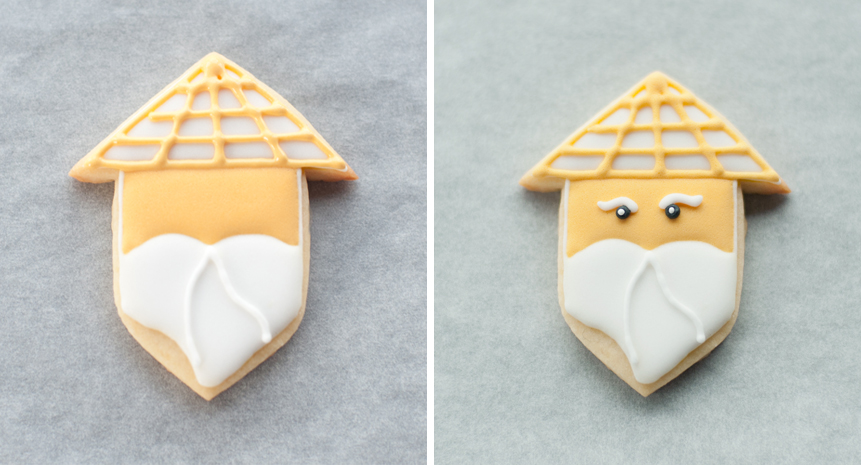 That's all, they are pretty simple to make and we love these cool ninjas :) 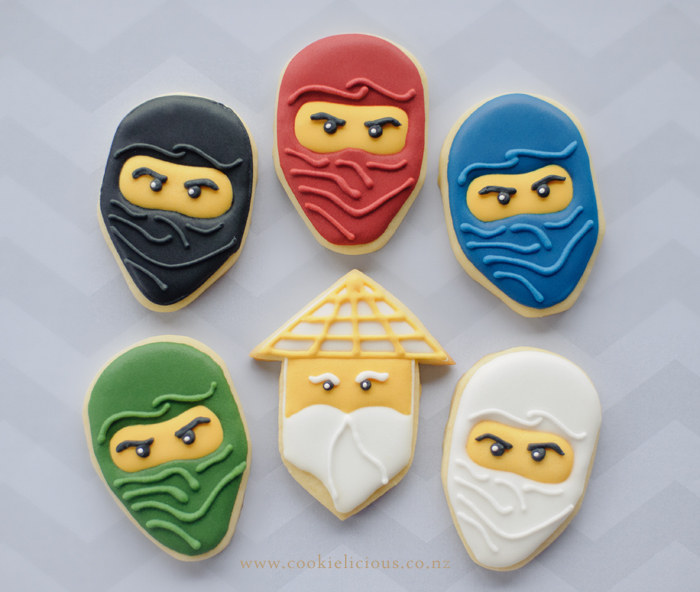 Here is my boy with his favorite ninja - Kai the fire ninja ;-) 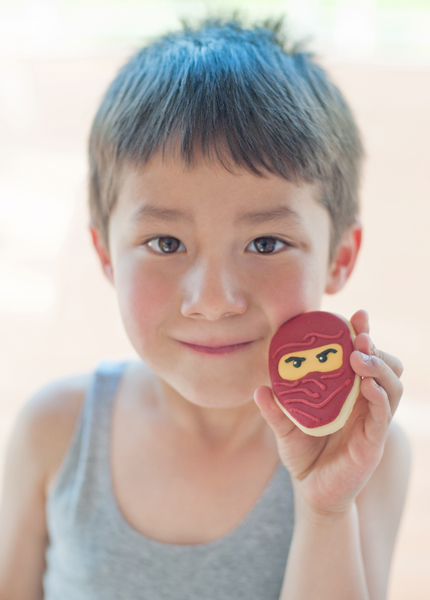 Have a great day everyone! One more sleep and then bring on the weekend! ;-)  Ever since I saw the post on Lisa's blog at Bearfoot Baker about how to make girl bat cookies i have always wanted to try making them. The only problem is that we don't have the airbrush tool that made the cookies look wayyyy cool... so unfortunately we have to make do without it. Another thing that we also cannot get in New Zealand is the chocolate covered sunflower seeds....she uses it to make the fang on the bats, so we had to get creative in replacing them :) If you want to see Lisa's original tutorial, you can find them HERE. The ones we made without the airbrush, doesn't look quite as polished as Lisa's but we still like them anyway, we thought they look pretty cute & sweet :) 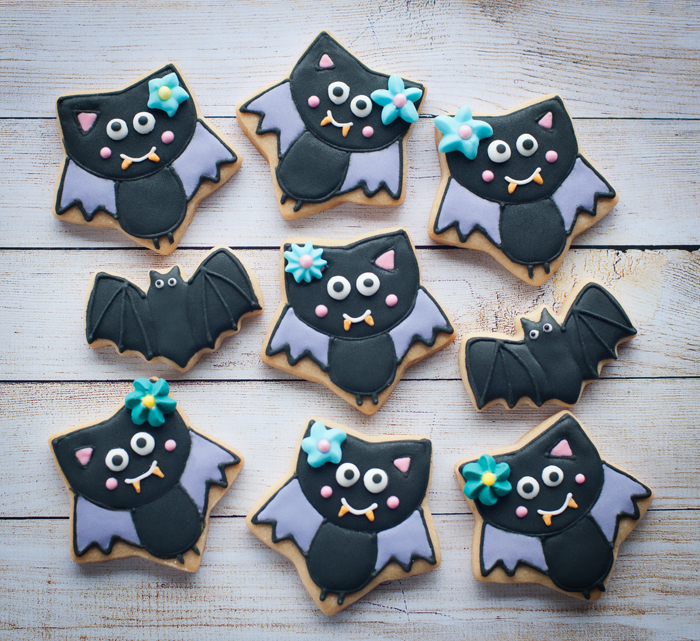 These bats were made using a simple star cookie cutter, anyone has a star cookie cutter right? The first thing we do after the star cookies are cooled, is to mark the areas we want to decorate with edible marker. You can do them free-hand like Lisa's tutorial but we are not so good at doing that, so we play it safe and we marked the head and body areas with edible marker :) 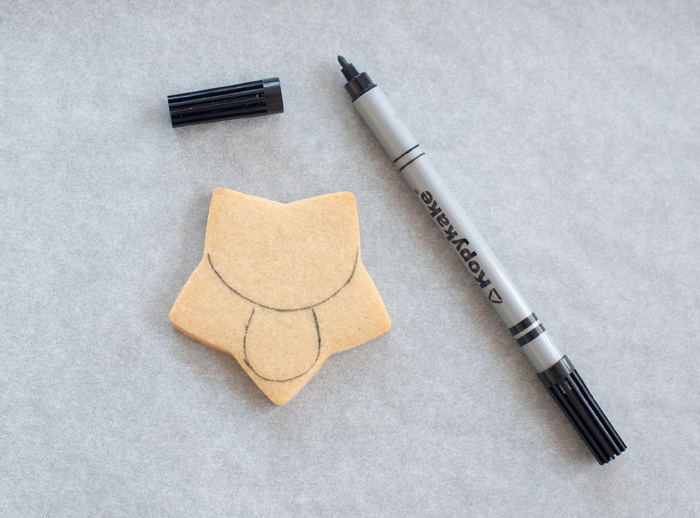 After we finished marking the cookies we outlined the areas with black outline consistency icing. When the outline is done, start off with filling in the ears with pink icing & the wings with purple icing. 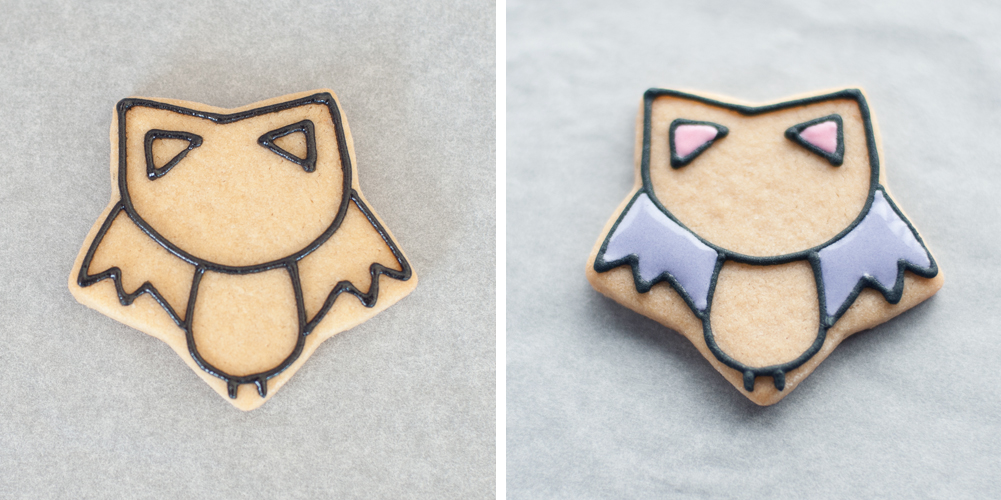 The next step is to fill the body & head area with black icing and let it dry. After the black icing is dry add the eyes (we use royal icing eyes - Lisa also have a tutorial on how to make them) and the royal icing flowers. Now this is the different part from Lisa's bat cookies, since we cannot buy chocolate covered sunflower seed we tried piping-in the fang on its on and it looks a bit odd to us, so we decided to add a mouth with the fangs and also add in pink cheeks to make it even more girly :P 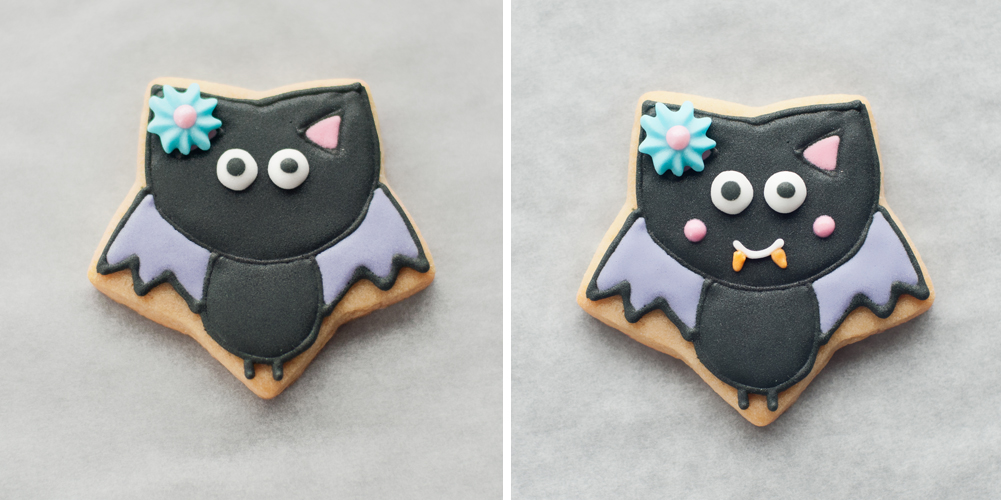 As you can see, the wings and ears area were not airbrushed and they don't look as fancy as the airbrushed version, but the kids still adore them and what you can also do is turn them into a cookie pop, all you need to do is glue them on a stick using royal icing, like the way we do it with the other bats i posted yesterday HERE. 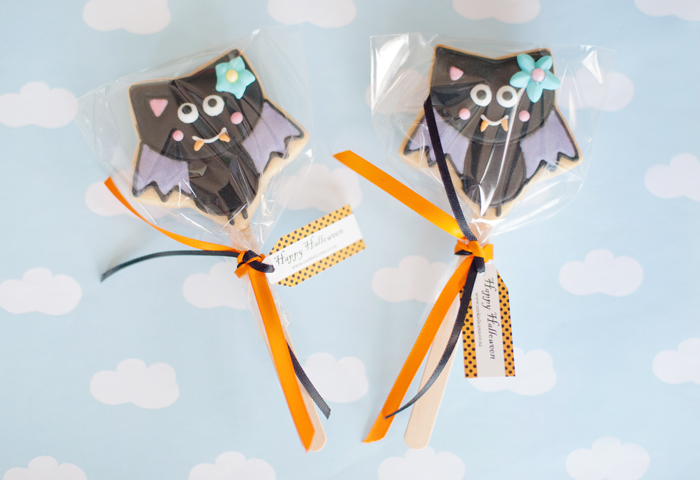 So there you go, either have them as normal cookies or turn your girl bat cookies into cookie pops :) Hope everyone is having a fabulous weekend! ;-)  Two blog post in one day....i think that is definitely a record for us :) We just wanted to share simple Halloween cookies this time :) 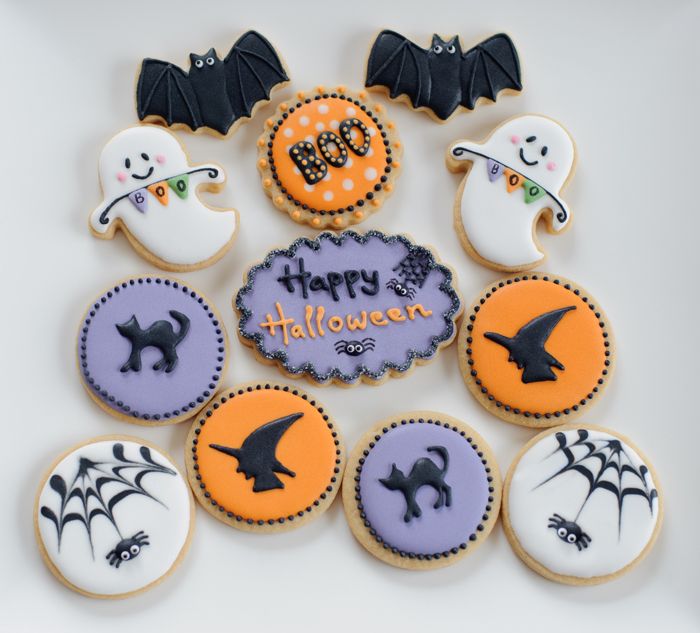 So you've seen the ghost and the bats from our previous blog posts. The ones we have not share are the plain round cookies and the spider webs cookies. The round cookies were very simple, you just need to iced them with any Halloween colour, either orange or purple or even black icing if you want to, then let it dry for a few hours. When they are ready you can attach any royal icing transfer on top as a black silhouette. For these set of cookies, we made a witch silhouette and a black cat silhouette. After the royal icing transfer dries you can then attach them with some royal icing. Then the last step was to pipe the black dots surrounding the cookie :) 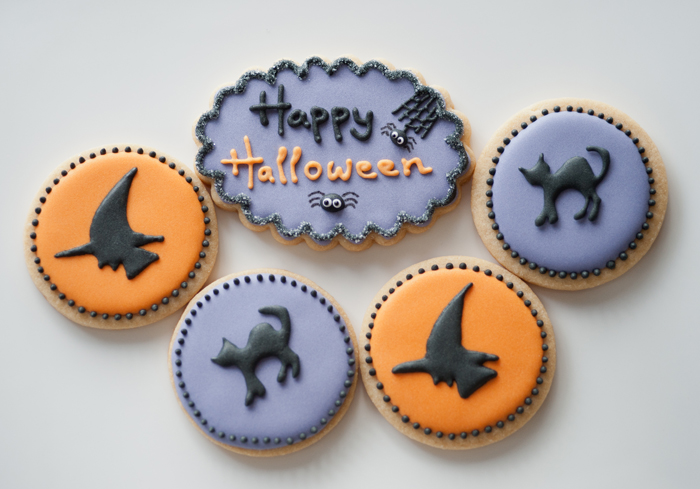 The other set of cookies that we have were the spider web cookies, they were made with "wet on wet technique". We didn't get a chance to take a step by step photos for them, so sorry about that. We simply iced the cookies with royal icing, for ours we choose white & green. Then while the icing is still wet draw either a few full circle or 3 half circles then drag the icing from the outer point into the middle with a toothpick or a scribe tool to create a spider web look. Then let it dry. 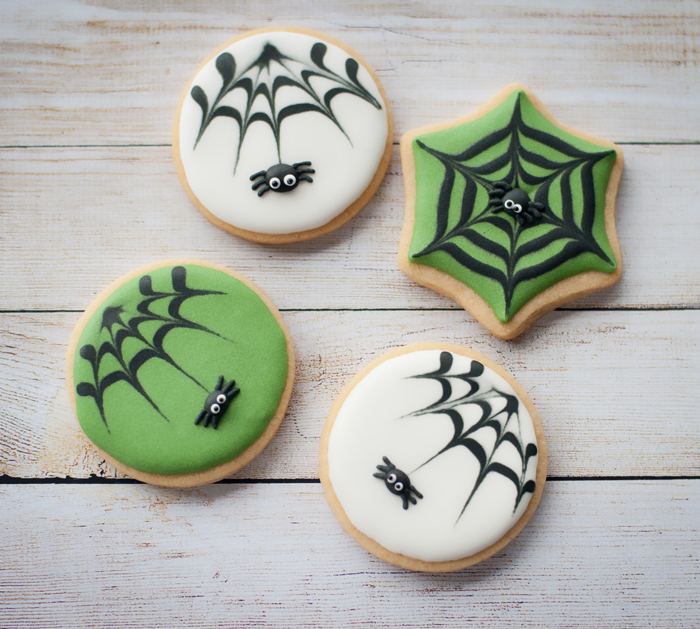 After the base icing colour is dry then add the little spider on top, put a blob of black icing for the body and let it dry for a few minutes and then add the spider legs. We waited a bit longer before putting the eyes on the spider because we want to make extra sure that the black icing were dried completely as we don't want any colour bleeding into the white eyes. 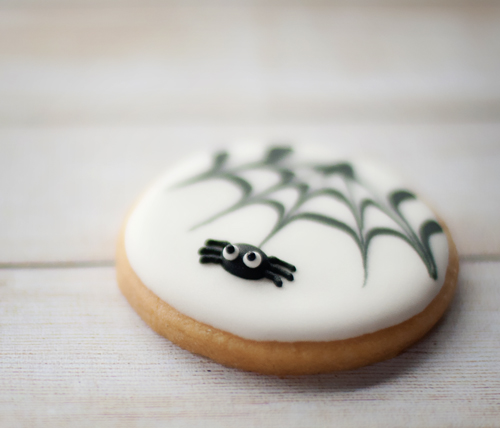 With the green spider webs, we put a few black circle while the icing are still wet and then drag the icing from the middle to the outer part of the cookies with either a toothpick or a scribe tool. 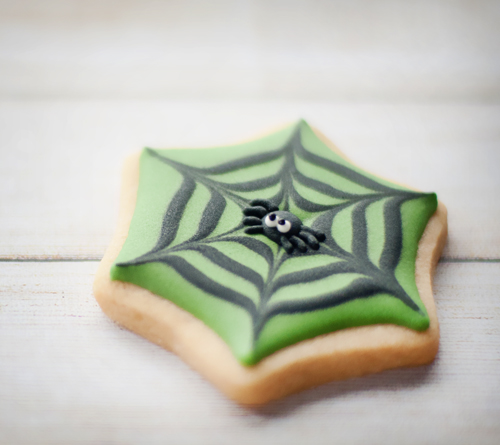 Okay, that was all the Halloween cookies we have today. We are really sorry that we completely forgot to take a step by step photo of how to make them. I did try to explain how to do them on my post, hopefully that's clear enough :) Here is one last photo of the spider cookies in their packaging. 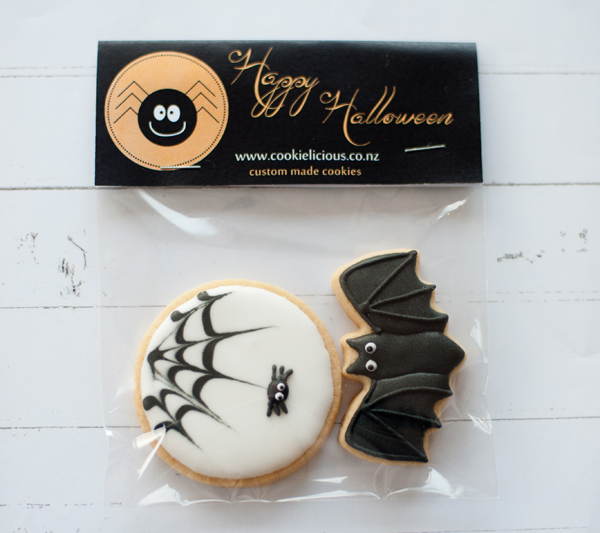 Happy Halloween everyone and enjoy your spooky weekend! ;-)  They are the same cookies that posted yesterday along with Count Dracula cookies. We will show you how to make them and how to turn them into a cookie pop or cookie on a stick :) This is what they look like as Halloween treats :)  With these bat cookies, we kept it very simple, started off with the wings...fill the wing areas with black 20 second icing and wait for the wings to dry. Then add the middle body, we just wanted some definition between the wings and the body so that's why we did it this way. 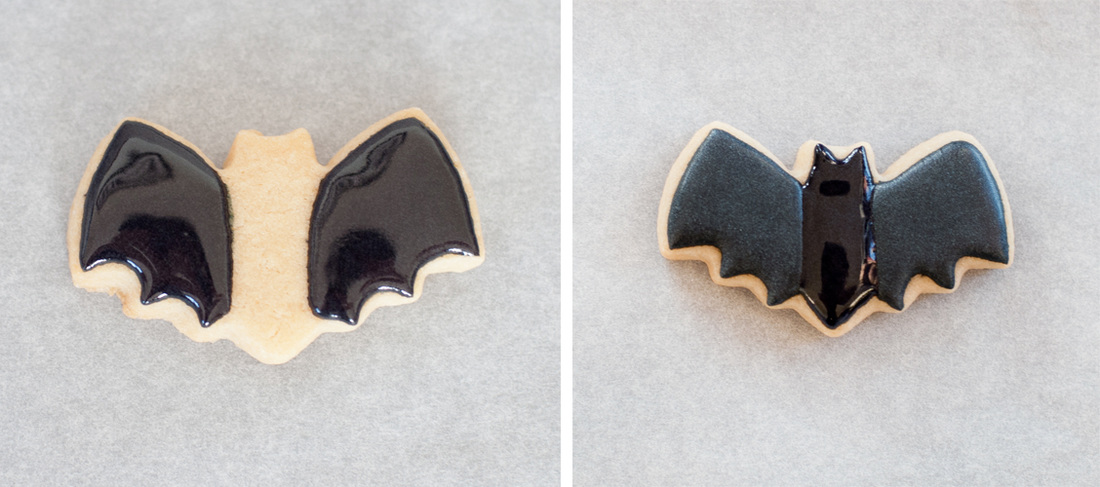 Next step is to pipe the wing details (see photo below) then after the middle body is dry we add the eyes. 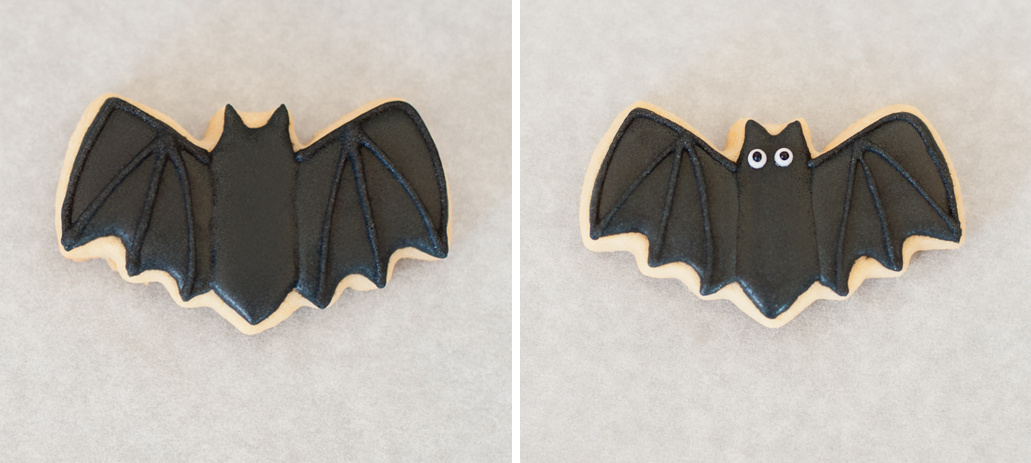 The cool thing about these bat cookies is because they are small, they are perfect to turn into a cookie pop. We just attached a small wodden popcicle stick at the back of the cookie to turn them into cookie on a stick! We use a little bit of royal icing as a glue to attach them :) 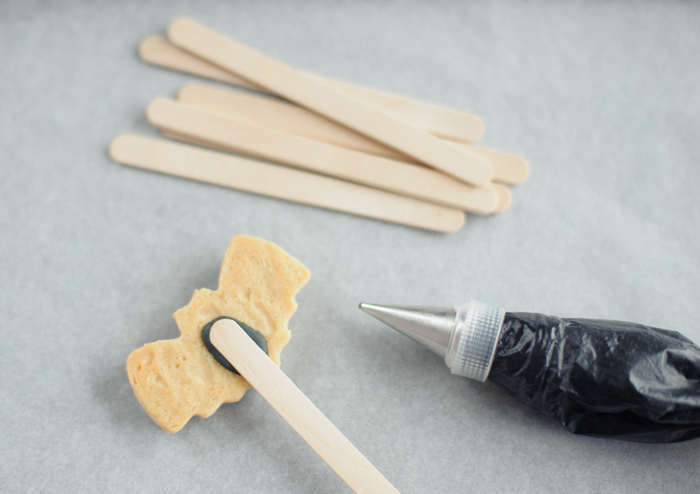 Here they are ready to be wrapped up and presented as Halloween treats :) 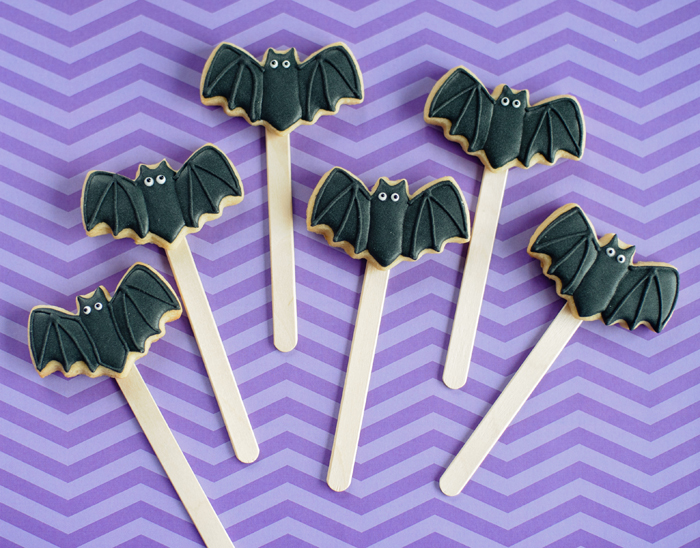 There you go, that's how to you turn a cookie into a cookie pop, so simple and easy. Because today is Halloween we will do a separate post on simple Halloween cookies using royal icing transfer. Stay tuned ;-)  Trick or treat, smell my feet...give me something sweet to eat! ;-) We usually get lots of trick or treaters in our neighbourhood during halloween, although its not really a custom as such here in New Zealand. Some kids still dress up as any character (not even necessarily scary or spooky) and come around to our house looking for treats :) Not sure if these lot of cookies will make it to Halloween day as they are slowly dwindlling from my kids and hubby sneakily grabbing them to eat LOL Here are the full set of Jack O'lantern & ghost cookies :) 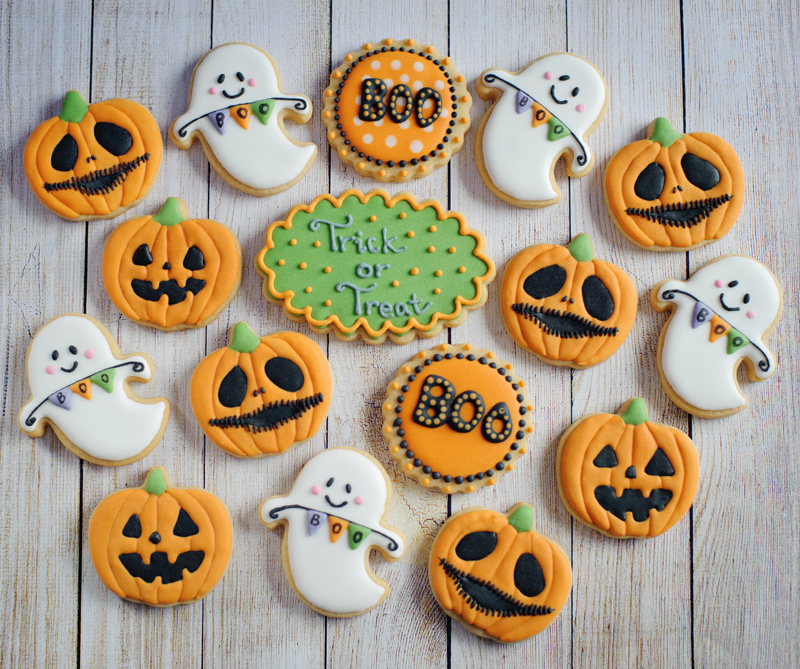 To decorate these pumpkin, we start with marking the pumpkin with edible marker, then get the green icing to fill the top of the pumpkin (the stem srea). Then fill in the area in alternate space (as shown in the picture below) use orange flood icing and wait about 30mins to 1 hour, then fill the alternate spaces. This will give some dimensions in between the pumpkin groves. We use tip #1 for these coz the pumpkin is a mini size. You can use a bigger tip for a bigger size cookie, depending on your cookie size. 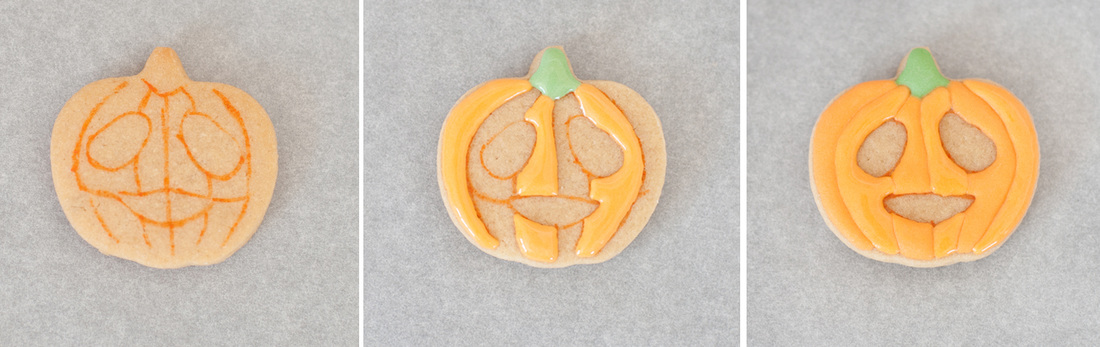 After the orange icing has dried completely, fill the eyes and mouth area with black flood icing. In the mouth area drag the black icing across the side of the mouth with a toothpick or a sribe tool if you have it. Give it 10-15mins to dry a little bit and then add the stiches. 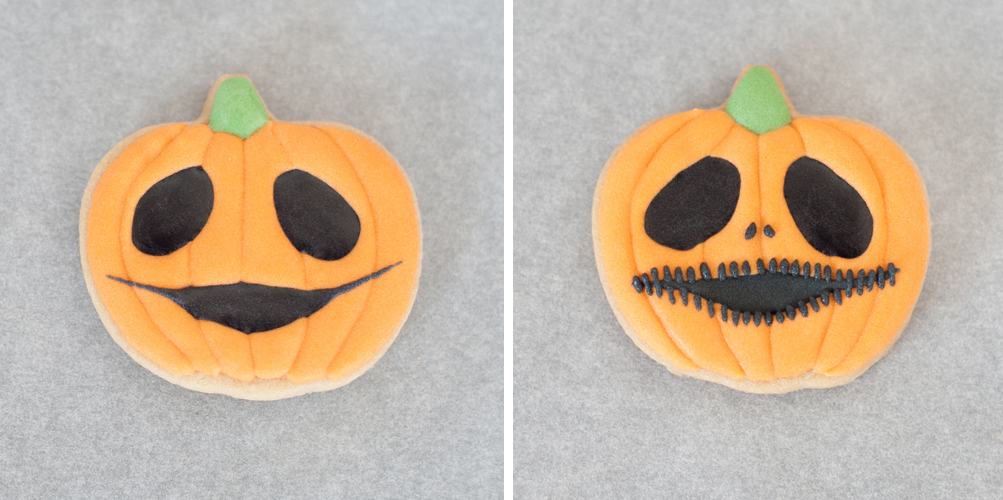 My favorite pumpkin are the ones with scary stiches on his mouth, i think they look cool....but the usual halloween pumpkin are cute too :) They were made with the same technique but with a slightly different sketch when we are outlining the cookies with edible marker. Here are the two types of jack o'lanterns. 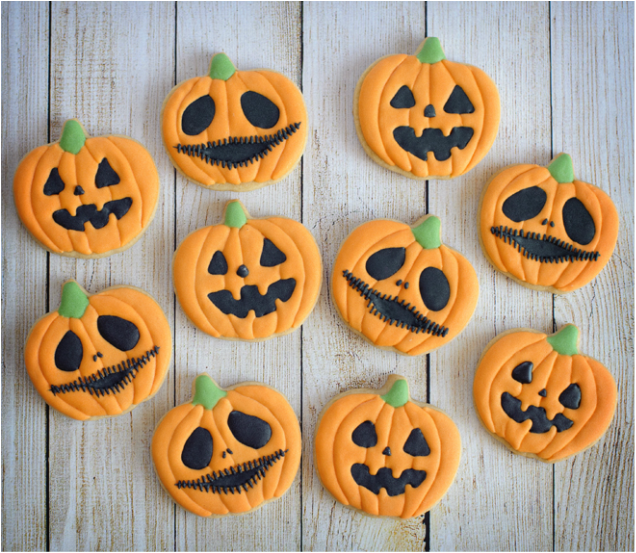 So next we have the ghost cookies, they are very simple to make and so very cute! :) Start with outlining the ghost cookie with white icing, you can ether make 2 different consistency icing so you outline with piping consistency & fill with flood icing or if you are lazy like us we just use 20 second icing and use it for outlining and flooding ;-) 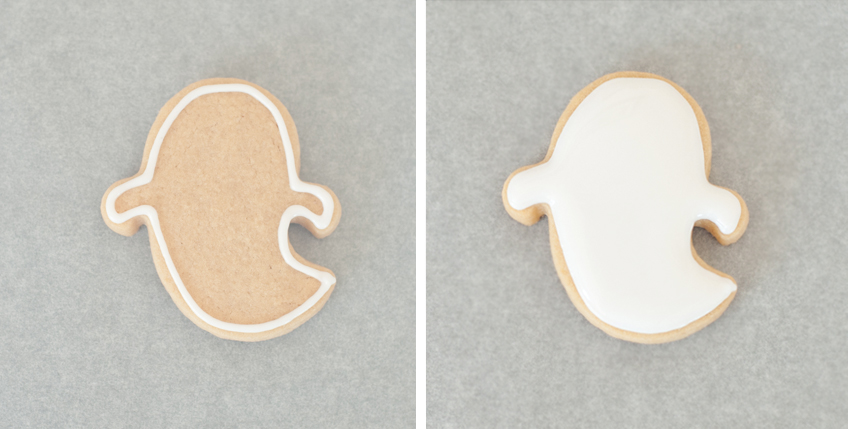 Wait until the white icing is completely dry, then add the details such as black eyes, mouth and pink cheeks. We also add a black line across the middle so that we can add colourful bunting across its chest. Let the black line dry (shouldnt take long) and then add the colourful bunting. When the icing for the bunting dries then add the letters BOO :) 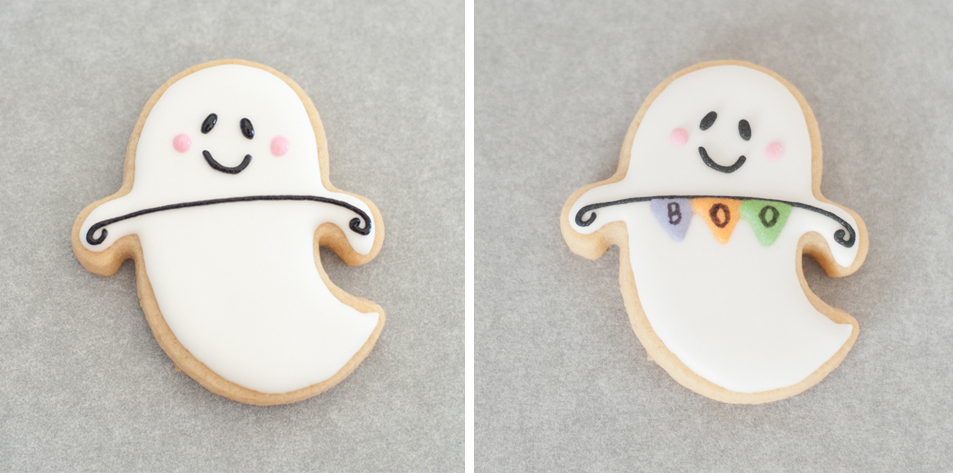 Here are the ghosts together...they look great when teamed up with other halloween cookies :) 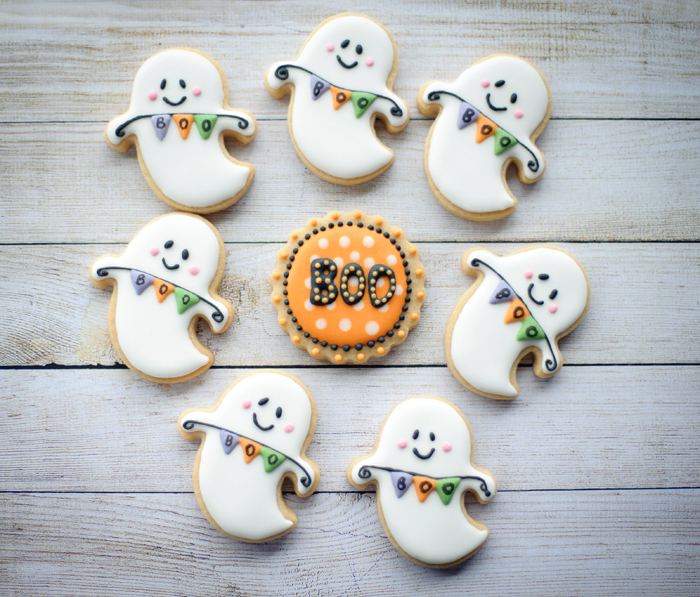 Will be posting more cookies tomorrow, so stay tuned for more halloween cookies to come this week ;-)  Tis week we will continue to post Halloween cookies until the actual Halloween day this weekend. So as promised we will be going over how to make Count Dracula cookies. They are made with the same steps as we did Frankenstein monster cookies, but i thought i'll give you a quick run down of how to make them as well as giving you a visual of the step by step tutorial :) 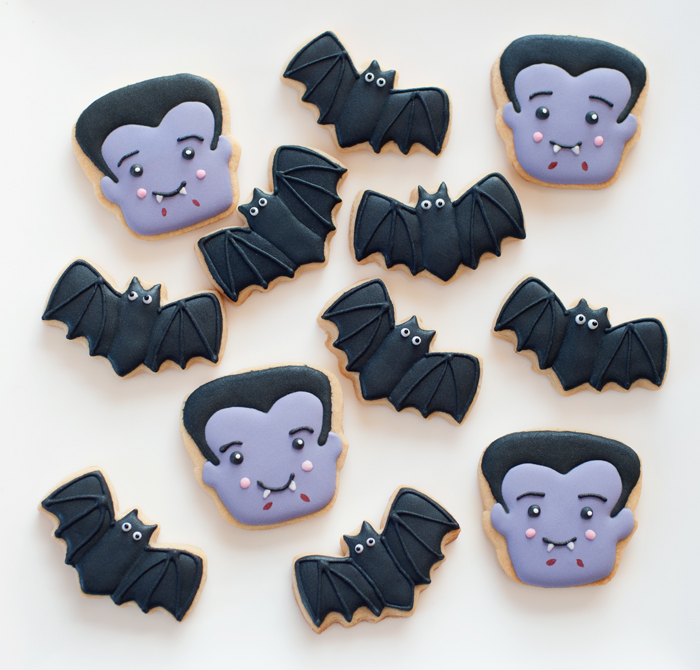 These cookies were part of the halloween batch that we made and because we dont have a cookie cutter we handcut them using a paper template. They are a very simple shape so its reasonably easy to hand-cut using a sharp knife. 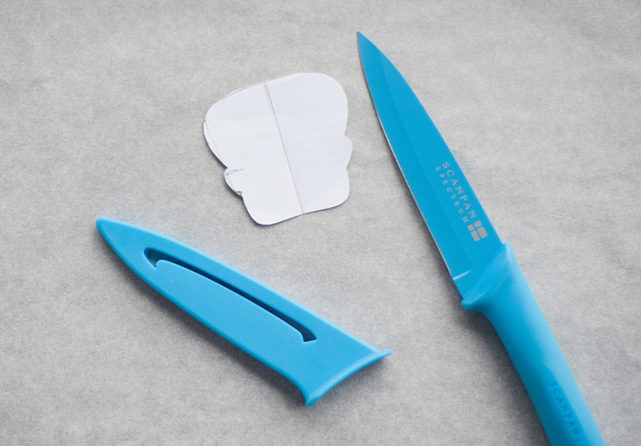 To decorate Count Dracula cookie, we started off with the hair, fill the hair area using 20 second black icing and tip#2. When the hair is dry we add the purple icing for his face area. Let it dry for a few hours. 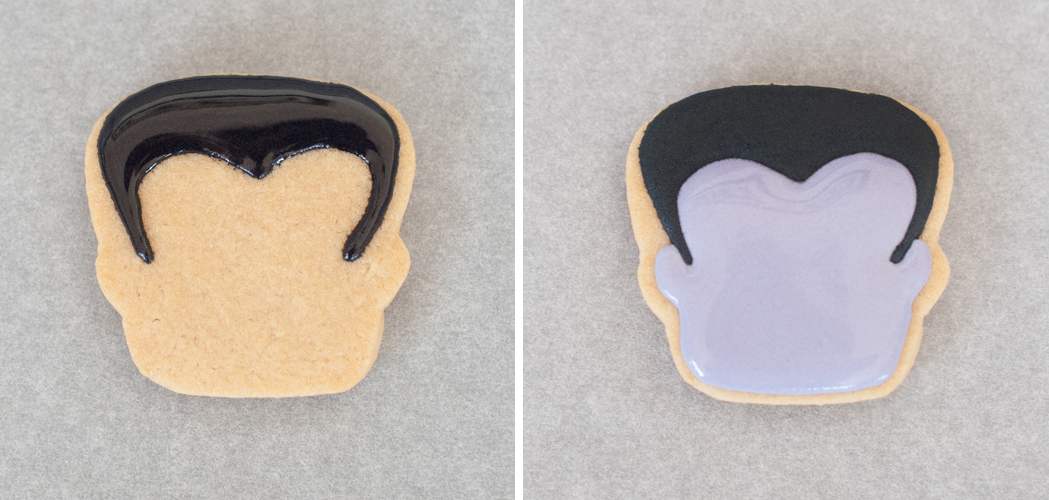 When the purple icing is dry its time to add the details on his face, add his eyes, mouth, pink cheeks and mouth. We waited about 10-15mins until the black line for his mouth to dry and then we piped the white fangs with white icing and add the dripping blood with red edible marker. 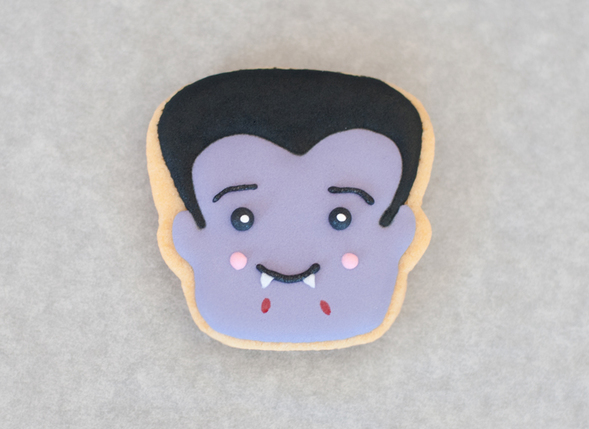 Here are the Count Dracula in closeups :) 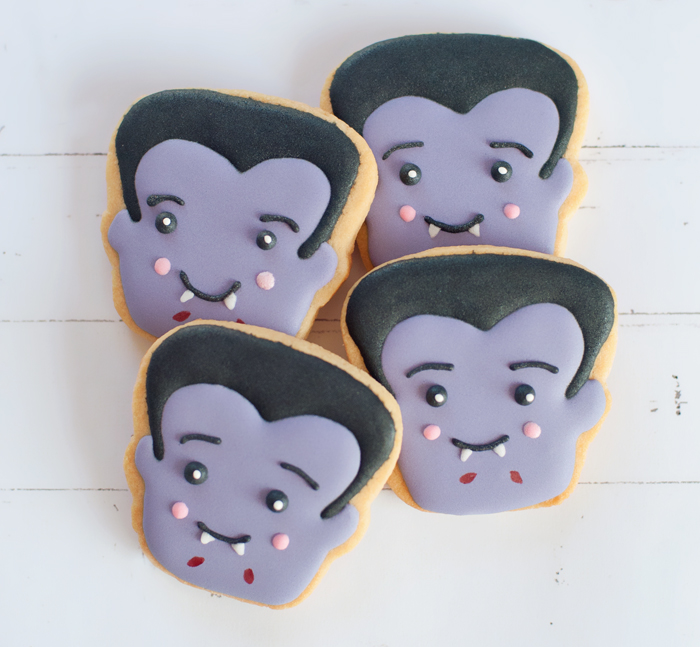 Tomorrow we will go over how to make the bats and how to turn them into Bat Cookies on a stick, so kids can eat them as cookie pops. In the mean time have a fantastic week! ;-)  Its the week before halloween and we were in the mood to create something spooky for the kids :) This time we are trying out a new recipe, instead of the plain sugar cookies we tried out a peanut butter cookie recipe for these halloween cookies. They actually turned out great as we still get that smooth surface on the cookie for decorating. We found the peanut butter cookie recipe from Sweetopia, HERE is the link if you want to try it out :) The first batch we turned into Frankenstein monsters and mummies, they turn out pretty cute instead of spooky but still appropriate for halloween we think lol :P 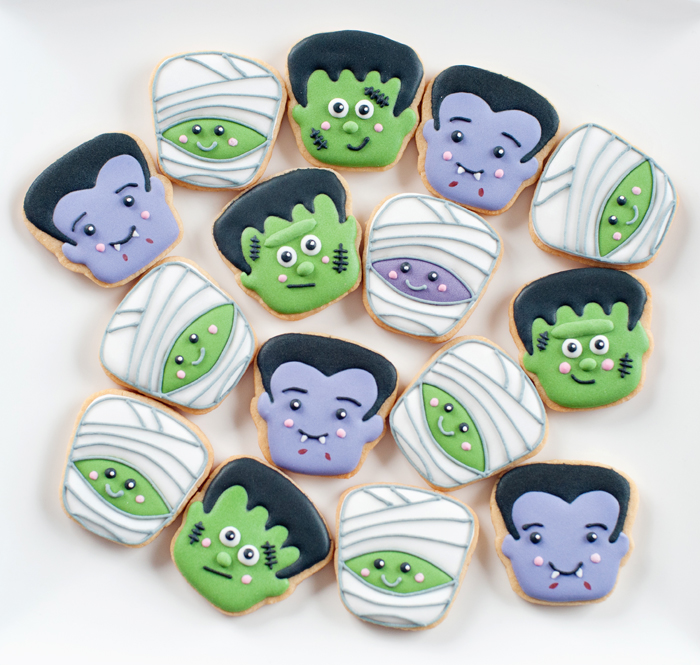 Lets start with Frankenstein monster cookies, to make him we started off with the hair, fill the hair area using 20 second black icing and tip#2. When the hair is dry we add the green icing for his face area. Let it dry for a few hours. 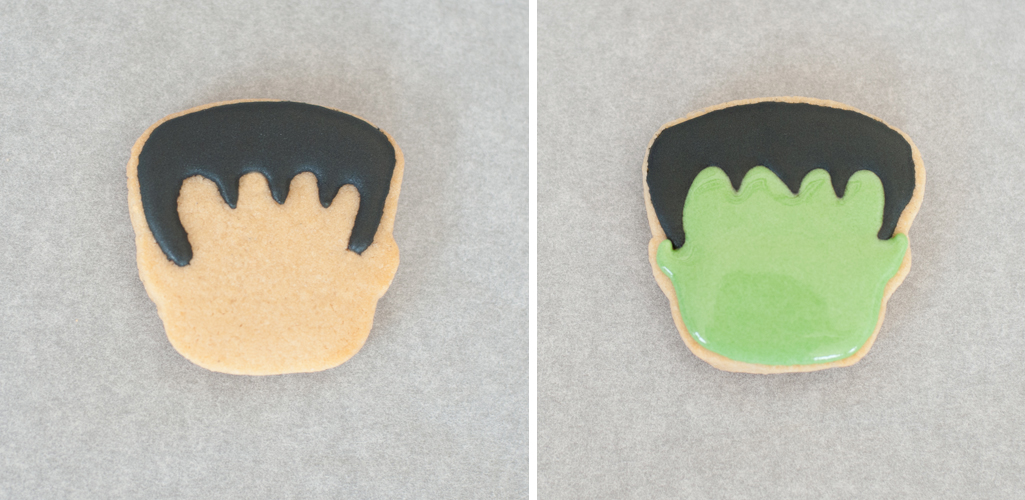 When the green icing is dry its time to add the details on his face, add his eyes, mouth, black stiches and pink cheeks (this is optional, if you prefer your monster without it you can skip this part). We tried two different 'look' on our monster, one with raised forhead and one without as we couldnt decide which one we like better, so we did both versions :) 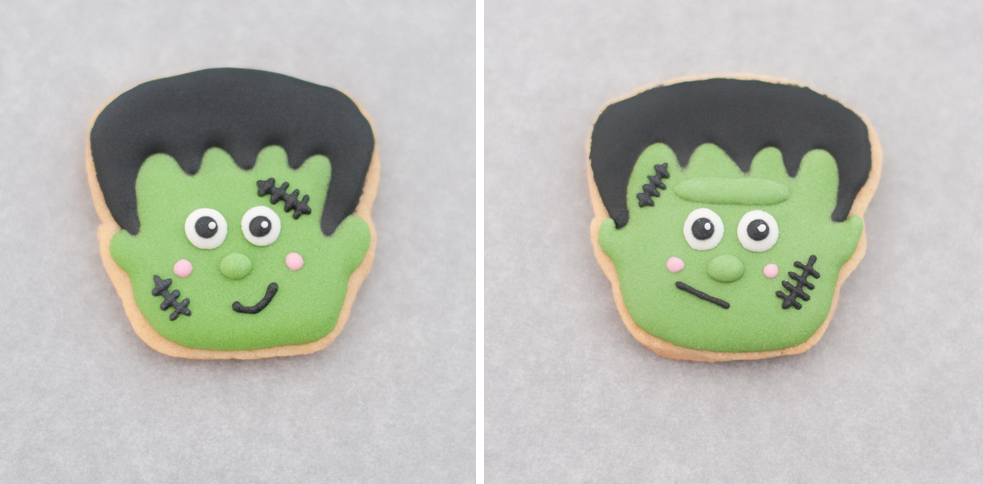 You can also have fun with piping different mouth shape to give him different characters 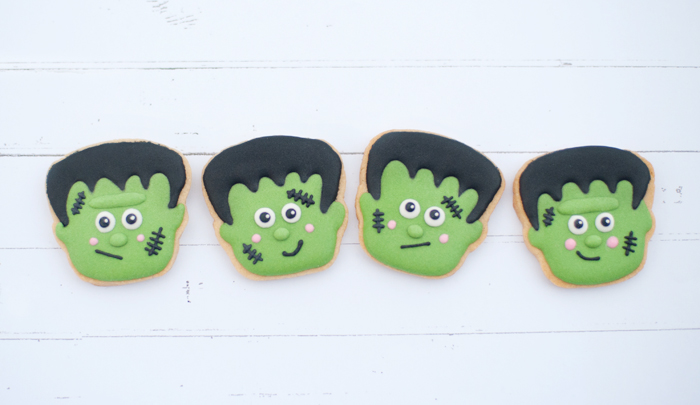 Next is how to make the Mummies... start off with the face area, we are not really good at free-hand piping so we mark off the area we want to fill as the face and then fill it with green or purple (your preferred colour icing) and let it dry. When the face area is dry, cover the top and bottom area with white 20 second icing and let it dry. 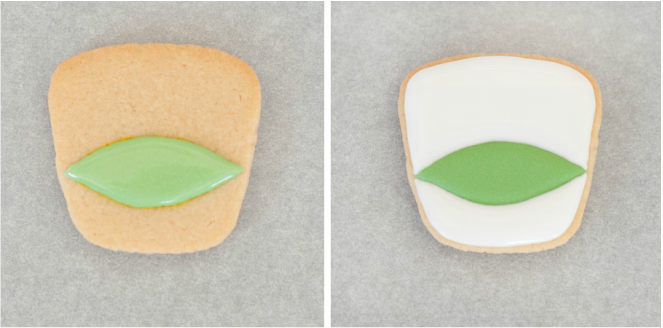 While waiting for the white icing to dry we add the face details, add the eyes, mouth and pink cheeks. After the white icing dries, pipe the bandages with stiff consistency icing all around the top and bottom of the cookies. Let it dry. 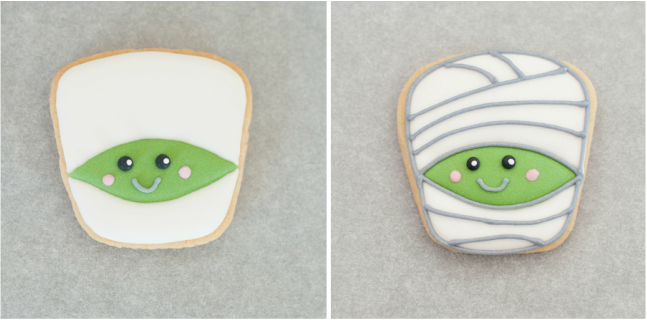 Here are the mummies together, you can do whatever colour face you like, we tried one purple mummy and leave the rest with green face :) 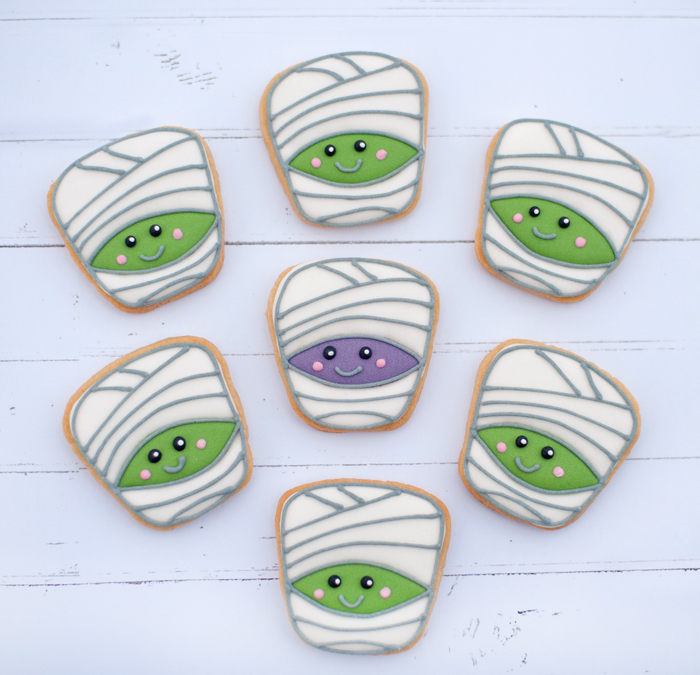 So that's how you make the Frankensten monster and the mummies, i will be posting the Count Dracula and some bat cookies tomorrow, so stay tuned ;-)  Sometimes life takes us thru a few storms that knocks us back and everything just seem dark. We knew someone who just went thru a very difficult time in her journey. So we want to make her something sweet to brighten up her day :) Someone wise once told me to always look for the rainbow in every storm and to train ourselves to find the blessings in everything. So hopefully these cookies will encourage her to do just that :)  Rainbow always makes me happy, and its also a sign of blessing....so i knew i wanted to make a rainbow cookie, but unfortunately we dont have a rainbow cutter so we had to get creative in using the cutters we have. We use a big round cutter, a small cutter and a small flower cutter. Cut the dough with the round cutter and then cut it into half, then put the flower on each end of the half circle. 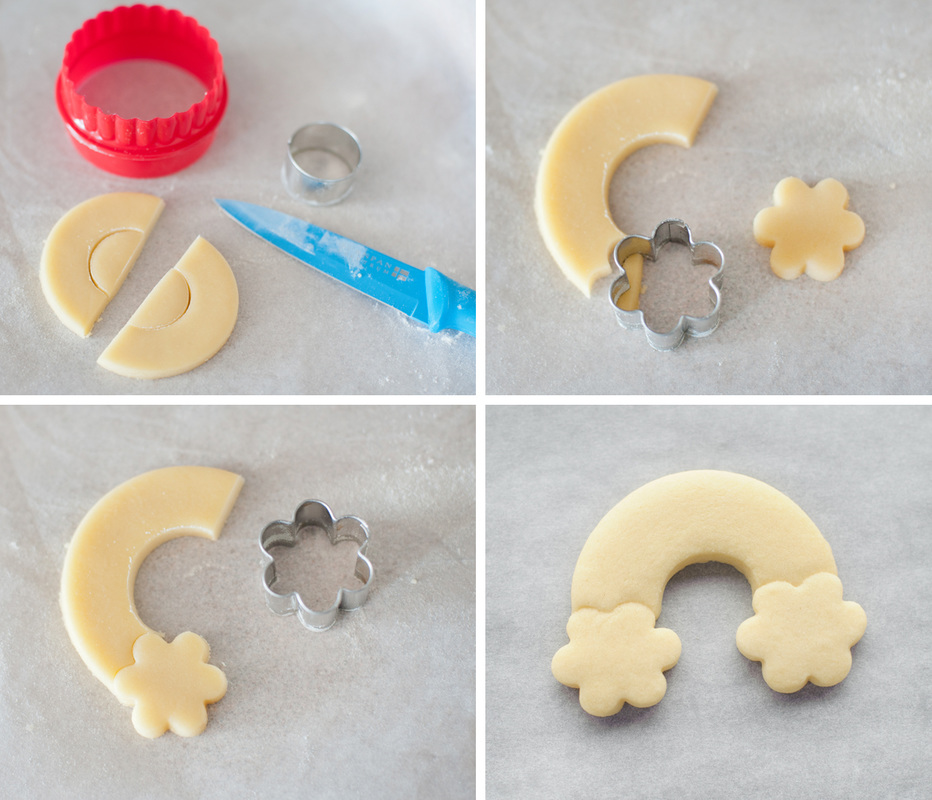 We usually get all our icing colours prepared while waiting for the cookies to cool. Start with alternating the rainbow colours and let it dry and then do the altenating colour. We use tip #3. 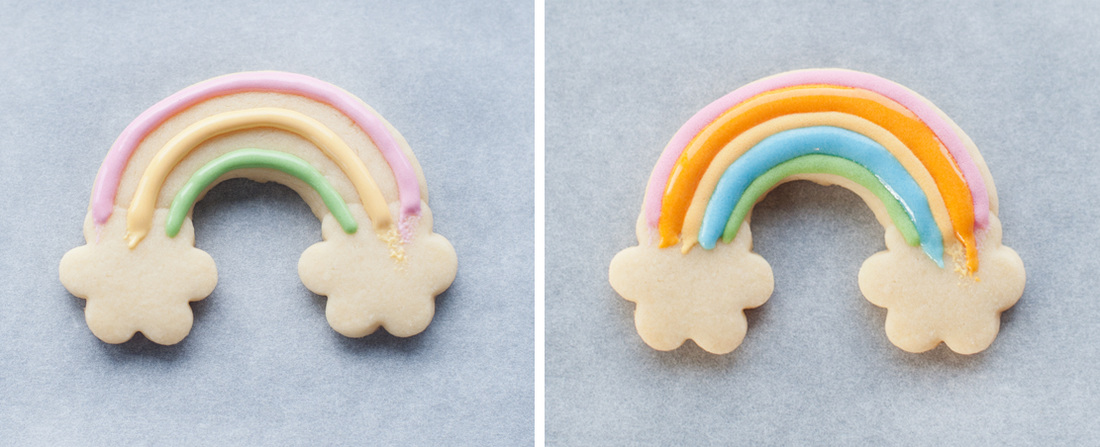 After the rainbow colours are dry, fill the cloud area with white flooding and let it dry, then add the outline all around the clouds. We use tip #2 to do the outline. 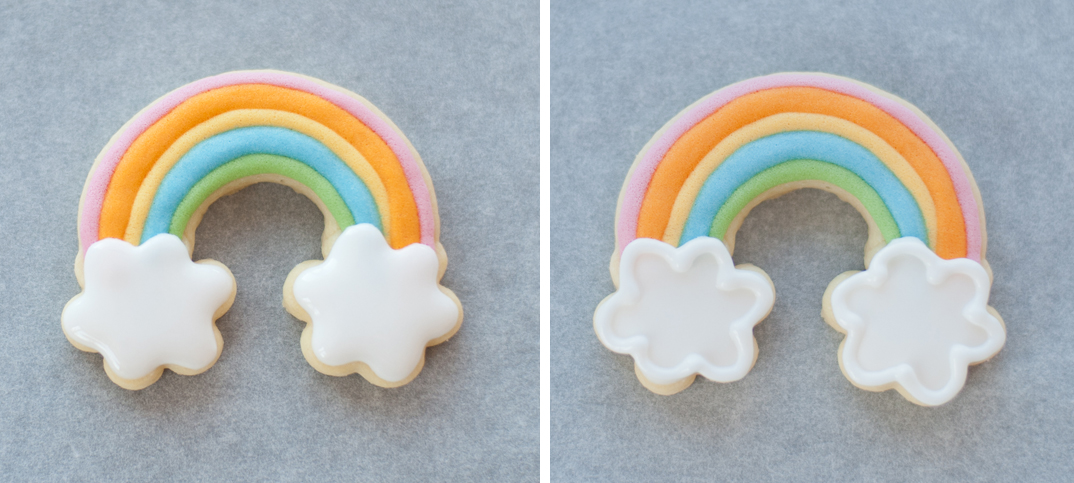 You can make the rainbows in different colour combo if you like, we made 2 different sets :) 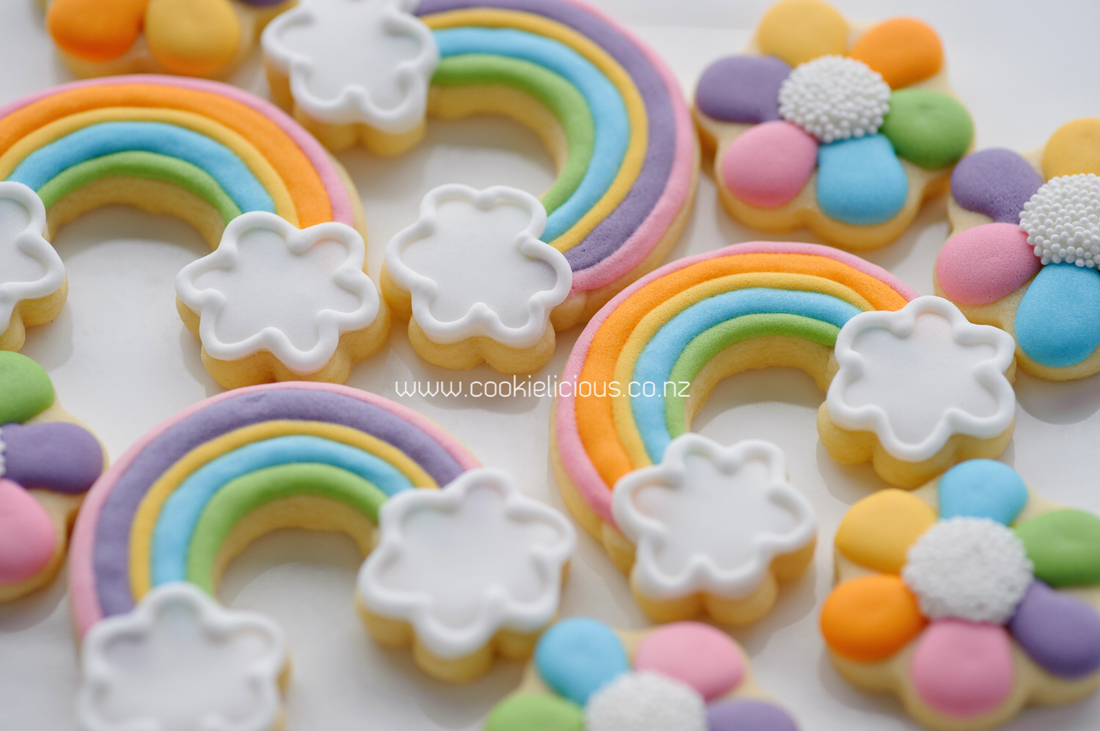 For the hot air baloon we start with marking the area that we want to fill with different colours. Use edible marker to mark the sections. 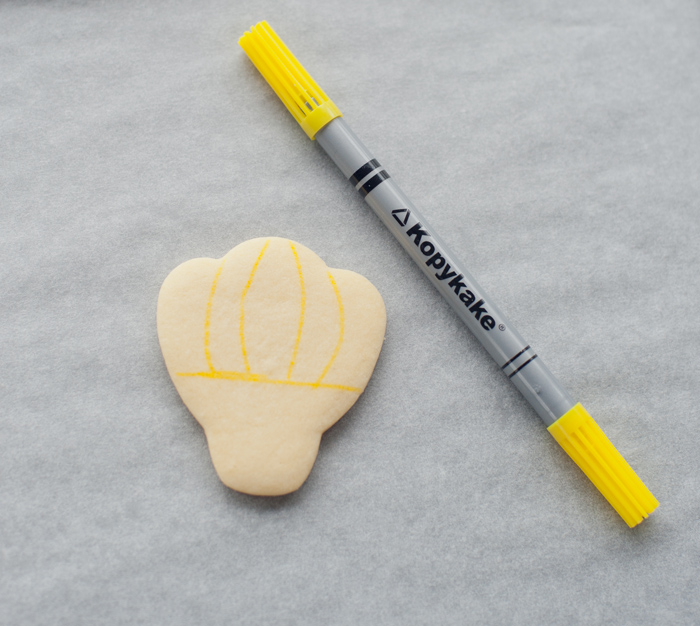 To start decorating the hot air baloon, begin with alternating colours to give definition between each colours. Let it dry before doing the next step. 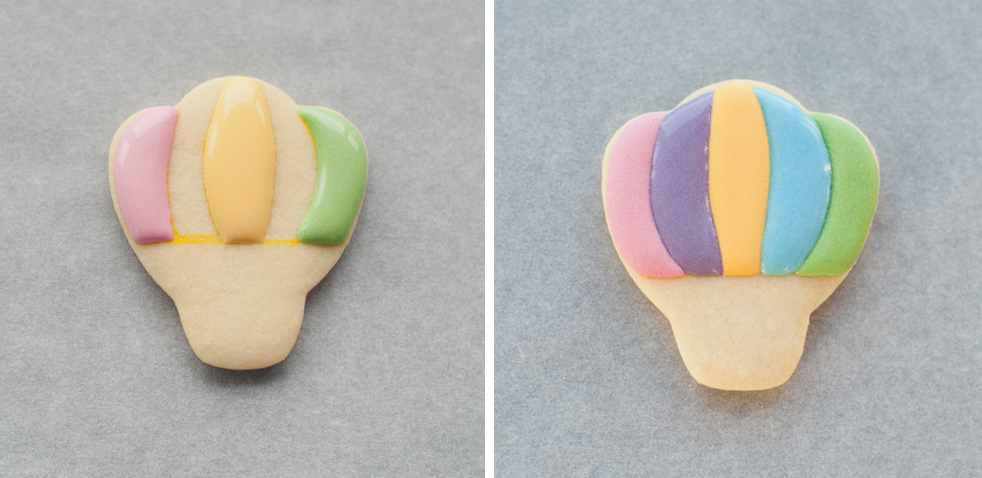 Next we use outline consistency brown icing to do the outline of the balloon. Then add the rope at the bottom as well as pipe the hot air balloon basket with the same brown icing. We use tip#1.5 for the brown icing. 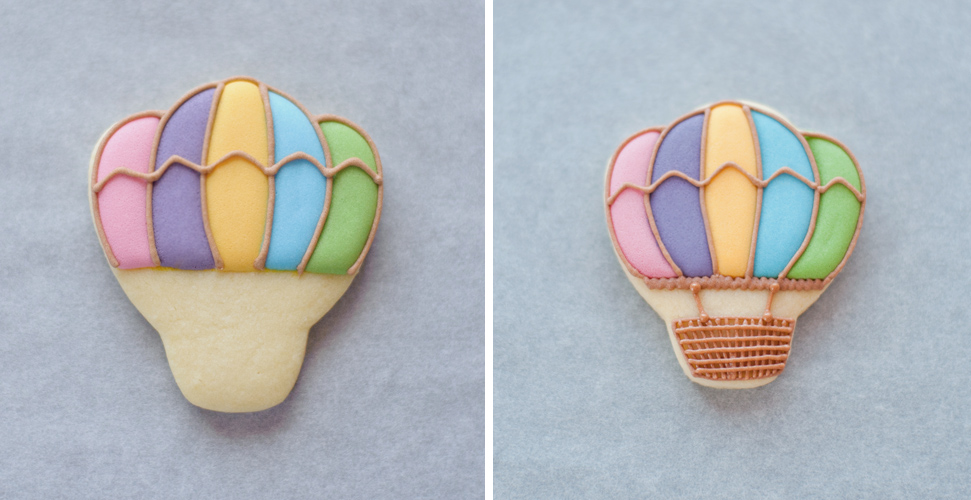 This is what they look like when they are done :) 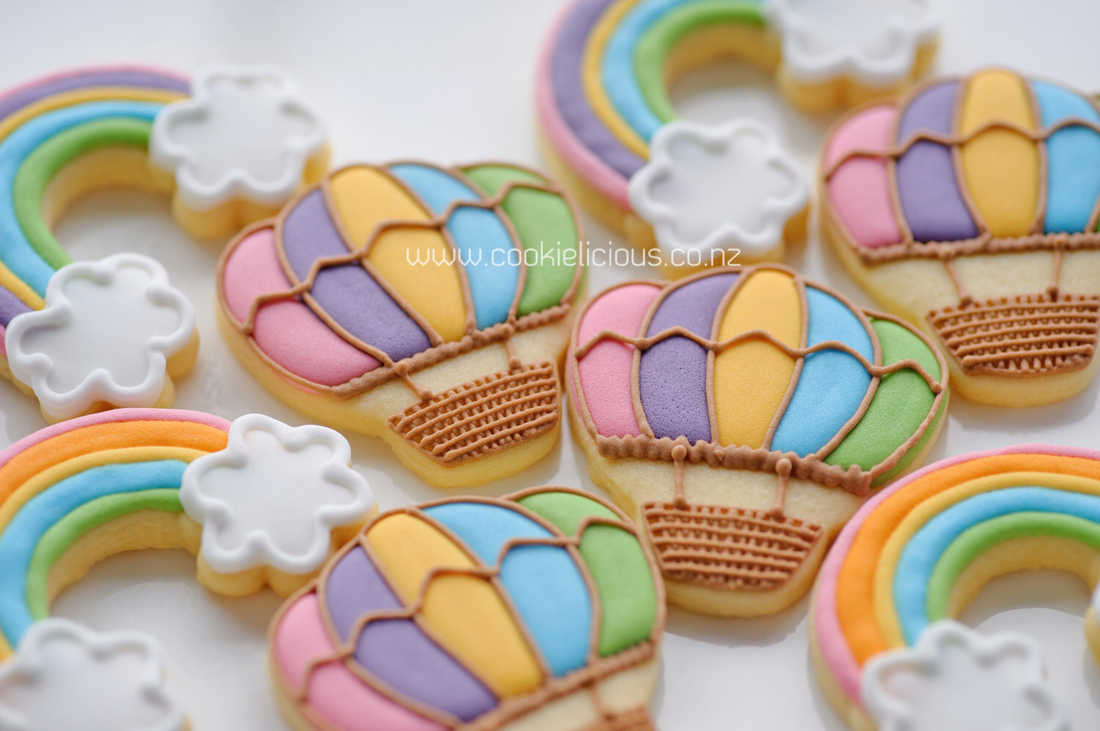 The flowers are decorated the same way, put the icing in alternating colours. 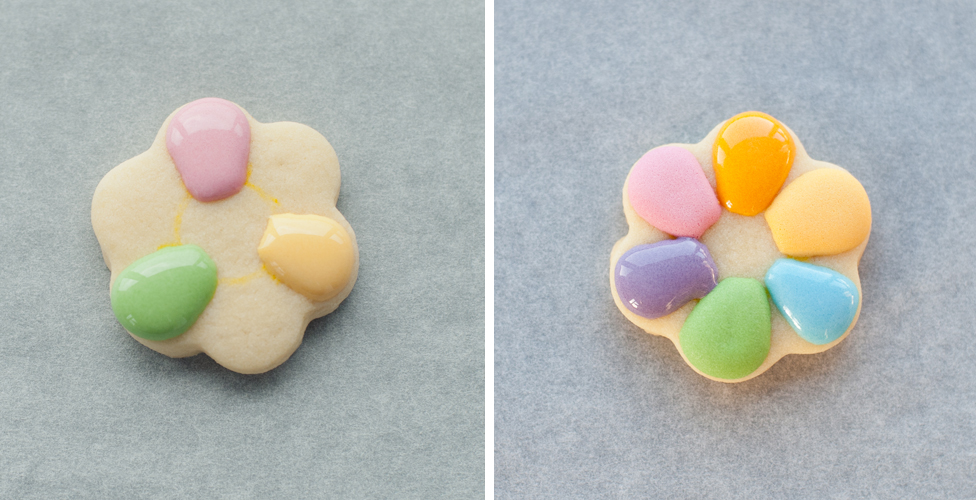 Add the white centre, while the white icing is still wet sprinkle the white 100 & 1000s on top of the wet icing. Let it dry. 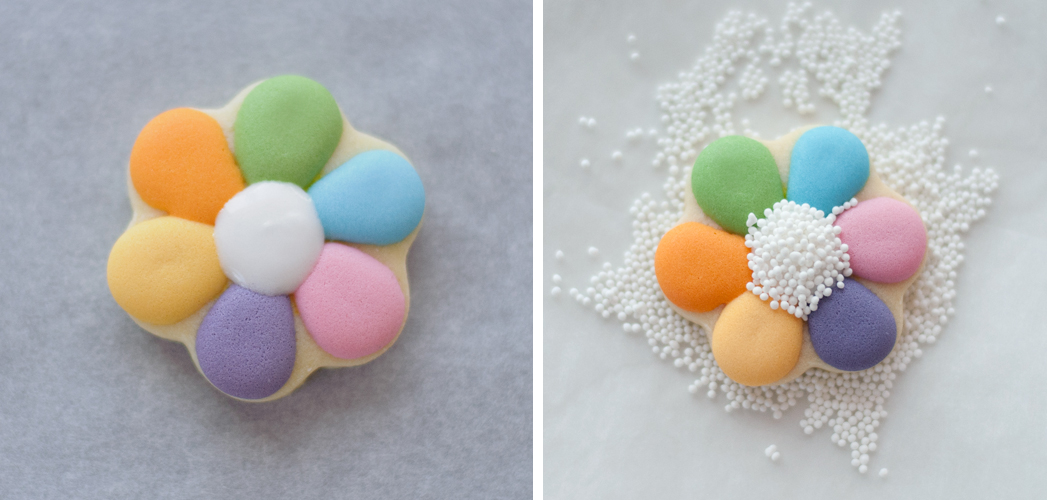 Close-ups of the colourful flower cookies :) 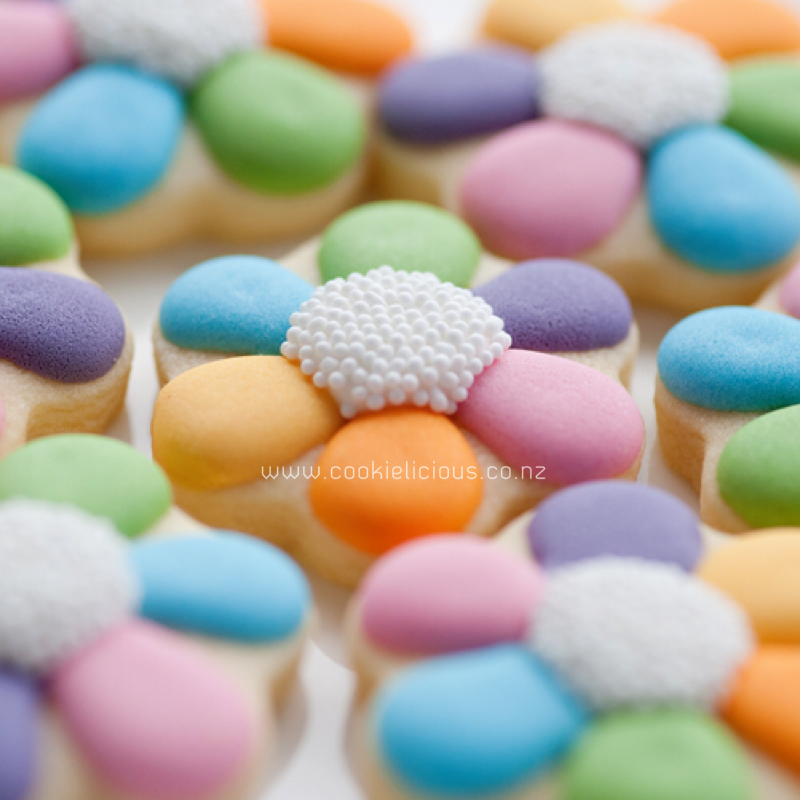 Homemade baking always cheers me up so we hope that these cookies will cheer her up :) 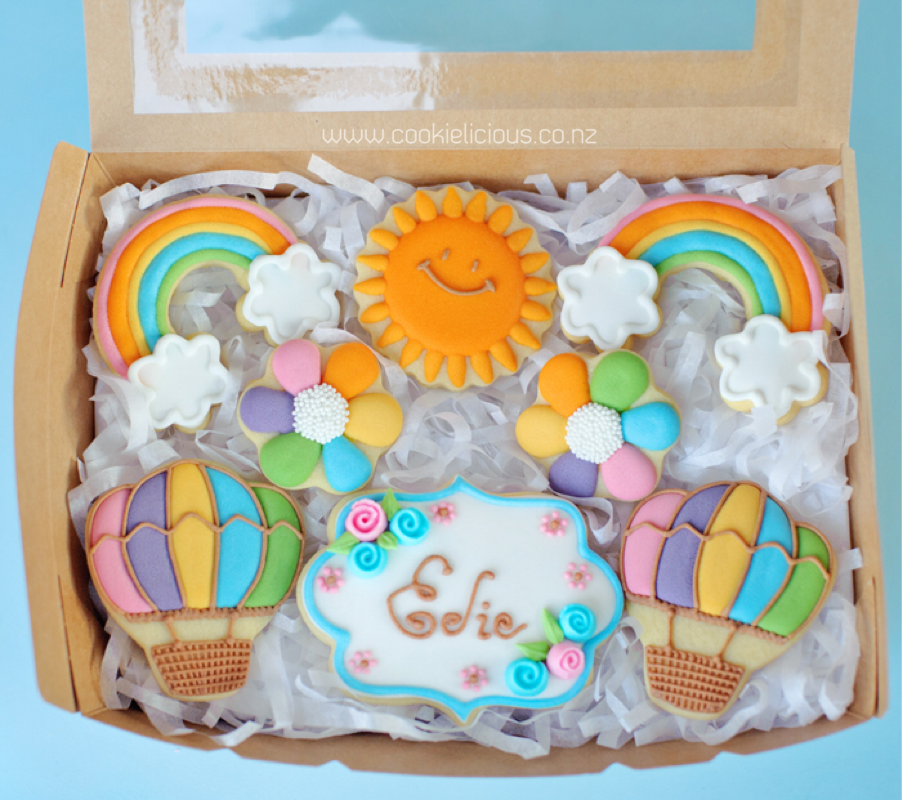 Have a fantastic long weekend everyone! 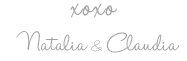 One of my dear friend's son is turning 5 and its a special milestone birthday so he wants a Lego theme birthday party. Kelda asked me to make lego cookies for Ethan's birthday this weekend so this is what we did for the birthday boy :)  We dont have a lego head cookie cutter so we printed a template that was shared by SugarBelle HERE. Its a pretty simple shape so you can easily cut the cookie dough with a knife.  When the cookies are baked, cooled and ready to decorate, start with outlining the cookie with a piping consistency yellow icing, we used tip#2. Then fill with flooding yellow icing. Let it dry for a few hours. 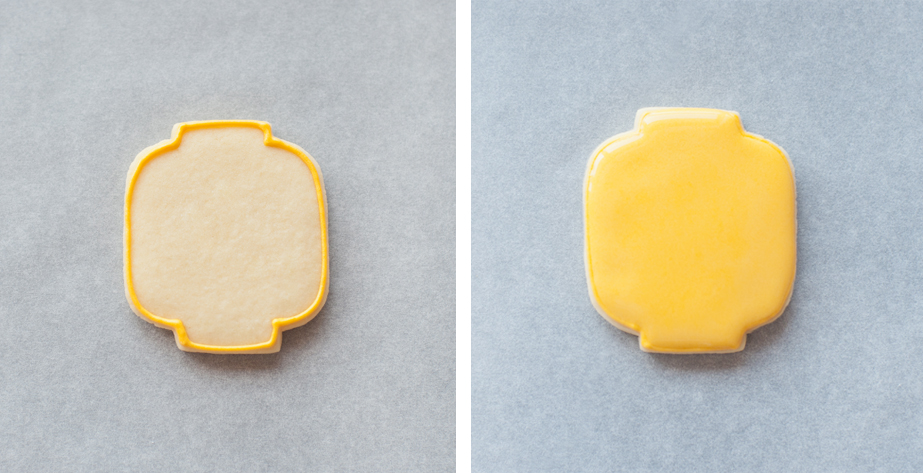 Love seeing the lego heads in my tray ready for the next step of decorating :) 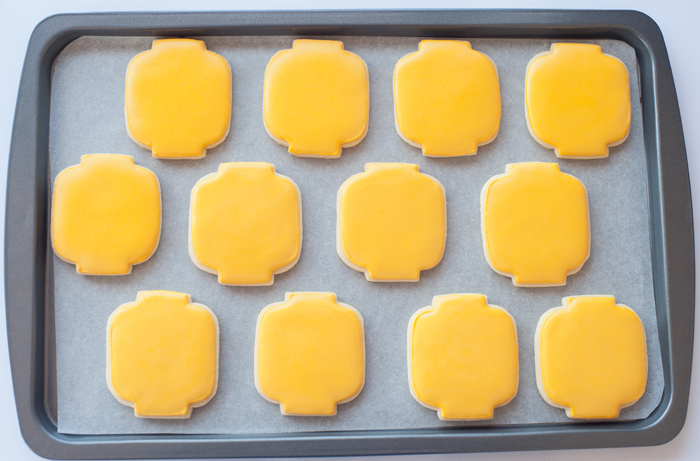 When the yellow base icing is dry, pipe the outline around the lego head, we use tip #2 and yellow piping consistency icing. Then add the eyes & mouth with black icing also with tip #2. Let it dry. 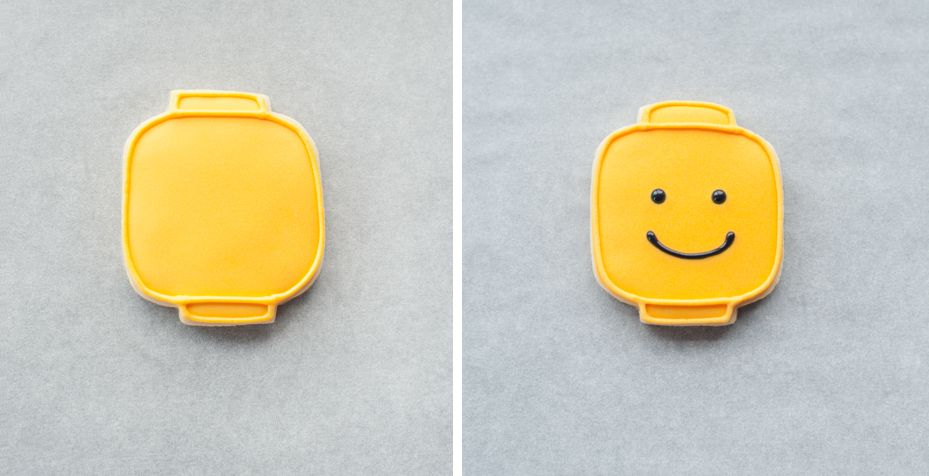 Next is the lego blocks, we use a small rectangle cookie cutter to make them. We are too lazy to make 2 different consistencies for these small blocks so we use 20 second icing to pipe and fill the cookies. Let it to dry for at least 1 hour before piping the dots on top with the same icing to make the lego blocks. Let it dry for a few hours. 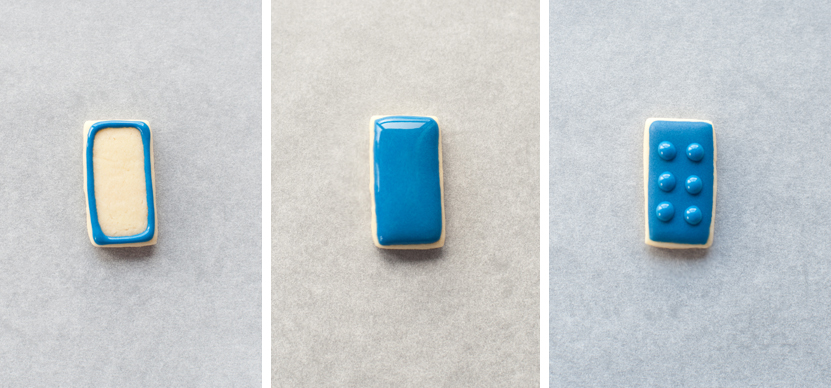 We made 3 different colour blocks, red, blue & green - all primary colours. 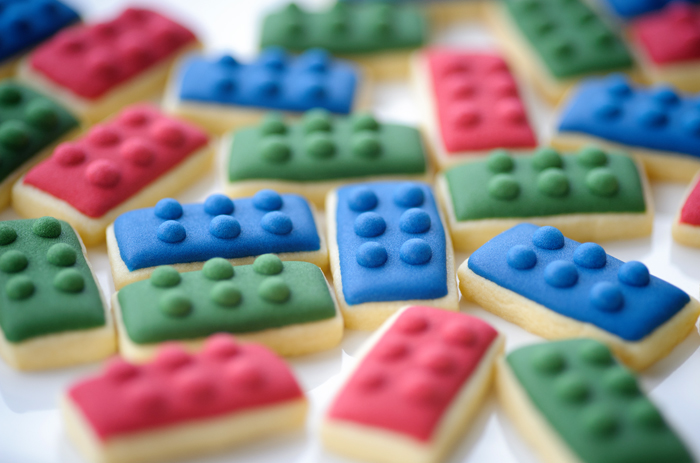 When the cookies are dry, they are ready to be packaged up for the party :) 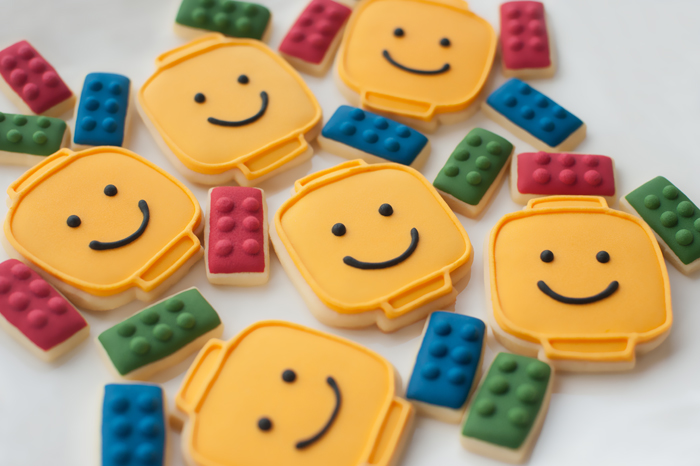 We put them in individual cellophane bag and heat seal them for freshness. We made a matching lego theme tag for Ethan's birthday too, here they are ready to go to the party :) 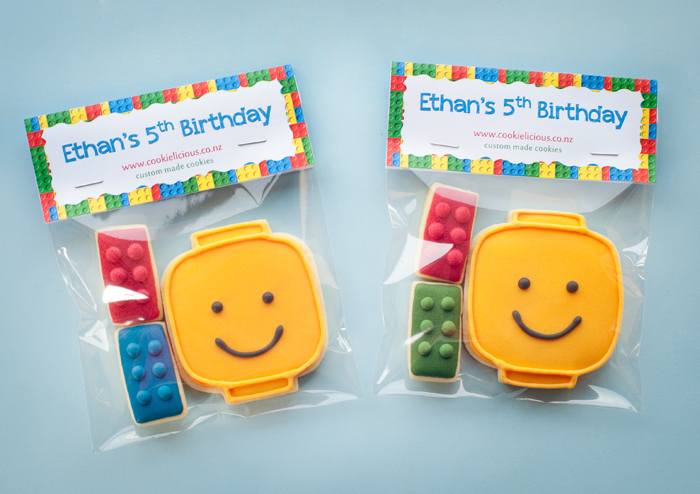 Have an awesome Lego party Ethan! Hope you love your lego cookies ;-)  I wanted to make a special cookie gift basket for Rachel's baby shower, so i have had images playing in my head for the last couple of weeks of what i want to make to her. Today is her baby shower and these are the baby shower cookies we made specially for her :)  I have taken a few photos on how to make some of the cookies in the baby shower collection, just to give you a visual of the step by step idea of what to do if you want to try making them :) For the baby onesie's cookies: Blue stripey with elephant onesie.
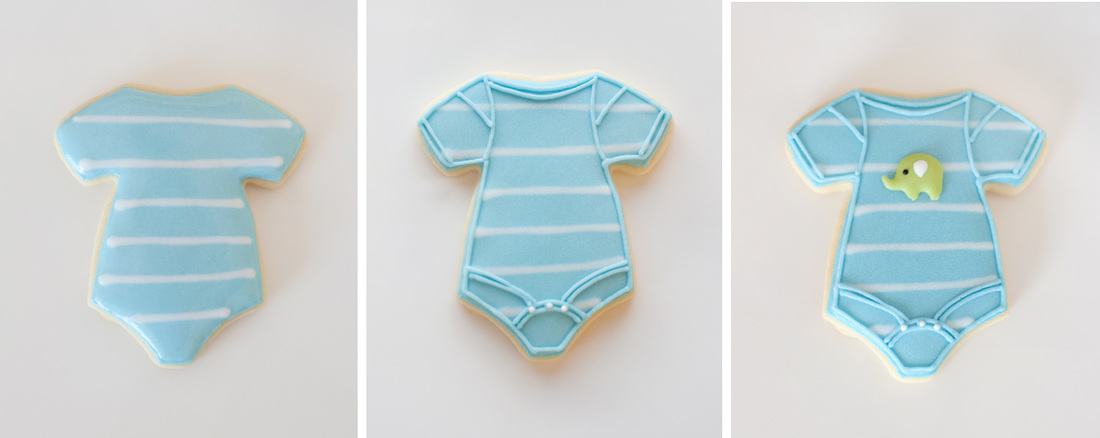 White shirt with bracers & green pattern onesie:
 Blue onesie with green bracer and elephant:
 Here are the finished onesies :) 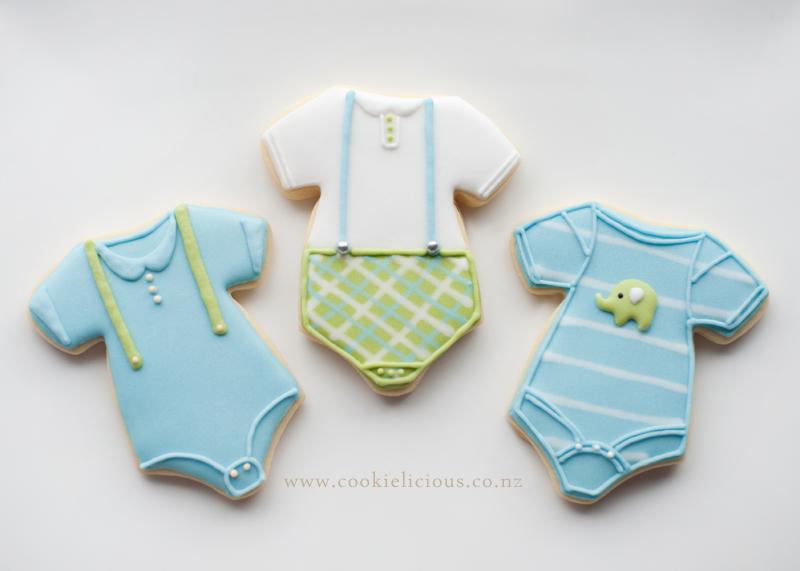 Next are the baby stroller.
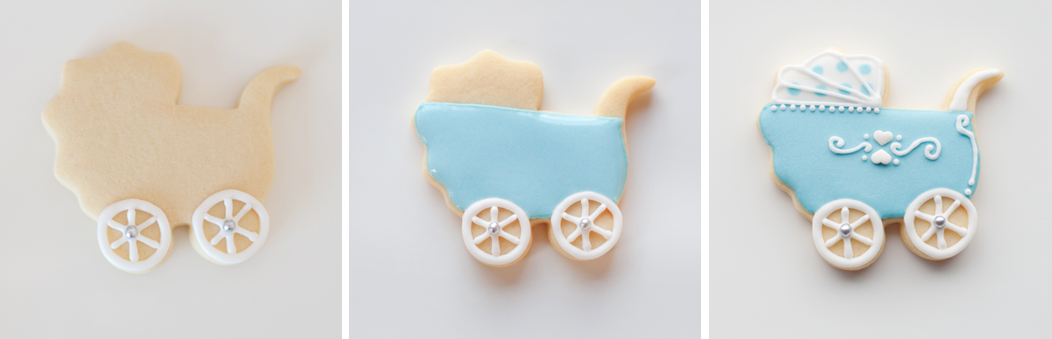 These are the finished stroller in blue & green :) 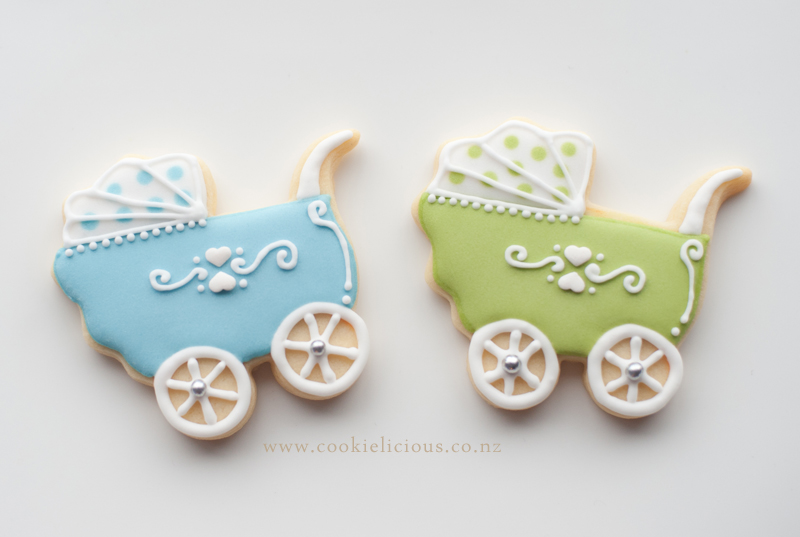 Baby bottle cookies
 Baby bibs cookies
 These are the finished result of the baby bottles and bibs together :) 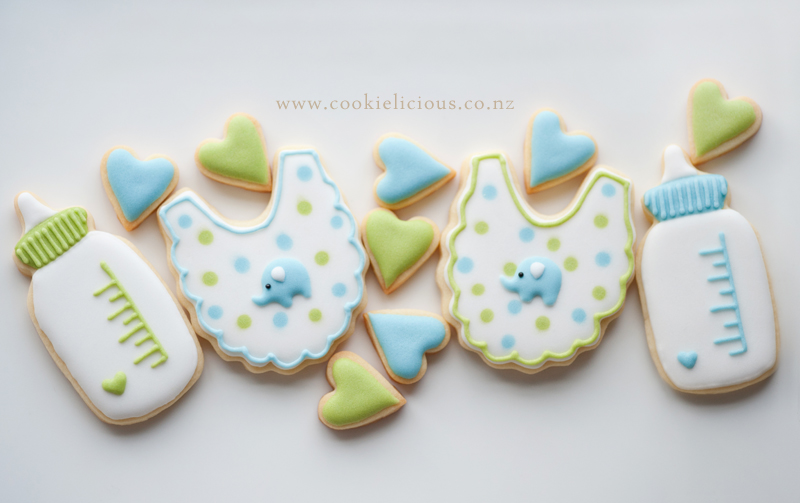 I have already posted on how to make the elephant cookies in my previous post. If you missed it and wants to have a look you can read it HERE. So what's left to do is to package them individually in a clear cellophane plastic to make sure that they will stay fresh for longer. We did 2 different packaging, some with tags and some with bows :) These are the cookie tags that we made for Rachel 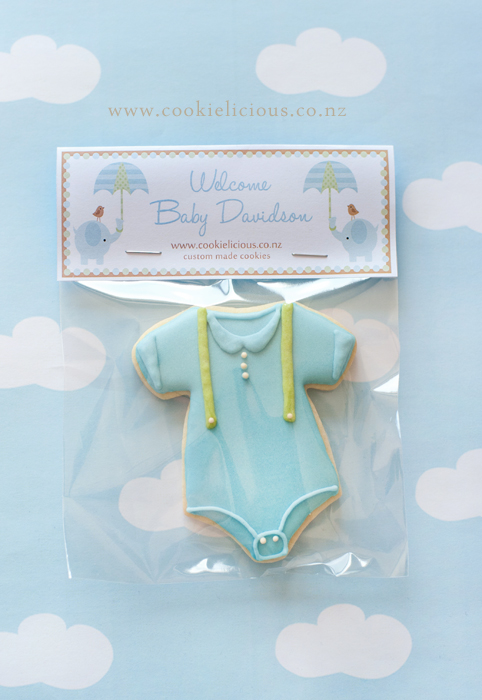 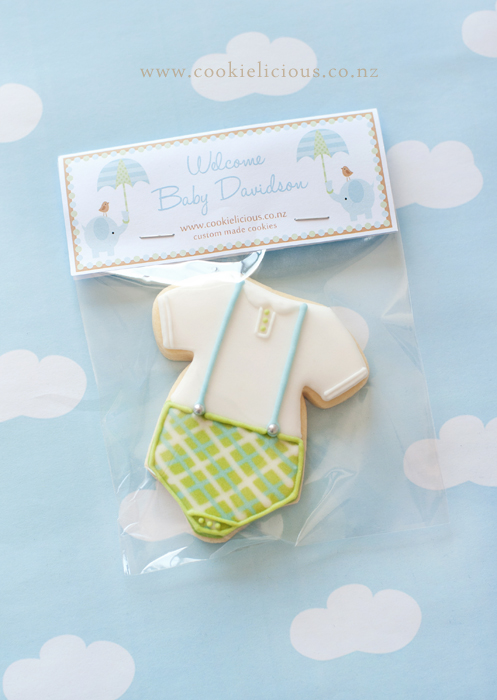 and the ones with bows are like this 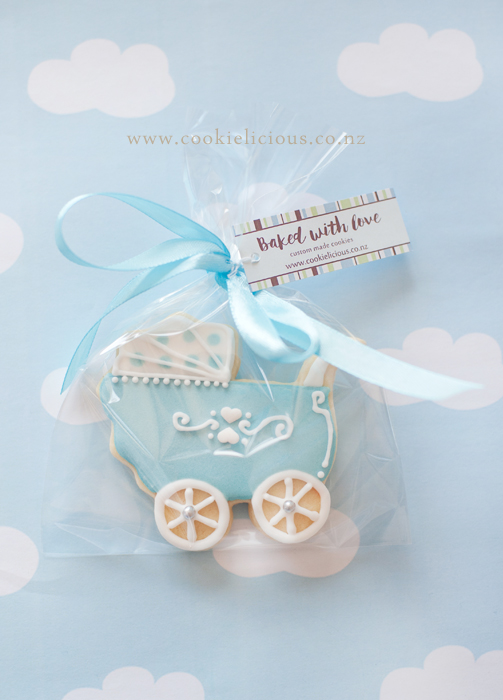 That's all done and here is the finished cookie gift basket for Rachel's baby shower :) 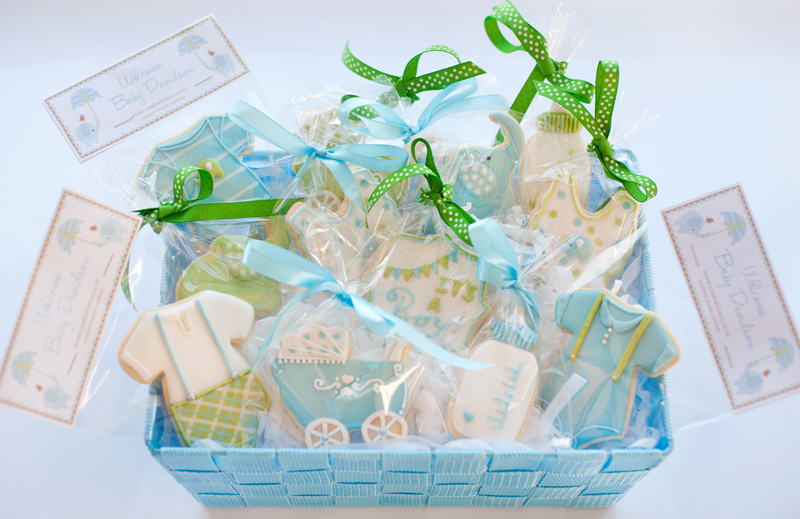 We have a great time at the baby shower today, Rachel's mum and her cousin did a fantastic job at organizing everything for her. Its been a nice sunny day today, hope everyone is enjoying their weekend!  Special request from Ellie for elephant cookies :) she is having an elephant birthday theme because elephant is her favorite animal :) 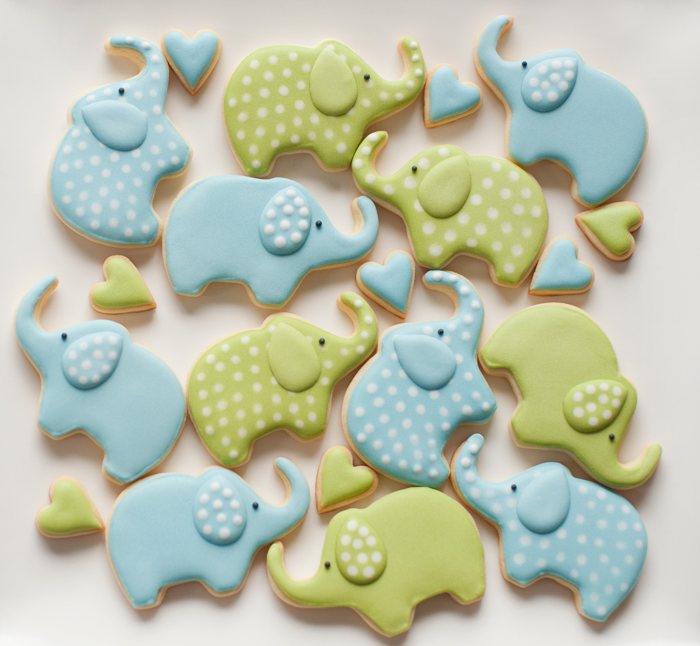 These elephant were fun to make, i specially love the fun colour combo and the polkadots. Here are the step by step visual on how to make them, very simple and yet very cute :) For the first batch we made the polkadot elephants. Step 1: Outline with piping consistency icing using tip #2 and fill with flood icing with tip#3. 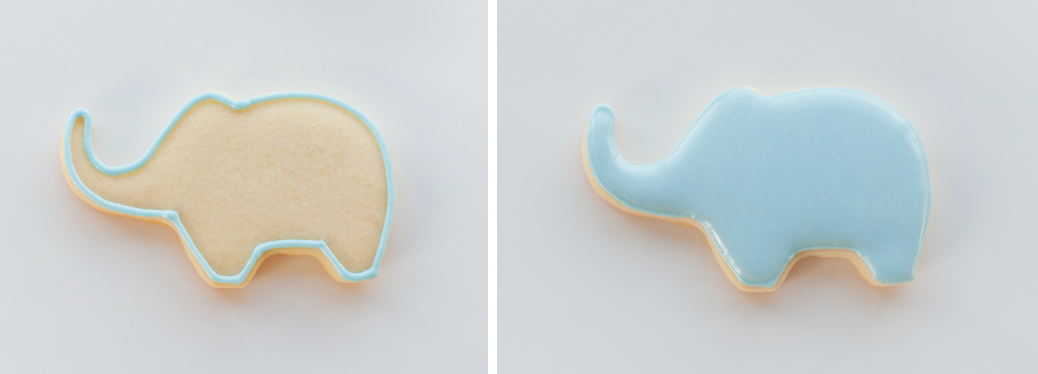 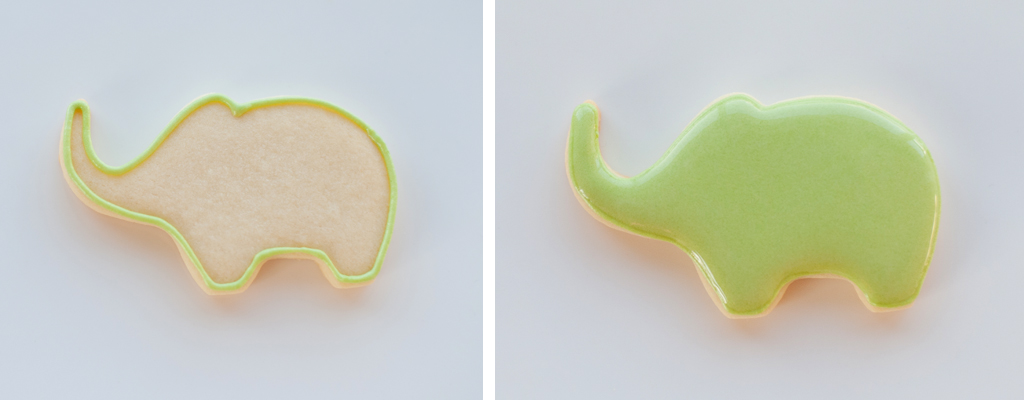 Step 2: While the icing is still wet, add the polkadots with white flood icing with tip #2. Let it dry. 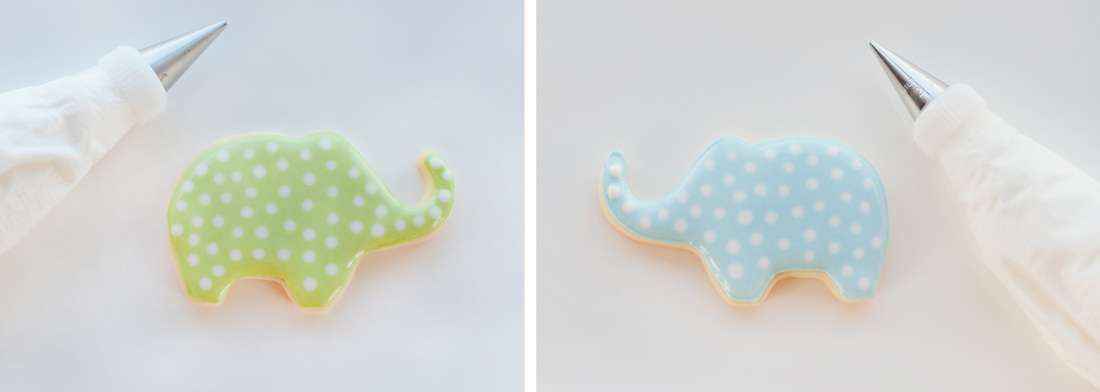 Step 3: Piped the ears with flood icing using tip#2. 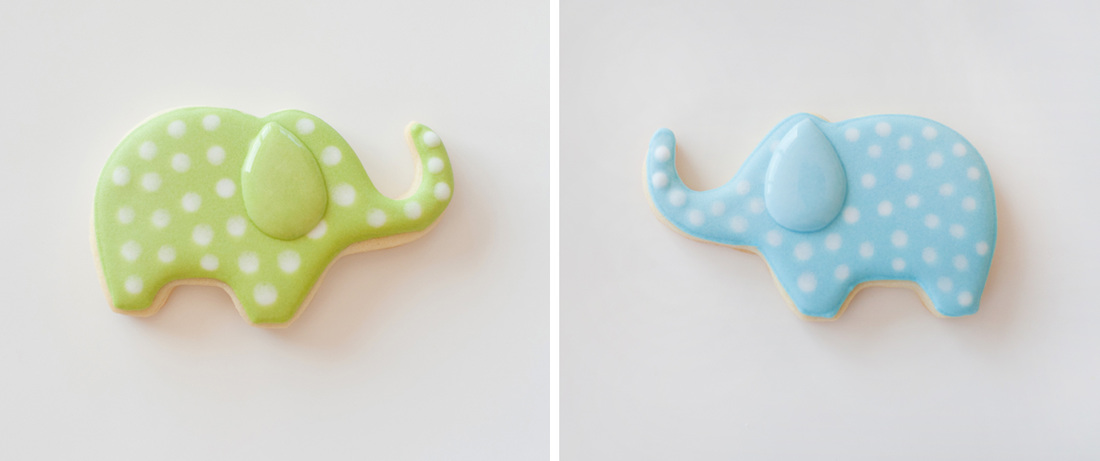 Step 4: Lastly, add the eyes with black icing. 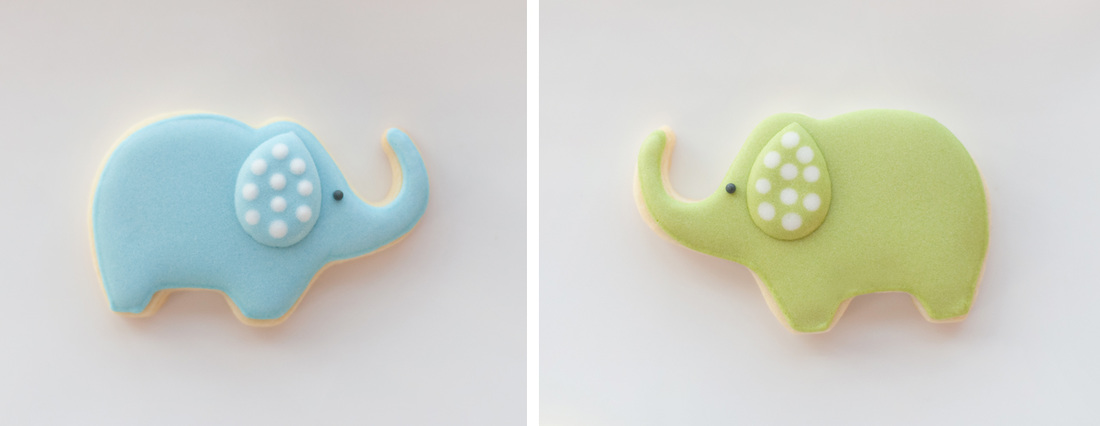 To make the plain colour elephant with polkadot ears all you need to do is skip step 2 and let the base colour dries in plain colour without adding the white polkadots, and then add the ears. While the ears are still wet add the polkadot with white flood icing. 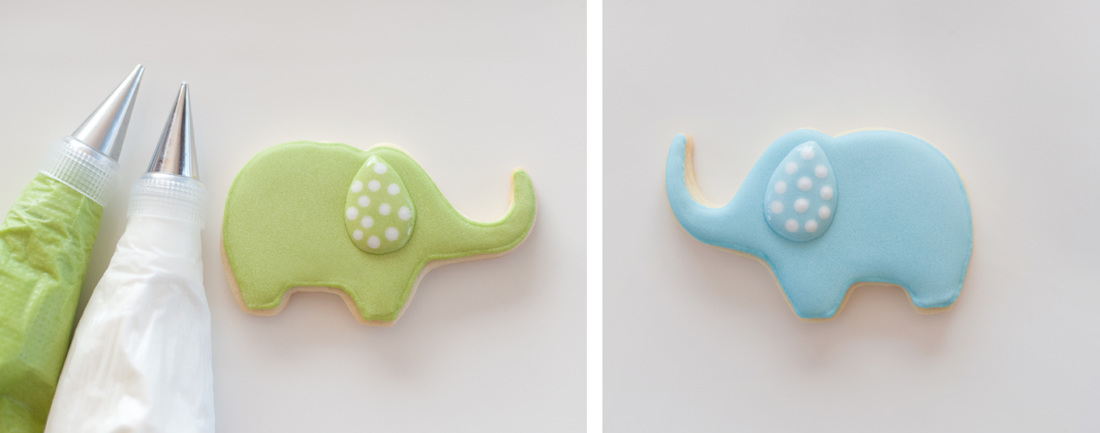 Then the last step is also add the eyes with black icing :) 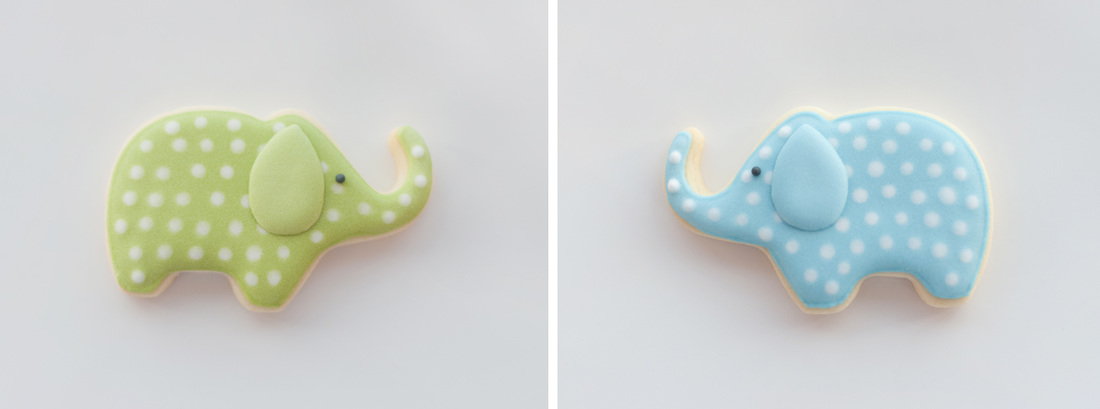 That was it, all done. We made a dozen of lime green and a dozen of baby blues.  Hope everyone enjoy these cookies at the birthday party this weekend :) 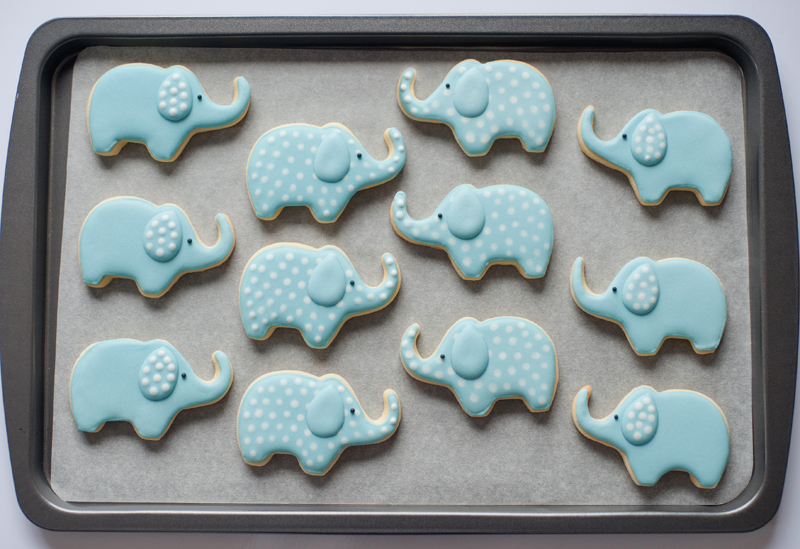  A workmate of mine mentioned that her nephew really love sharks. He is really into it and she mentioned one day that if i ever want to make a shark cookie to remember him :) Well we had some left over cookie dough after making our last batch of cookies, so we decided to make some shark cookies. Its pretty simple as we only need one base colour and a little bit of red, black & white icing. Here are the sharks ready to attack :P 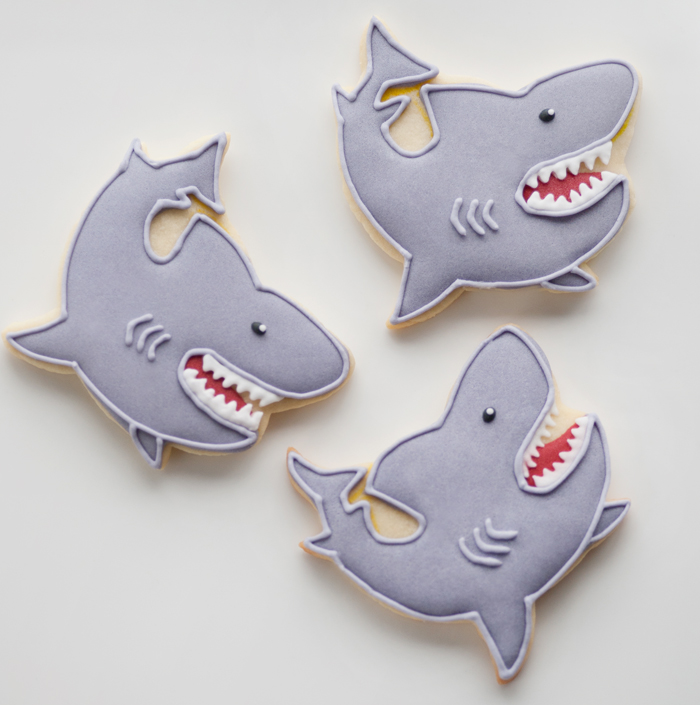 Okay so to make these sharks we had to make a paper template as unfortunately we don't have a shark cookie cutter. We cut out the shape of the shark in paper and we cut the dough with a sharp knife. I think i have put a link to Haniela's tutorial on how to make a paper template in my lil red riding hood post. If you missed it, here is the link again. So after you have cut and baked the cookie dough the next step is to mark the area that you want to fill with icing with an edible food marker. After the next steps are quite simple - see the photos below for a step by step visual Step 1: Outline and fill the area with a purplish grey icing and let it dry for a few hours. Step 2: Fill in the mouth area with a red flood icing to make a shape of the shark's tongue & let it dry. Step 3: With a white piping icing piped the shark's sharp teeth on the mouth area & let it dry. 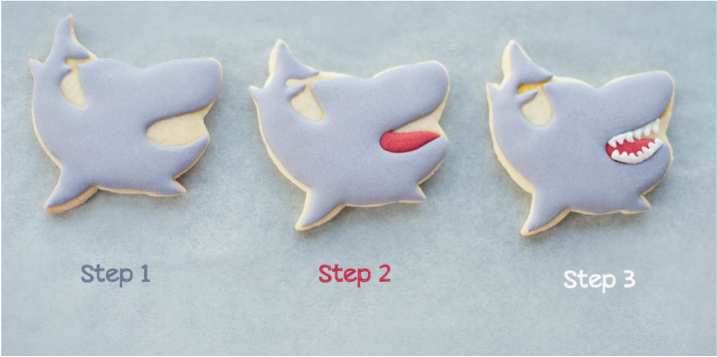 The next step is to put the details. With a tip#2 piped a small black icing for the eye, once it dries pipe a small white dot on top of the black with a tip#1. When that's done the next thing to do is to pipe the outline of the shark with a piping consistency icing, then pipe the same icing to make 3 gills on the body of the shark. That's it, all done :) 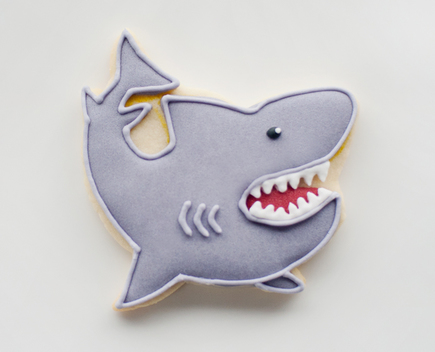 Hope the boys who had these shark cookies loves their shark attack treats ;-)  |
About MeCookie Artist & Content Creator, who loves spreading the cookie love. 

Archives
February 2020
Categories
All
|
 RSS Feed